240Redblock
Member
- Joined
- Jun 17, 2020
- Location
- Lafayette, CO
Preamble:
**Extreme caution must be used when making modifications to A/C systems, PAG oil and Mineral oil DO NOT MIX and may EXPLODE! Be sure to know what you are doing and I recommend replacing EVERY piece of equipment when making this conversion**
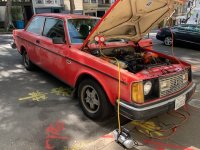
This is for my 1985 245 N/A with M46, mostly stock DD. I had a HUGE leak in my heater core (wet floors, adding quart of distilled water any time I used the heat and windows so fogged it became too dangerous to drive with the heat on, it was a rather chilly winter for me...) and decided that while I was in there it was time to replace my A/C stuff too. While the dash removal and heater core replacement was pretty straightforward, there is much debate over A/C systems on this and other forums so I figured it was time to share my experience. I drive between Flagstaff, AZ and Las Vegas, NV each way 3 times a month so having heating and cooling are two luxuries I recommend we all enjoy and be thankful for! I love these cars stock so when making the decision as to whether to upgrade to 91+ or remain with original cooling I hit the message boards to see what the community was saying...it was overwhelmingly conflicting. I purchased evaporators for both style systems figuring I'd decide later on which one to go with. The decision was grueling, but was made when my local JY scrapped the last 91+ 240 I've seen in over a year. Because of this I was also conflicted about making the conversion to r134a or to use an HC replacement, but figured that legal refrigerants are more accessible and likely to be available for a longer time. I am aware that r134a is flammable and that there is not necessarily a greater explosion risk when using HC replacements, but my greatest concern was ease, availability, and possible complications. I decided on r134a and am very happy with the final result, you will see all the trials and tribulations, but in the end I need to turn the A/C knob to low in temperatures below 100deg F or I will become a popsicle, yes even at idle. So I stuck with my original HVAC box and decided not to modify this or my firewall in favor of my love for (mostly) stock-ness. The following is a write up of my own experience and is meant to be a guide, not gospel.
Body:
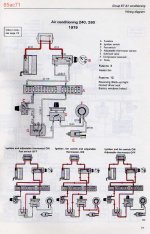
I will gloss over the removal of the dash and center console supports as there are numerous and better documented articles available. I will comment that I did refinish (filled all cracks with silcone caulking, smoothed to flush and slightly textured) and repaint all dash plastic with SEM Camel colored spray for the tan interior which was a 90% match and much prettier than my grease-stained cracked and weathered dash was previously. I also replaced the blower motor and resistor at this time, they were functioning fine and not nearly as noisy as I've had, but when you're in there you might as well (not necessary to remove the dash to do this, but I don't recommend skipping the opportunity when it reveals itself)**Shout-out to Rock auto supplied VDO blower motor, it's worth it! I did not replace the blades, but I don't regret that...yet...**, and it did make a noticeable and pleasant improvement. To make sure we're all on the same page, this system has only a low pressure sensor (mine was set around 30psi) on the accumulator as well as a pressure relief valve for over-pressures; this is a Thermal Expansion Valve (TXV) system without an orifice tube and a DKS-15BH compressor. The parts for the a/c system were purchased from Rockauto and were as follows, all parts are designed for r12 and r134a applications:
Evaporator Coil: FOUR SEASONS 54603
Hoses:
From Compressor to Evaporator: FOUR SEASONS 55992
From Accumulator to Condenser: FOUR SEASONS 55998
From Compressor to Condenser: FOUR SEASONS 55594
Accumulator: ?RO PARTS 1370235*(note this one comes with a pressure relief valve set for 325 psi)* and FOUR SEASONS 33264**(no pressure relief valve, more on these later)**
Thermal Expansion Valve: UAC EX6076C***(many users have commented on adjustment for r134a, I heeded this advice and turned spring inward to seat, then outward 7 complete rotations)***
Mechanical Cooling Fan: Aisin FCV-002****("Tropical" version, turns on at lower temps and runs up to about 3000rpm, I drive "spiritedly" and have no noticed any loss of power or joy from this addition, just an extra whoosh here and there when passing other drivers)****
Electric Cooling Fan: bought a 16in push fan to increase airflow from CL
Condenser: BuyAutoParts 60-61242N
I had contemplated purchasing an aftermarket parallel flow condenser and having lines made, or even making them myself but decided that stock would be easier and cheaper to maintain in the long-run (obviously I must have been huffing refrigerant at that point because we all know that's never the case!). As is always the case, there were some parts that could not be found, notably the muffler (or whatever you want to call it) and the short hose from the condenser to the accumulator. The new compressor to condenser hose was so long that there was no way of placing the muffler were it was, so I simply deleted it and ran the new hose as if it were the whole original series of hoses +muffler, this did not increase the noise from the compressor and reduced the number of places for a leak to develop, so I'll count that as a win. The short hose from condenser to accumulator needed to be replaced so I went to the local All-Hose and had them fabricate one for $30. In hindsight, it would've been a bit more expensive, but ultimately more user-friendly to have done this with all the hoses as many of them were a bit too long, or not angled perfectly to fit as nicely as stock; but it all worked out in the end. So I went with all of the above parts and installed everything but the compressor as I was in the process of rebuilding this (I can do a writeup on this if there is any interest, but the myriad issues with worn pistons and gasket kits that weren't quite perfect lead to lower than desirable high pressures even when properly charged and resulted in me purchasing a new compressor: FOUR SEASONS 58521). The rebuild was simple, if a bit time consuming but resulted in lackluster cooling "forcing" my hand to purchase a new one from my trusted Four Seasons brand. The inconveniently positioned ports on this new compressor notwithstanding, I am thrilled with its output! This new compressor came with a built-in pressure relief valve and suction and discharge ports on the hose housing, as opposed to the original version where these were threaded into the rear body of the compressor.
System Prep:
As per the manufacturer instructions, I drained the shipping oil and filled with 6 oz of PAG46 oil with UV dye. I mounted the push fan to the front of the condenser and it dwarfed the thing! I needed to notch out the shape for the fan motor into the hood latch support bracket and everything was fit into place. I decided to go easy on myself and insert the relay into a system that is always hot when ignition is on figuring I'll disconnect this when winter comes. I drew the system to vacuum of 25 inHg for an 1.2 hours (until no more bubbles present), then closed the gauges and left for an hour with no drop in vacuum.
Charging the System (1):
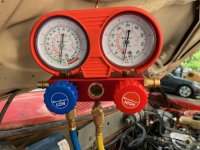
With the fan on I charged this with just under 3 12oz cans of Dupont Suva to 55 psi low side, and 200 psi high side in 98deg F temp. Judging this to be low I made a note and drove around a few days. After a 108deg F day I was not happy: during rebuilding the compressor I used scotchbrite on the pistons and cylinder bores to remove all of the scratches and pitting, needless to say there was A LOT and I figured this was the cause of these low high-side pressures. I can't say if I made an error with my rebuild, or if the original compressor was too worn, but the performance was...lacking. I had the refrigerant recovered, drained the oil out of the compressor and replaced it with the new one. When I filled this compressor, I added 1 oz more of the oil than what I pulled out, thinking I was being cautious and this would ensure proper lubrication (ahh, the best laid plans..), removed the schrader valve core in the suction port and threaded an r134a low side quick-disconnect (these new ports were angled such that I couldn't fit the connectors onto low side when the belt was taught, so I had to slacken belt every time I needed attach or remove gauges...PITA!). At this time I decided to use the four seasons accumulator because the new compressor came with a pressure relief valve built in and I believe that less is more in these instances, plus I'm not the biggest fan of URO parts even though they are often the only vendor for Volvos. Then I pulled vacuum as before and let sit for 2 hours and noticed no change.
Charging the System (2):
This time I charged with just under 3 cans of the same Dupont refrigerant about 2.1 lbs (2.9 R12 charge * 80% = 2.32 lbs) to 52psi low side and 230 psi high side in 88deg F temperature. It blew ice cold in the garage so I went for a drive and I was happy.
Then:
Two days later I start my drive, turn on the A/C and...nothing. So I turn home, popped the hood and saw the compressor running so I had to turn off, slacken compressor belt, attach gauges, when off both gauges read about 120 psi, when I turned it on I saw vacuum on low side and 300 psi high side!! I figured this was a sticking TXV so I had the refrigerant recovered and opened everything to see a beautifully clean valve, but I went ahead and disassembled the spring seat and removed valve, cleaned it all, then I went ahead and blew air through every hose and found (and heard) a splatter of oil in my passenger footwell (TXV still removed). My theory: The extra bit of oil I had used when replacing the compressor bit my bottom by pooling in the U-bend of the evaporator hard-lines! Mess cleaned, the door to my HVAC box adjusted and TXV reinstalled, I re-vacuumed and refilled as above.
Results:
When on the highway if it's 100 deg F or higher (so far up to 106) when the knob is set to max I am near frozen at speed 4 on the blower, and rather comfortable at speed 2 and air recirculation. When in traffic I usually use the max setting unless it's in the mid-low 90s. The knob is very effective at pulsing compressor when I moved the sensing bulb to the lowest place on the liquid line coming out of the evaporator and insulated well. I am thrilled with the performance and recommend this to anyone who has lived for far too long in the desert summers with 4-60 cooling. It was a headache, it cost a lot more than I had anticipated (a total around $570 with all my mishaps) and took much longer to feel comfortable with reliability than I ever thought would be the case. But I had the time (quarantine) and now I am very pleased with the results and happy that I chose r134a as I required refrigerant recovery 2 times before I was finished. I notice a very slight decrease in low-end power when climbing highway hills using A/C but it's well worth the cost (and will be a moot issue when my 2.1 turbo is fully rebuilt and installed, story to come) and makes me wonder why I didn't do this sooner. Please comment or ask questions and let me know your experiences doing this.
Stay cool out there!
*****These are all of my own personal experiences and do not reflect every situation, I am not sponsored or paid for my writing, nor do I receive any funding from the parts manufacturers and distributors listed above. I am a home mechanic with years of professional experience, but have left that life behind.*****
**Extreme caution must be used when making modifications to A/C systems, PAG oil and Mineral oil DO NOT MIX and may EXPLODE! Be sure to know what you are doing and I recommend replacing EVERY piece of equipment when making this conversion**
This is for my 1985 245 N/A with M46, mostly stock DD. I had a HUGE leak in my heater core (wet floors, adding quart of distilled water any time I used the heat and windows so fogged it became too dangerous to drive with the heat on, it was a rather chilly winter for me...) and decided that while I was in there it was time to replace my A/C stuff too. While the dash removal and heater core replacement was pretty straightforward, there is much debate over A/C systems on this and other forums so I figured it was time to share my experience. I drive between Flagstaff, AZ and Las Vegas, NV each way 3 times a month so having heating and cooling are two luxuries I recommend we all enjoy and be thankful for! I love these cars stock so when making the decision as to whether to upgrade to 91+ or remain with original cooling I hit the message boards to see what the community was saying...it was overwhelmingly conflicting. I purchased evaporators for both style systems figuring I'd decide later on which one to go with. The decision was grueling, but was made when my local JY scrapped the last 91+ 240 I've seen in over a year. Because of this I was also conflicted about making the conversion to r134a or to use an HC replacement, but figured that legal refrigerants are more accessible and likely to be available for a longer time. I am aware that r134a is flammable and that there is not necessarily a greater explosion risk when using HC replacements, but my greatest concern was ease, availability, and possible complications. I decided on r134a and am very happy with the final result, you will see all the trials and tribulations, but in the end I need to turn the A/C knob to low in temperatures below 100deg F or I will become a popsicle, yes even at idle. So I stuck with my original HVAC box and decided not to modify this or my firewall in favor of my love for (mostly) stock-ness. The following is a write up of my own experience and is meant to be a guide, not gospel.
Body:
I will gloss over the removal of the dash and center console supports as there are numerous and better documented articles available. I will comment that I did refinish (filled all cracks with silcone caulking, smoothed to flush and slightly textured) and repaint all dash plastic with SEM Camel colored spray for the tan interior which was a 90% match and much prettier than my grease-stained cracked and weathered dash was previously. I also replaced the blower motor and resistor at this time, they were functioning fine and not nearly as noisy as I've had, but when you're in there you might as well (not necessary to remove the dash to do this, but I don't recommend skipping the opportunity when it reveals itself)**Shout-out to Rock auto supplied VDO blower motor, it's worth it! I did not replace the blades, but I don't regret that...yet...**, and it did make a noticeable and pleasant improvement. To make sure we're all on the same page, this system has only a low pressure sensor (mine was set around 30psi) on the accumulator as well as a pressure relief valve for over-pressures; this is a Thermal Expansion Valve (TXV) system without an orifice tube and a DKS-15BH compressor. The parts for the a/c system were purchased from Rockauto and were as follows, all parts are designed for r12 and r134a applications:
Evaporator Coil: FOUR SEASONS 54603
Hoses:
From Compressor to Evaporator: FOUR SEASONS 55992
From Accumulator to Condenser: FOUR SEASONS 55998
From Compressor to Condenser: FOUR SEASONS 55594
Accumulator: ?RO PARTS 1370235*(note this one comes with a pressure relief valve set for 325 psi)* and FOUR SEASONS 33264**(no pressure relief valve, more on these later)**
Thermal Expansion Valve: UAC EX6076C***(many users have commented on adjustment for r134a, I heeded this advice and turned spring inward to seat, then outward 7 complete rotations)***
Mechanical Cooling Fan: Aisin FCV-002****("Tropical" version, turns on at lower temps and runs up to about 3000rpm, I drive "spiritedly" and have no noticed any loss of power or joy from this addition, just an extra whoosh here and there when passing other drivers)****
Electric Cooling Fan: bought a 16in push fan to increase airflow from CL
Condenser: BuyAutoParts 60-61242N
I had contemplated purchasing an aftermarket parallel flow condenser and having lines made, or even making them myself but decided that stock would be easier and cheaper to maintain in the long-run (obviously I must have been huffing refrigerant at that point because we all know that's never the case!). As is always the case, there were some parts that could not be found, notably the muffler (or whatever you want to call it) and the short hose from the condenser to the accumulator. The new compressor to condenser hose was so long that there was no way of placing the muffler were it was, so I simply deleted it and ran the new hose as if it were the whole original series of hoses +muffler, this did not increase the noise from the compressor and reduced the number of places for a leak to develop, so I'll count that as a win. The short hose from condenser to accumulator needed to be replaced so I went to the local All-Hose and had them fabricate one for $30. In hindsight, it would've been a bit more expensive, but ultimately more user-friendly to have done this with all the hoses as many of them were a bit too long, or not angled perfectly to fit as nicely as stock; but it all worked out in the end. So I went with all of the above parts and installed everything but the compressor as I was in the process of rebuilding this (I can do a writeup on this if there is any interest, but the myriad issues with worn pistons and gasket kits that weren't quite perfect lead to lower than desirable high pressures even when properly charged and resulted in me purchasing a new compressor: FOUR SEASONS 58521). The rebuild was simple, if a bit time consuming but resulted in lackluster cooling "forcing" my hand to purchase a new one from my trusted Four Seasons brand. The inconveniently positioned ports on this new compressor notwithstanding, I am thrilled with its output! This new compressor came with a built-in pressure relief valve and suction and discharge ports on the hose housing, as opposed to the original version where these were threaded into the rear body of the compressor.
System Prep:
As per the manufacturer instructions, I drained the shipping oil and filled with 6 oz of PAG46 oil with UV dye. I mounted the push fan to the front of the condenser and it dwarfed the thing! I needed to notch out the shape for the fan motor into the hood latch support bracket and everything was fit into place. I decided to go easy on myself and insert the relay into a system that is always hot when ignition is on figuring I'll disconnect this when winter comes. I drew the system to vacuum of 25 inHg for an 1.2 hours (until no more bubbles present), then closed the gauges and left for an hour with no drop in vacuum.
Charging the System (1):
With the fan on I charged this with just under 3 12oz cans of Dupont Suva to 55 psi low side, and 200 psi high side in 98deg F temp. Judging this to be low I made a note and drove around a few days. After a 108deg F day I was not happy: during rebuilding the compressor I used scotchbrite on the pistons and cylinder bores to remove all of the scratches and pitting, needless to say there was A LOT and I figured this was the cause of these low high-side pressures. I can't say if I made an error with my rebuild, or if the original compressor was too worn, but the performance was...lacking. I had the refrigerant recovered, drained the oil out of the compressor and replaced it with the new one. When I filled this compressor, I added 1 oz more of the oil than what I pulled out, thinking I was being cautious and this would ensure proper lubrication (ahh, the best laid plans..), removed the schrader valve core in the suction port and threaded an r134a low side quick-disconnect (these new ports were angled such that I couldn't fit the connectors onto low side when the belt was taught, so I had to slacken belt every time I needed attach or remove gauges...PITA!). At this time I decided to use the four seasons accumulator because the new compressor came with a pressure relief valve built in and I believe that less is more in these instances, plus I'm not the biggest fan of URO parts even though they are often the only vendor for Volvos. Then I pulled vacuum as before and let sit for 2 hours and noticed no change.
Charging the System (2):
This time I charged with just under 3 cans of the same Dupont refrigerant about 2.1 lbs (2.9 R12 charge * 80% = 2.32 lbs) to 52psi low side and 230 psi high side in 88deg F temperature. It blew ice cold in the garage so I went for a drive and I was happy.
Then:
Two days later I start my drive, turn on the A/C and...nothing. So I turn home, popped the hood and saw the compressor running so I had to turn off, slacken compressor belt, attach gauges, when off both gauges read about 120 psi, when I turned it on I saw vacuum on low side and 300 psi high side!! I figured this was a sticking TXV so I had the refrigerant recovered and opened everything to see a beautifully clean valve, but I went ahead and disassembled the spring seat and removed valve, cleaned it all, then I went ahead and blew air through every hose and found (and heard) a splatter of oil in my passenger footwell (TXV still removed). My theory: The extra bit of oil I had used when replacing the compressor bit my bottom by pooling in the U-bend of the evaporator hard-lines! Mess cleaned, the door to my HVAC box adjusted and TXV reinstalled, I re-vacuumed and refilled as above.
Results:
When on the highway if it's 100 deg F or higher (so far up to 106) when the knob is set to max I am near frozen at speed 4 on the blower, and rather comfortable at speed 2 and air recirculation. When in traffic I usually use the max setting unless it's in the mid-low 90s. The knob is very effective at pulsing compressor when I moved the sensing bulb to the lowest place on the liquid line coming out of the evaporator and insulated well. I am thrilled with the performance and recommend this to anyone who has lived for far too long in the desert summers with 4-60 cooling. It was a headache, it cost a lot more than I had anticipated (a total around $570 with all my mishaps) and took much longer to feel comfortable with reliability than I ever thought would be the case. But I had the time (quarantine) and now I am very pleased with the results and happy that I chose r134a as I required refrigerant recovery 2 times before I was finished. I notice a very slight decrease in low-end power when climbing highway hills using A/C but it's well worth the cost (and will be a moot issue when my 2.1 turbo is fully rebuilt and installed, story to come) and makes me wonder why I didn't do this sooner. Please comment or ask questions and let me know your experiences doing this.
Stay cool out there!
*****These are all of my own personal experiences and do not reflect every situation, I am not sponsored or paid for my writing, nor do I receive any funding from the parts manufacturers and distributors listed above. I am a home mechanic with years of professional experience, but have left that life behind.*****
Last edited: