DET17
Reformed SAABaholic
- Joined
- Nov 1, 2009
- Location
- NW Georgia
Christmas coilovers
Months ago I purchased the full set of F & R coilover conversion parts from Kaplhenke Racing. Due to this unprecedented year, zero progress has occurred until now. I finally have earned a long stretch of downtime between Xmas and NY weekends, so with the wife out of town a few days, a perfect opportunity presented itself to build these and get them installed into the 940.
And here it begins:
.jpg?width=1920&height=1080&fit=bounds)
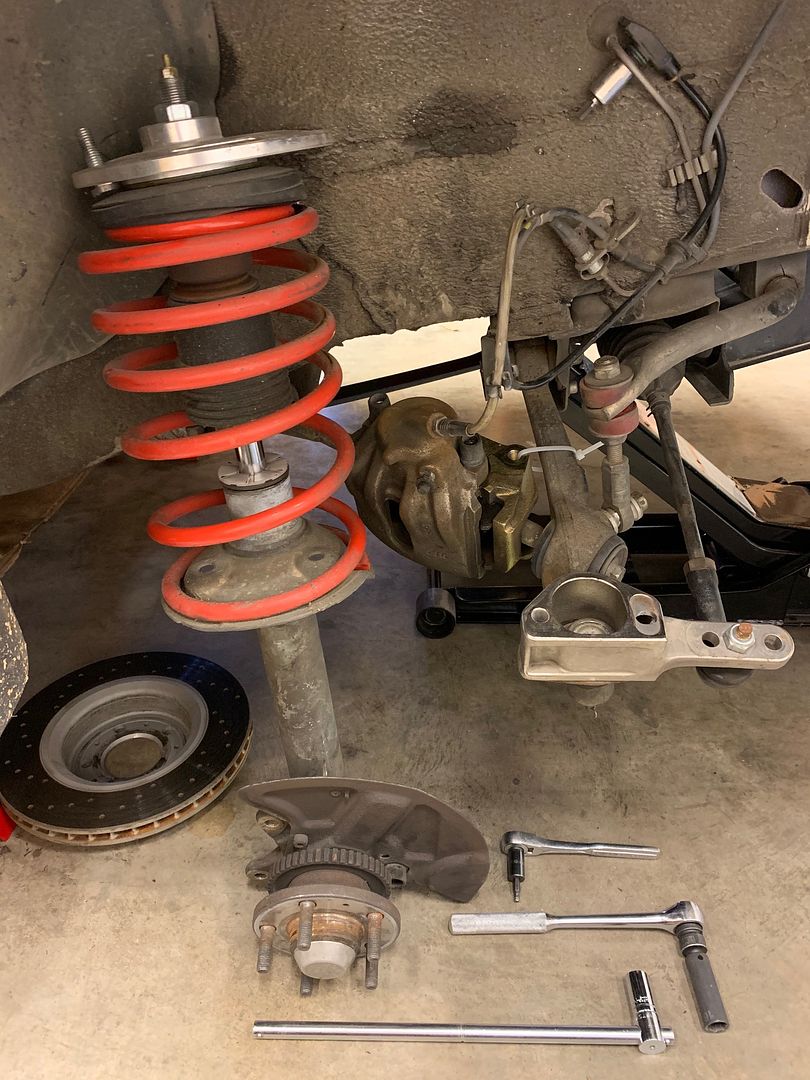
Roy was nice enough to harvest a PNW set of front struts to fit my needs. I'll transfer the 150K mile bearings from my current struts over to this set after modification, so these were truly just cores to start the process. After a lengthy discussion with Ben, I decided there was no need for short struts in my Gpa application..... he was helpful in selecting the best spring rates for my KONI Sports, as well as my age & DD service application. The actual rates I am using a posted earlier in this build thread.
I cut off the original spring perches using a METABO metal slicer disc, installed on my 4" MAKITA side grinder:

Public Service WARNING: The use of such metal slicers is inherently dangerous! I always try to put the work being carved into a vice to hold it fast. The composite nature of the METABO discs are such that they will easily cut your fingers & thumb off even while coasting to a stop. NEVER cut metal with this tool, unless you keep BOTH HANDS firmly attached to the grinder! If your work moves/jumps/flies, then LET IT GO..... your safety is what matters, and you can always get another widget to carve, but nearly no one get's their digits reinstalled. A slice from this disc and you'll bleed out quick! You have been warned........a healthy amount of fear and respect for this tool will keep you safe. Of course, always use the right PPE which includes impact resistant safety glasses/face shield, and DB cancelling ear muffs.
As you can see, I made an octogon-like series of cuts plunging thru the OE spring perch, which is heavier steel than I thought it would be. Volvo did a helluva job when these were welded to the strut tubes. Once the spring perch was cut clear and gone, it was then time to grind the OE welds off the OD of the strut tube. For this task I used the same 4" MAKITA grinder with the appropriate grinding wheel installed. I've got to say, if you are going to hot rod cars and fabricate/destroy metal, there is really not another tool as useful as this baby. I put my Dad's old giant vice to use (someday to be mounted onto my yet to be built welding table). The grinder reasonably took the welds off of the tubes and down to flush.... use restraint, because it is easy to go too far and take steel out of the strut tube that should remain. I used a 6" straight edge to check the progress as I went, and finally fit checked the BNE threaded coilover adjustment sleeve.

With the original welds gone, I needed to locate the positions of the new stop rings which come with the conversion kit. These are 1/8" thick steel steel tubing, matching the wall thickness of the strut tube. Here I locate the stop of the threaded sleeve 1" below the strut top as Ben recommended, and then marked the tube for the location of the welded stop ring:
.jpg?width=1920&height=1080&fit=bounds)
These strut tubes have a nice layer of plating on them that needs to come off if you want full strength welds. I have used acid for this task, but was out of stock. Plan B was to use a drill motor and a 60 grit flapper disc..... takes some time but you can clearly see when you have gone thru the plating (it's thick) and have reached the steel. I only buffed out about a half inch width of plating, plenty of room for my MIG machine to do it's job:

With the plating gone, I fitted things back up again and tacked these stop rings 180* apart. Finally I turned loose my Millermatic 220V machine on the rings. Settings were around 4.5 voltage and 55 feed rate of the .030 wire. My welds are never going to make Nathan envious (he was/is the MAN), but I know these won't fall off either!
.jpg?width=1920&height=1080&fit=bounds)
With the welding complete, you can see the fit checked assemblies. I still have to put self etching primer and paint where the old welds were removed, and my rust proofing 395A around the stop ring and welds that will be directly exposed to road grit and water.
.jpg?width=1920&height=1080&fit=bounds)
Next up: get the old Swede up on stands are remove the front struts to transplant all my parts into these coilover-ready struts. Won't be long now!
Months ago I purchased the full set of F & R coilover conversion parts from Kaplhenke Racing. Due to this unprecedented year, zero progress has occurred until now. I finally have earned a long stretch of downtime between Xmas and NY weekends, so with the wife out of town a few days, a perfect opportunity presented itself to build these and get them installed into the 940.
And here it begins:
Roy was nice enough to harvest a PNW set of front struts to fit my needs. I'll transfer the 150K mile bearings from my current struts over to this set after modification, so these were truly just cores to start the process. After a lengthy discussion with Ben, I decided there was no need for short struts in my Gpa application..... he was helpful in selecting the best spring rates for my KONI Sports, as well as my age & DD service application. The actual rates I am using a posted earlier in this build thread.
I cut off the original spring perches using a METABO metal slicer disc, installed on my 4" MAKITA side grinder:
Public Service WARNING: The use of such metal slicers is inherently dangerous! I always try to put the work being carved into a vice to hold it fast. The composite nature of the METABO discs are such that they will easily cut your fingers & thumb off even while coasting to a stop. NEVER cut metal with this tool, unless you keep BOTH HANDS firmly attached to the grinder! If your work moves/jumps/flies, then LET IT GO..... your safety is what matters, and you can always get another widget to carve, but nearly no one get's their digits reinstalled. A slice from this disc and you'll bleed out quick! You have been warned........a healthy amount of fear and respect for this tool will keep you safe. Of course, always use the right PPE which includes impact resistant safety glasses/face shield, and DB cancelling ear muffs.
As you can see, I made an octogon-like series of cuts plunging thru the OE spring perch, which is heavier steel than I thought it would be. Volvo did a helluva job when these were welded to the strut tubes. Once the spring perch was cut clear and gone, it was then time to grind the OE welds off the OD of the strut tube. For this task I used the same 4" MAKITA grinder with the appropriate grinding wheel installed. I've got to say, if you are going to hot rod cars and fabricate/destroy metal, there is really not another tool as useful as this baby. I put my Dad's old giant vice to use (someday to be mounted onto my yet to be built welding table). The grinder reasonably took the welds off of the tubes and down to flush.... use restraint, because it is easy to go too far and take steel out of the strut tube that should remain. I used a 6" straight edge to check the progress as I went, and finally fit checked the BNE threaded coilover adjustment sleeve.
With the original welds gone, I needed to locate the positions of the new stop rings which come with the conversion kit. These are 1/8" thick steel steel tubing, matching the wall thickness of the strut tube. Here I locate the stop of the threaded sleeve 1" below the strut top as Ben recommended, and then marked the tube for the location of the welded stop ring:
These strut tubes have a nice layer of plating on them that needs to come off if you want full strength welds. I have used acid for this task, but was out of stock. Plan B was to use a drill motor and a 60 grit flapper disc..... takes some time but you can clearly see when you have gone thru the plating (it's thick) and have reached the steel. I only buffed out about a half inch width of plating, plenty of room for my MIG machine to do it's job:
With the plating gone, I fitted things back up again and tacked these stop rings 180* apart. Finally I turned loose my Millermatic 220V machine on the rings. Settings were around 4.5 voltage and 55 feed rate of the .030 wire. My welds are never going to make Nathan envious (he was/is the MAN), but I know these won't fall off either!
With the welding complete, you can see the fit checked assemblies. I still have to put self etching primer and paint where the old welds were removed, and my rust proofing 395A around the stop ring and welds that will be directly exposed to road grit and water.
Next up: get the old Swede up on stands are remove the front struts to transplant all my parts into these coilover-ready struts. Won't be long now!