
adrianpike
🔥
- Joined
- Dec 1, 2002
- Location
- Seattle, WA
So let's say you're heater core is failing. How do you know, you say?
<ul>
<li>Leaking Coolant</li>
<li>Smell of antifreeze with heater running</li>
<li>No defrost or heat</li>
<li>Some cases are bad enough that your windows will actually fog when you try to run the defrost</li>
</ul>
So you've got two or more of those symptoms, you've decided to do the heater core swap, and all you've heard about the job is how much a pain it is. Perhaps you've heard rumors, or in my case, even been given diagrams, that there is "a better way". Well, my friends, (droogs, if you will) there is a better way, and I'm here to show you how to do it, in true pictoral fashion.
There are a few names circulating around for this "hack", which it truly is.
The Chainsaw method, the Dremel method, and sometimes, it's just called "cutting a big hole in the side of the heater box".
Basically, to replace the heater core the classic way, it requires removing the entire heater assembly, which to do, you usually have to remove the dash. Removing the dash in and of itself isn't really all that horrible, it can be done. It's the removal of the center console and guages, plus the myriad of little electric glitches that will present themselves once you've put everything back together, that really gets you. Here is a photo of an assembly in it's natural environment, highlighted for your viewing pleasure.

So now, I shall speak of my better way. It's not for everybody, as it involves permanently modifying parts of your car that are in some ways better off unmodified, but it makes the job night and day easier.
Pros:
-Shaves hours off core replacement.
-Less headache with wiring
-Easy to replace in future
-Don't have to de-pressurize A/C system
Cons:
-Heater will be less efficient
-Ethical issues with a "quick fix"
Tools/equipment required:
-New Core
-Dremel or close-quarters hack saw
-Eye protection if you're using a powered cutting tool
-RTV Silicone
-Foam, with one adhesive side (weatherstripping works)
-Screwdrivers, socket wrenches, etc.
-Vacuum (not required, but desired)
-Sandpaper (optional, see below)
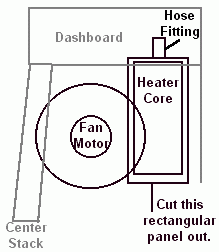
Here's a diagram of the cut you'll make, much thanks to kyle242GT:
And here's a photo outlining the same cut:

Note that the cut has to be curved around the top to create a slot for the core tubes to slide out, as shown in the next photo:

Now that I have shown and described the cut, I'll do a step-by-step process on how to swap in a new heater core, using the "chainsaw" method.
1. Remove the front passenger seat. This is optional, but it makes your life a lot easier.
2. Remove the fabric on the underside of the dash in the passenger footwell. It's held in by little black clips. All you have to do is turn them 90 degrees and they come out.
3. Remove the center console passenger-side trim, as well as the front trim. The side trim is held in by a screw at the top side of the front trim, and a clip, again which you turn 90 degrees, at the bottom of the front trim.
4. Remove the glovebox. Six screws, open the glovebox and they're on the lip.
5. Remove the passenger kickpanel. Again, this is optional, but you might as well, it's easy to pull out. Pull up the rocker trim, peel back the rubber weatherstripping around the door, and pull out the kickpanel.
6. Pull back the carpet as far as you like. This is optional, but a good idea, as it's very likely that some coolant will come in your direction.
7. Here's where it gets fun. Now you should be able to make out the heater unit, and now you get to remove the "oh %$@*" clips that hold the panel on the outside of the unit. Here's a photo showing where they like to hide.

They like to shoot off into the void when you pry them off with a screwdriver, so have something ready to retain them. I found that a magnet right next to the clip would grab it before it got a chance to zoom off into god-knows where.
Keep in mind that you may have to loosen the vertical support bracket for the dash on the passenger's side of the console to get at all the clips, and to remove the panel. I've outlined the bracket in the following photo:

Note that it has already been unbolted and moved out of the way.
8. Now that you've got the clips off, remove the panel that they were holding on. It may take some persuasion. Now you'll see the blower fan:

Pull the blower fan off by removing the clip. The clip slides up or down relative to the shaft, and the clip is narrower in the middle. The shaft is slotted for the clip to fit. Slide the clip until the shaft is in one of the larger holes and pull it out.
9. You might want to sand down the shaft to help the fan slide off it.
10. Slide the fan off the shaft. Be careful, I've got a cut on my finger that says it likes to bite.
11. Now remove the three screws holding in the backing plate for the fan.

12. Now go have a beer, because the goal is in sight! While you're at it, drain the cooling system.

13. Let's cut! Make the cuts mentioned earlier, and when you're done, this is what you should see:

Make sure and wear eye protection, and cover anything you don't want plastic dust on. A filter mask is a good idea here too.
14. Now that you see the core, remove the two coolant hoses that run to the top of it, being careful not to spill too much all over yourself (you did drain the coolant, right?") ). Have a plug or rag ready to stopper the flow. The core slides out your hole easy as can be, but it may require a little bit of extra cutting for it to be butter-like. Don't cut too much, you've got to seal that hole back up in a few minutes.
). Have a plug or rag ready to stopper the flow. The core slides out your hole easy as can be, but it may require a little bit of extra cutting for it to be butter-like. Don't cut too much, you've got to seal that hole back up in a few minutes.
15. Clean out the heater core area of any coolant, dirt, or plastic chips and dust that will have accumulated in there. This is where the vacuum comes in handy.
16. Slide the new core in the way the old one came out, and hook up the coolant lines to it.
17. Now, using an RTV silicone or equivalent sealing adhesive, glue and seal the plate that you cut out back into place, and let the glue dry.
18. Reassembly is the reverse of removal. Don't replace all of the trim until you test it out and make sure that all of your re-wiring is correct, especially the blower motor. This is a scary one to find doesn't work once you get everything back together.
19. No matter how well you vacuumed everything up, the first time you fire up the blower motor, a little bit of plastic chips and dust will come flying out. Don't worry about it, unless it lasts more than a few seconds.
<ul>
<li>Leaking Coolant</li>
<li>Smell of antifreeze with heater running</li>
<li>No defrost or heat</li>
<li>Some cases are bad enough that your windows will actually fog when you try to run the defrost</li>
</ul>
So you've got two or more of those symptoms, you've decided to do the heater core swap, and all you've heard about the job is how much a pain it is. Perhaps you've heard rumors, or in my case, even been given diagrams, that there is "a better way". Well, my friends, (droogs, if you will) there is a better way, and I'm here to show you how to do it, in true pictoral fashion.
There are a few names circulating around for this "hack", which it truly is.
The Chainsaw method, the Dremel method, and sometimes, it's just called "cutting a big hole in the side of the heater box".
Basically, to replace the heater core the classic way, it requires removing the entire heater assembly, which to do, you usually have to remove the dash. Removing the dash in and of itself isn't really all that horrible, it can be done. It's the removal of the center console and guages, plus the myriad of little electric glitches that will present themselves once you've put everything back together, that really gets you. Here is a photo of an assembly in it's natural environment, highlighted for your viewing pleasure.
So now, I shall speak of my better way. It's not for everybody, as it involves permanently modifying parts of your car that are in some ways better off unmodified, but it makes the job night and day easier.
Pros:
-Shaves hours off core replacement.
-Less headache with wiring
-Easy to replace in future
-Don't have to de-pressurize A/C system
Cons:
-Heater will be less efficient
-Ethical issues with a "quick fix"
Tools/equipment required:
-New Core
-Dremel or close-quarters hack saw
-Eye protection if you're using a powered cutting tool
-RTV Silicone
-Foam, with one adhesive side (weatherstripping works)
-Screwdrivers, socket wrenches, etc.
-Vacuum (not required, but desired)
-Sandpaper (optional, see below)
Here's a diagram of the cut you'll make, much thanks to kyle242GT:
And here's a photo outlining the same cut:
Note that the cut has to be curved around the top to create a slot for the core tubes to slide out, as shown in the next photo:
Now that I have shown and described the cut, I'll do a step-by-step process on how to swap in a new heater core, using the "chainsaw" method.
1. Remove the front passenger seat. This is optional, but it makes your life a lot easier.
2. Remove the fabric on the underside of the dash in the passenger footwell. It's held in by little black clips. All you have to do is turn them 90 degrees and they come out.
3. Remove the center console passenger-side trim, as well as the front trim. The side trim is held in by a screw at the top side of the front trim, and a clip, again which you turn 90 degrees, at the bottom of the front trim.
4. Remove the glovebox. Six screws, open the glovebox and they're on the lip.
5. Remove the passenger kickpanel. Again, this is optional, but you might as well, it's easy to pull out. Pull up the rocker trim, peel back the rubber weatherstripping around the door, and pull out the kickpanel.
6. Pull back the carpet as far as you like. This is optional, but a good idea, as it's very likely that some coolant will come in your direction.
7. Here's where it gets fun. Now you should be able to make out the heater unit, and now you get to remove the "oh %$@*" clips that hold the panel on the outside of the unit. Here's a photo showing where they like to hide.
They like to shoot off into the void when you pry them off with a screwdriver, so have something ready to retain them. I found that a magnet right next to the clip would grab it before it got a chance to zoom off into god-knows where.
Keep in mind that you may have to loosen the vertical support bracket for the dash on the passenger's side of the console to get at all the clips, and to remove the panel. I've outlined the bracket in the following photo:
Note that it has already been unbolted and moved out of the way.
8. Now that you've got the clips off, remove the panel that they were holding on. It may take some persuasion. Now you'll see the blower fan:
Pull the blower fan off by removing the clip. The clip slides up or down relative to the shaft, and the clip is narrower in the middle. The shaft is slotted for the clip to fit. Slide the clip until the shaft is in one of the larger holes and pull it out.
9. You might want to sand down the shaft to help the fan slide off it.
10. Slide the fan off the shaft. Be careful, I've got a cut on my finger that says it likes to bite.
11. Now remove the three screws holding in the backing plate for the fan.
12. Now go have a beer, because the goal is in sight! While you're at it, drain the cooling system.
13. Let's cut! Make the cuts mentioned earlier, and when you're done, this is what you should see:
Make sure and wear eye protection, and cover anything you don't want plastic dust on. A filter mask is a good idea here too.
14. Now that you see the core, remove the two coolant hoses that run to the top of it, being careful not to spill too much all over yourself (you did drain the coolant, right?
15. Clean out the heater core area of any coolant, dirt, or plastic chips and dust that will have accumulated in there. This is where the vacuum comes in handy.
16. Slide the new core in the way the old one came out, and hook up the coolant lines to it.
17. Now, using an RTV silicone or equivalent sealing adhesive, glue and seal the plate that you cut out back into place, and let the glue dry.
18. Reassembly is the reverse of removal. Don't replace all of the trim until you test it out and make sure that all of your re-wiring is correct, especially the blower motor. This is a scary one to find doesn't work once you get everything back together.
19. No matter how well you vacuumed everything up, the first time you fire up the blower motor, a little bit of plastic chips and dust will come flying out. Don't worry about it, unless it lasts more than a few seconds.


