An annotated guide on how to +T your 1985-1995 Volvo 240-740-940
An annotated guide on how to +T your 1985-1995 Volvo 240-740-940
PREFACE
You?ve gotten this far because you know it?s possible to turbocharge your non-turbo 1985-1995 240-740-940. You don?t need any convincing, you just want to know how to do it.
I?ve performed this conversion on about 10 different Volvos? mostly 240?s, but also 740?s and 940?s. As long as you have all the materials, it could be done in a weekend for most people.
The timeline of your +T conversion depends on your experience and comfort working under the hood of your brick. You will need to become intimate with your engine. There's nothing in the swap that's rocket surgery, but if you've never changed a spark plug before, it may take you a bit longer than a weekend.
The best possible advice I could give to a person doing this swap is to find a junkyard and tear apart a junkyard turbo Volvo. Find as many as you can and tear them apart. Get your hands dirty as much as possible. The more you do, the more you?ll learn about what goes where. I must have taken apart a half dozen or so turbo 240/740/940?s before I even attempted my first +T. Granted, I never would have done any of this if it wasn't for the original +T article by Linuxman51 and Isaac. Thanks be to them.
+T by MikeJr. in a 240 wagon
+T by diponyou in a 240
WHY DO THE +T?
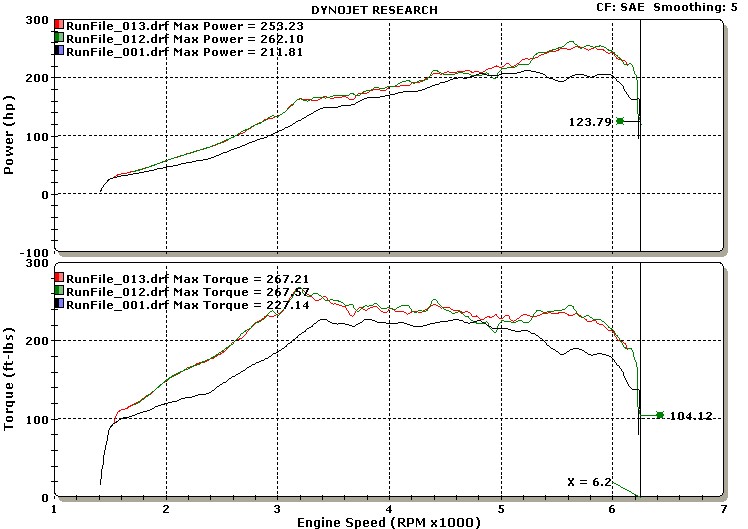
Because it's a way of making the car you love that much more enjoyable. Imagine being able to pass those pesky debutante mustangs and camaros and honda boys with your mom's car. Imagine the potential of easily running mid 14 second 1/4 mile times with nothing more than basic bolt-on, often junkyard parts. 14's are nothing to sneeze at. 12-15psi can get you near the 250hp mark which is more than enough to not only double your car's horsepower, but dramatically increase your enjoyment.
Why does the +T work so well?
Quite simply, it's the higher compression ratio. You'll be around 9.8:1 when things are all said and done with the conversion. Considering factory 740 turbo cars spec out at 8.7:1 CR, running around with the higher CR will make for a much torquey-er car. Much more responsive from a stop. It's what makes the whole conversion worth while. Many people want to do the swap but install a turbo block (same with the exception of lower compression pistons)... which is fine and while you will lose the +T's benefits, you will still have boost.
Moral of the story, don't swap blocks.
DO I NEED TO SWAP CYLINDER HEADS?
No. The stock NA cylinder head is fine and many have +T'd their non-turbo heads with no ill effects whatsoever. "Turbo" cylinder heads are for all purposes identical with the exception of having sodium filled exhaust valves. You be the judge.
PARTS
You?re going to need everything that came from a turbo car. Sounds simple, but it's one of the most-asked questions... "what do I need?" Short answer, get everything. The corollary to that is "Should I just get a turbo block" and the short answer is no... unless you like engine swaps. I?m assuming you?re getting most of this unless noted from a junkyard donor car. Below is a short list of every part.
- Turbocharger including wastegate and exhaust housing with all nuts bolts and clamps.
- Rebuild kit for the turbocharger.
- Turbo exhaust manifold with all nuts, studs, washers. Preferably a 90+ manifold.
- Downpipe. You?re going to have to fab here. 240 people can make a 740 downpipe work but it requires cutting/rewelding.
- Oil feed and return lines. Preferably you?re buying new here. * Plan to spend around $100 complete.
- EACH intercooler pipe with every hose clamp that came with it.
- An intercooler.
- 240 or 740/940 upper/lower intercooler clamps and isolators and bolts
- Fuel injectors, low impedance greentops with ballast resistor pack, or high impedance units sans ballast resistor. You can also get new higher flowing fuel injectors. *
- Idle valve to intercooler pipe hose
- Flame trap substitute y-pipe
- Compressor bypass valve and air intake pipe going into the turbo
- 7? extra length of wire to splice in and reroute air mass meter to passenger side
- Fuel and ignition computers from a TURBO donor car.
- If needed, turbo water cooling lines and hoses.
- 1 heat range colder spark plugs. NGK BPR7ES or equivalent.
THE MAJOR THEMES OF THE SWAP.
- OIL FEED
- OIL RETURN
- MOUNTING THE TURBO
- MOUNTING THE INTERCOOLER AND RADIATOR IN THEIR NEW POSITIONS
- TURBO WATER COOLING?
- COMPRESSOR BYPASS VALVE
- CRANKCASE VENTILATION HOSE
- MODIFYING THE IDLE VALVE HOSE TO FIT THE INTERCOOLER PIPE
- RE-ROUTING THE AMM WIRES
- CHOICES. BALLAST RESISTOR AND LOW IMPEDANCE INJECTORS, OR JUST HIGH IMPEDANCE INJECTORS?
- HOW TO SPLICE IN THE BALLAST RESISTOR PACK.
- 2.5 VS 3BAR FUEL PRESSURE REGULATOR
- WHAT DO I HAVE TO DO ON THE ECU SIDE OF THINGS?
- CAN I SWAP FROM LH2.2 to LH2.4?
- WHERE ARE THE FUEL AND IGNITION COMPUTERS?
- HOW DO I SET THE WASTEGATE?
- DOWNPIPES AND EXHAUST
- CAN I STOMP ON IT YET?
1. OIL FEED LINE
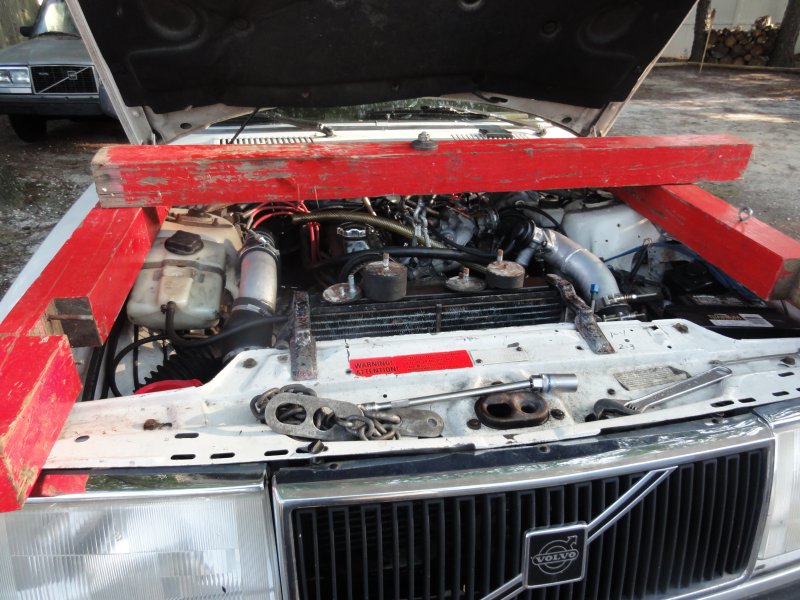
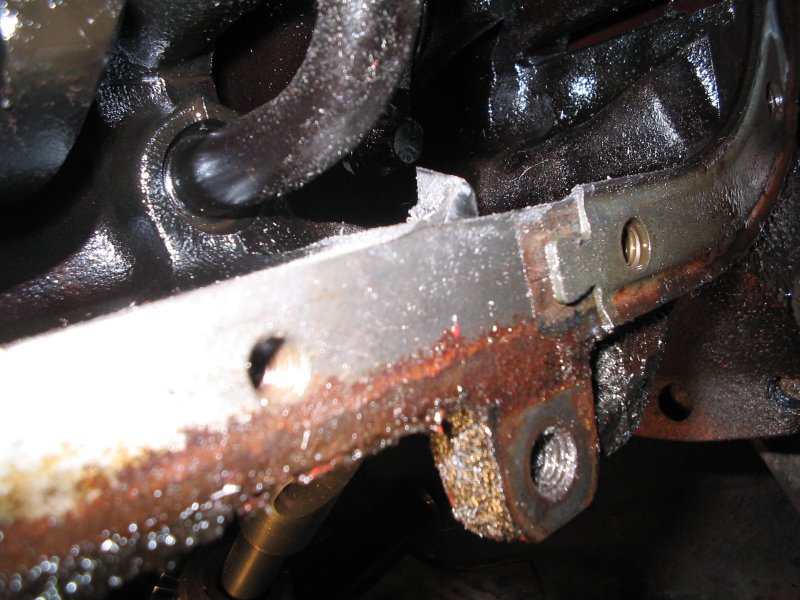
You will need to supply high pressure oil to the turbocharger. The best place to get high pressure oil is at the front of the block, where you will find an access port covered by an allen-head plug. This is where the factory engine foundry drilled the main oil gallery hole in the block, then tapped/threaded a nut here to seal it shut. It's shown in the picture below.
In order to get access to the port, you will probably need to remove the alternator or power steering pump bracket and remove temporarily the alternator/PS belts so you can get access to this plug. The plug is ?? NPT.
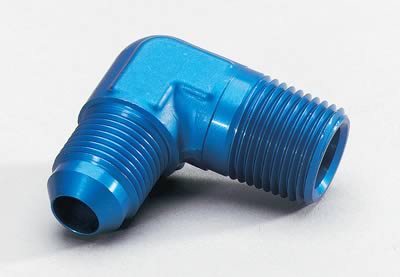
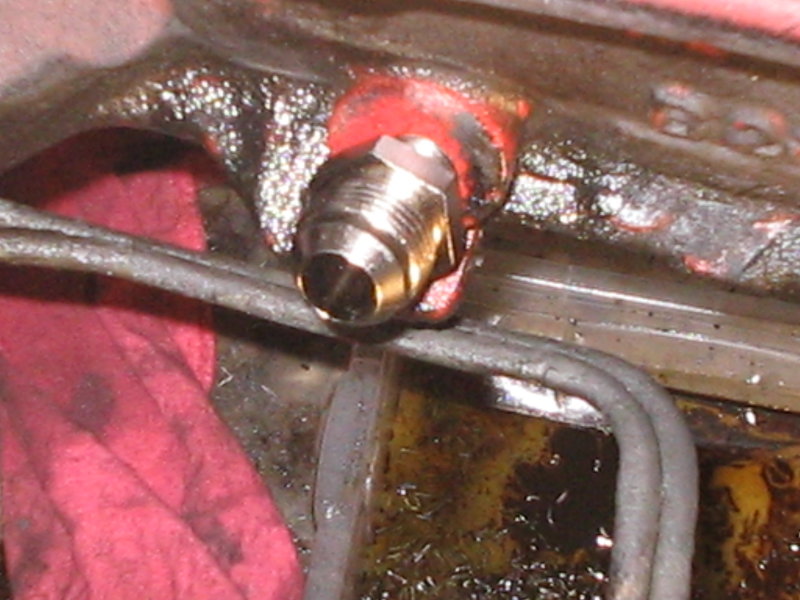
What do you do once it's been removed? Your best choice here is to obtain a 90degree AN fitting with ?? NPT going into the block and 4AN going out to the turbo such as the unit shown below from summit racing. (
SUM-220451)
You will have to angle the fitting and line such that it does not interfere with the alternator or power steering pump. 240 people may want to go with a slightly longer alternator belt, or might have to grind down the upper alternator bracket bolt for oil line clearance.
You need about a 16 inches of braided stainless line to loop upwards towards the turbocharger.
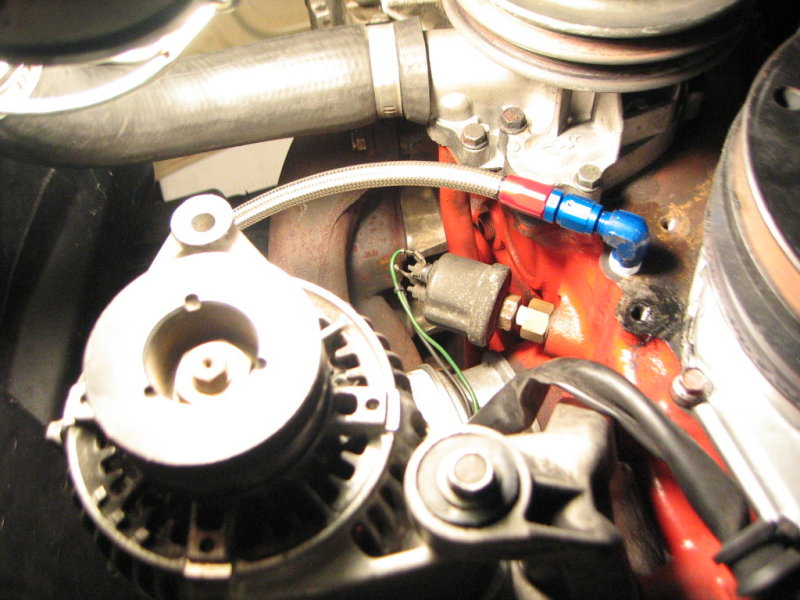
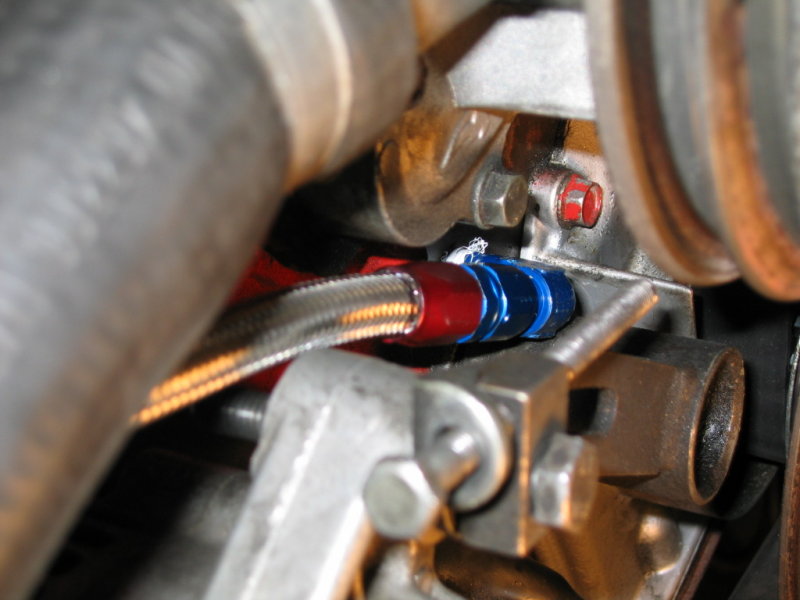
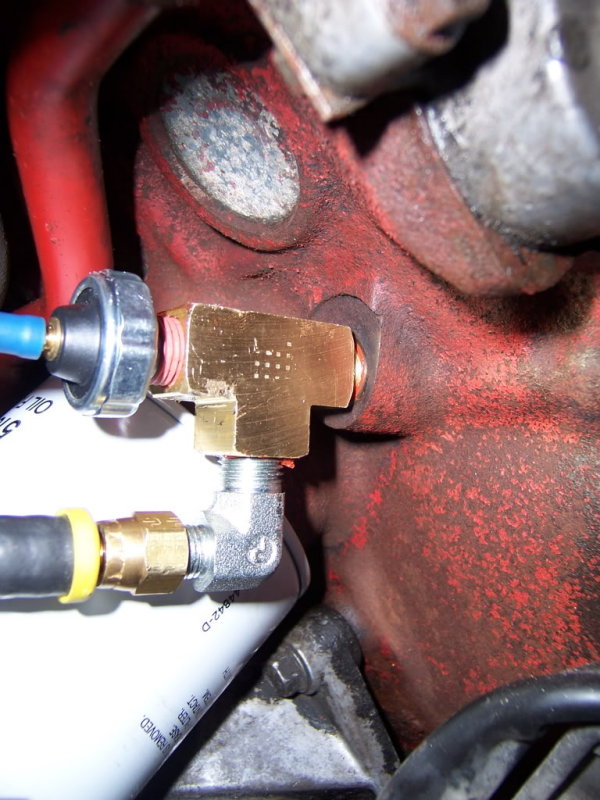
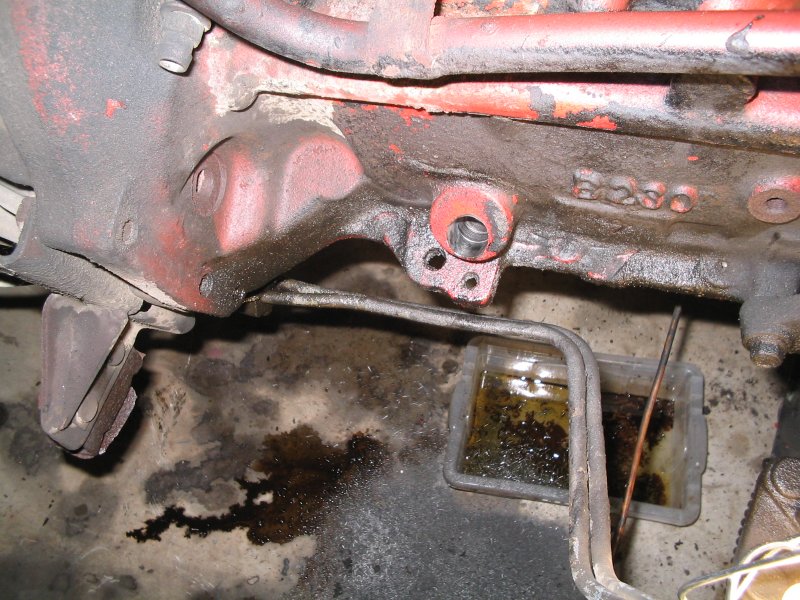
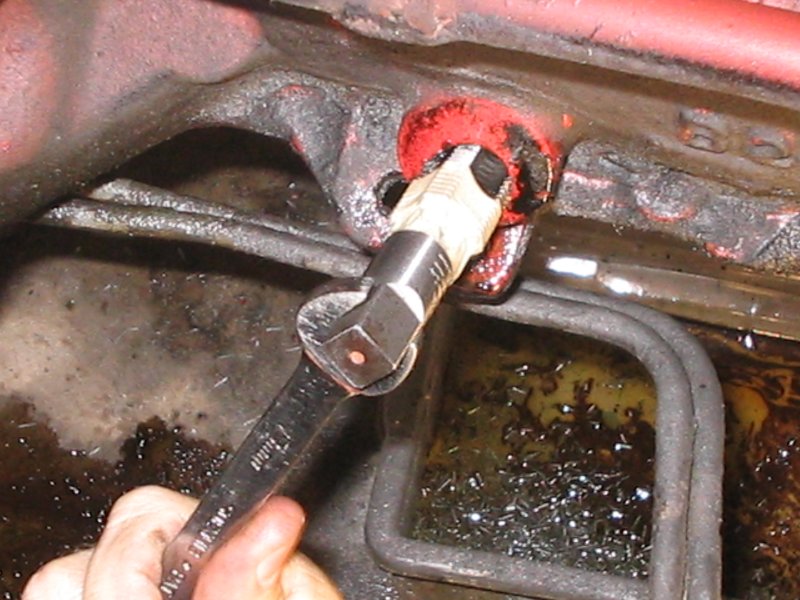
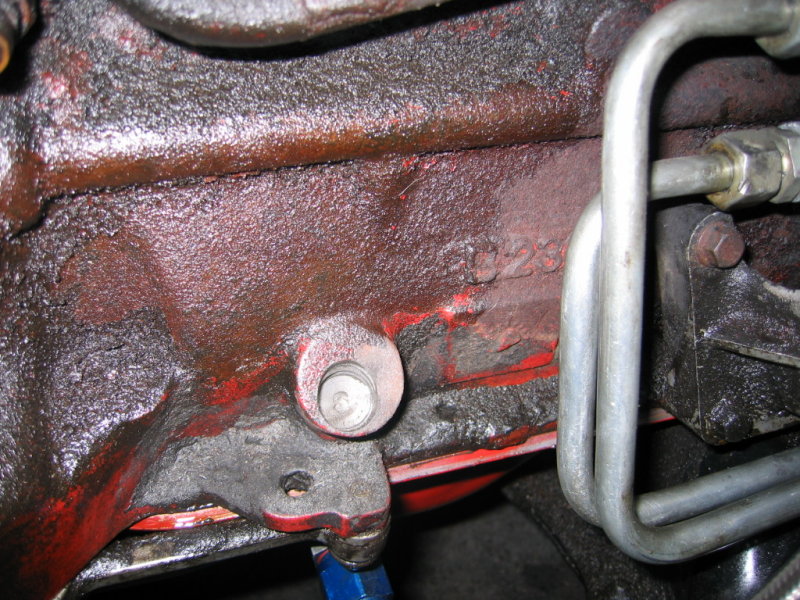
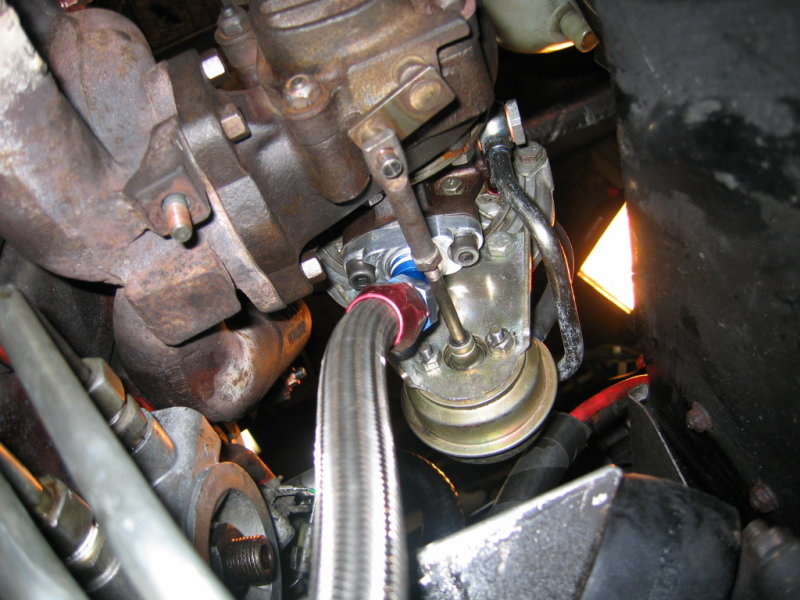
Note, there is another location for the oil feed... it's where the factory oil "idiot" light is located. The following are two examples where the Tb member has removed the idiot light 14mm fitting and put a separate junction in place to feed both the oil and the oil pressure sending unit. Either of these options may be easier for you depending on your needs.
If you are using a Mitsubishi turbo, you will need to get a 10x1.25 (*mikep edit: my mitsu was 12mmx1.5) to 4an banjo fitting,
available inexpensively on Ebay for about $12.
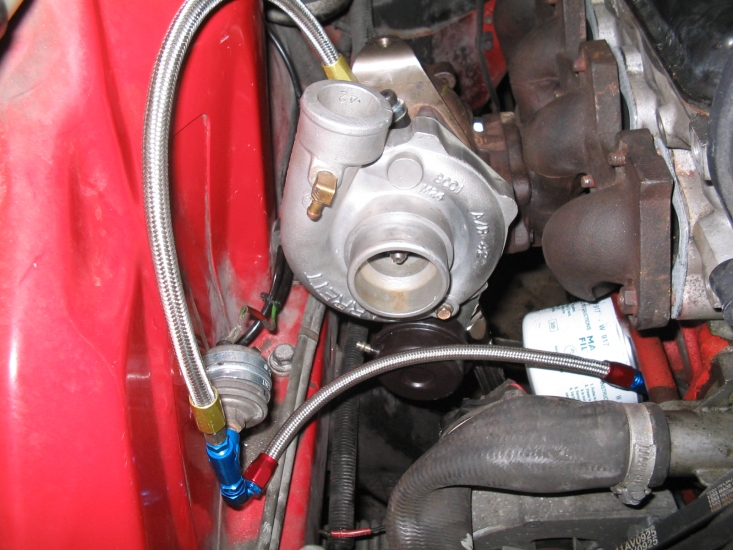
Here's the banjo mounted on the top of the turbo.
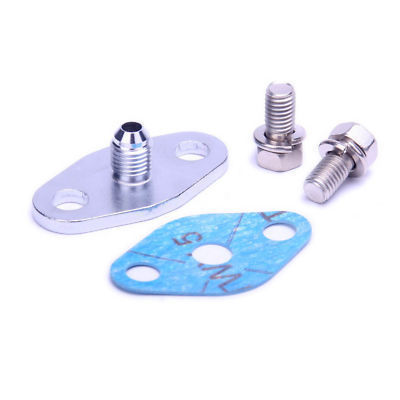
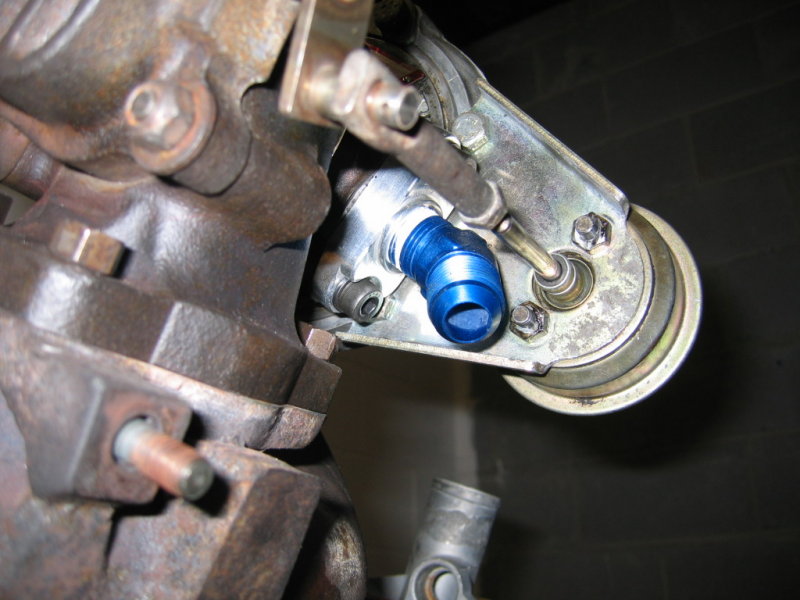
For garrett turbo?s, you can get an oil feed flange with a 4AN outlet fitting, or a 1/8? NPT hole, or simply use another 90degree aluminum fitting, this time 4AN on one side and 1/8? NPT going into the turbo. (
SUM-220450)
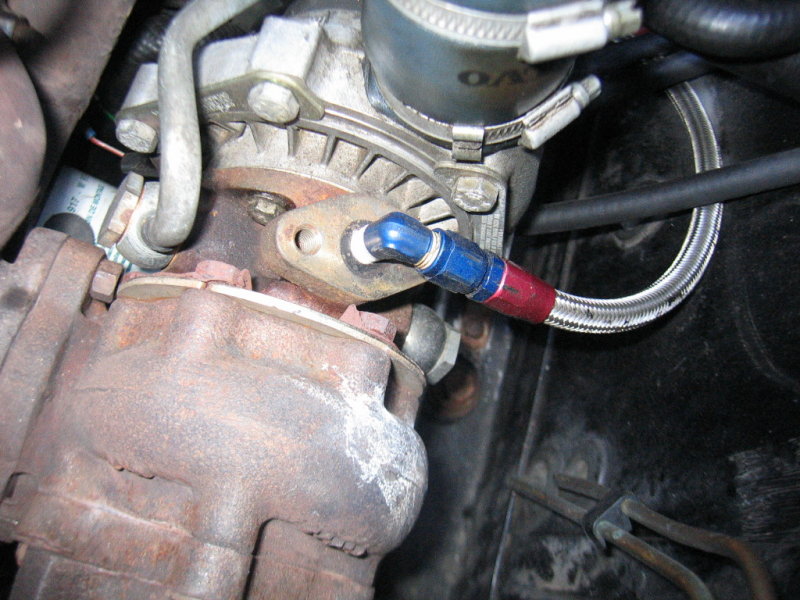
Garrett T3 oil feed with 4an to 1/8"NPT 90degree fitting.
Garrett T3 oil feed flange with 4AN outlet.
Do make sure not to route the line near anything hot. It should NOT be touching the exhaust manifold at any point.
We strongly recommend braided stainless hose in this location due to the high heat.
2. OIL RETURN LINE.
Lots of choices here as well. Your oil needs to drain by gravity, away from the turbo. Generally, the oil return line is much bigger than the feed as it is not under pressure. The factory return pipe is approximately ?? in diameter, with Mitsubishi turbos having a slightly thinner return.
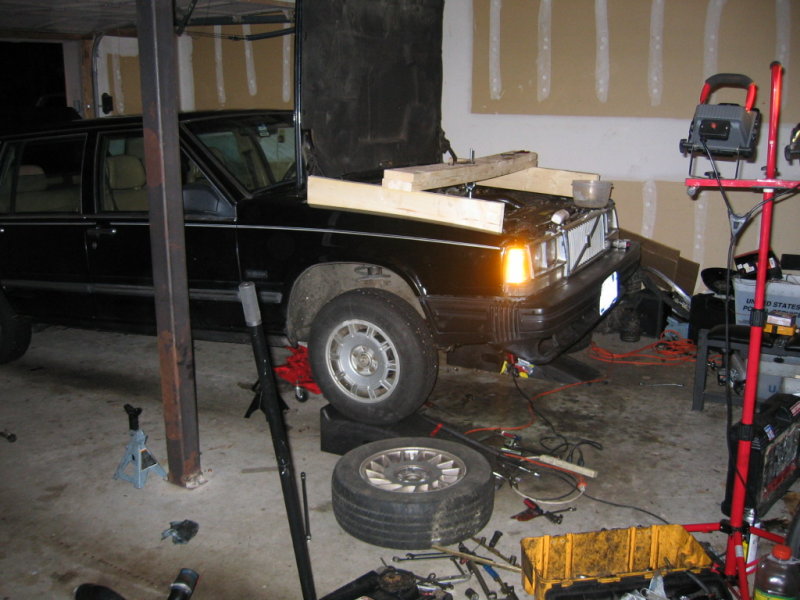
However... before you do any of this, you need to get the oil pan off the engine... No, you don't have to remove the engine... but you might have to build one of these. With one of these simple hoists, the engine is lifted by the hookeye on the thermostat outlet pipe. Just unbolt the motor mounts from underneath and you can get the engine a good 2-3 inches up in the air. You'll have to then unbolt the motor mounts from the block, but that allows you to unbolt the oil pan, and rotate it 90degrees to get it out from the car.
Your choices for the return line
1. Making your return from the factory line
To make your return from the factory line, generally, people will use the factory hard line for the upr 2/3?s of the return, then use rubber hose for the bottom part. This works well although it is slightly more prone to vibration and leaking. You would also need to have a hose barb fitting at either the block or the pan to complete this type of return.
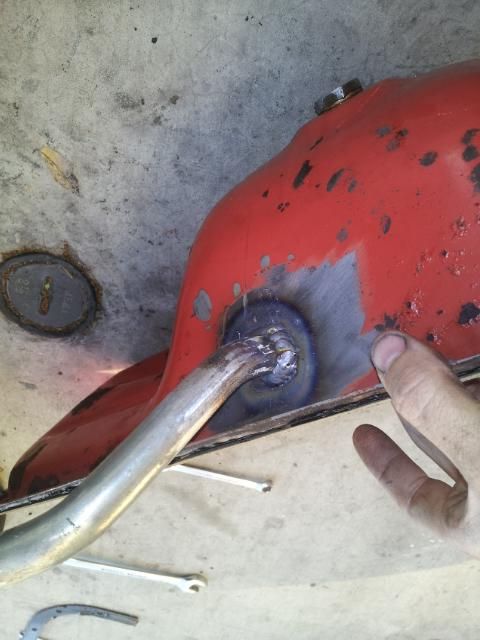
Another option is to simply modify the existing steel return and weld it to the pan as shown here. Then use rubber hose to connect the rest of the way.
contributed by diponyou.
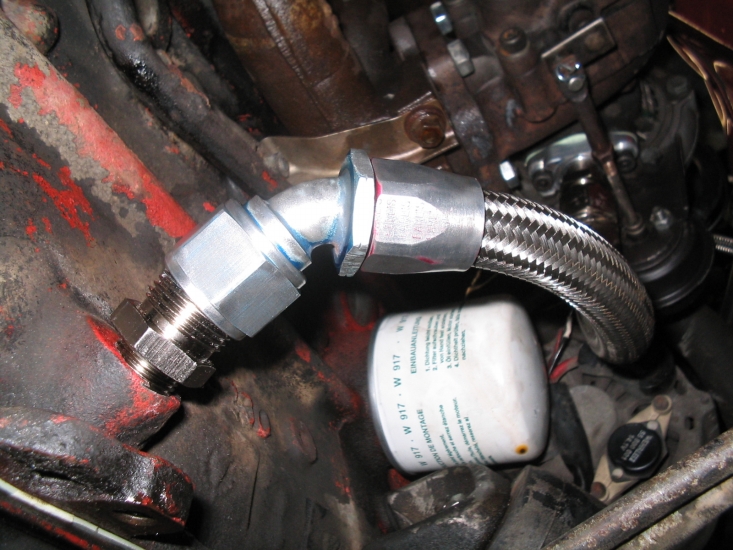
a. In this case, you should pick up one of the inexpensive oil return flanges from ebay. Figure about 12-20 dollars. This flange will bolt directly in place of your original hard line and in most cases you can simply reuse the original oil return gasket.
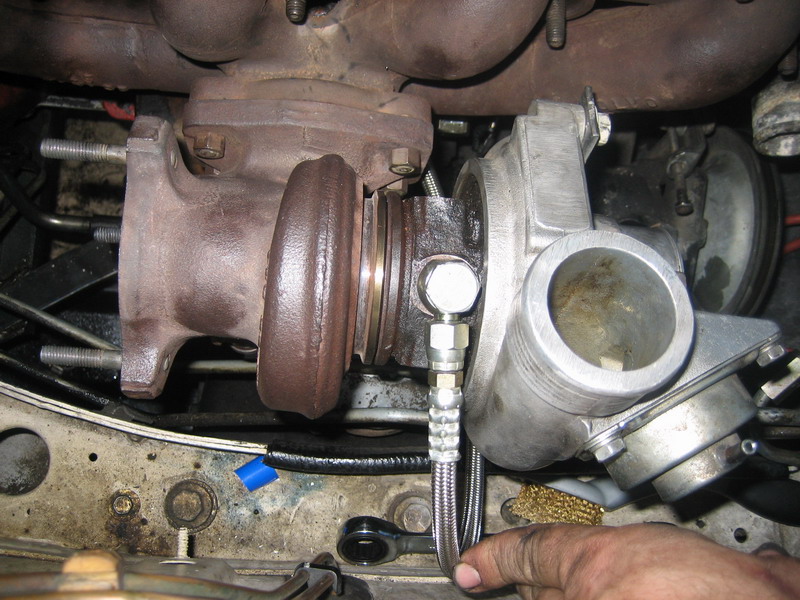
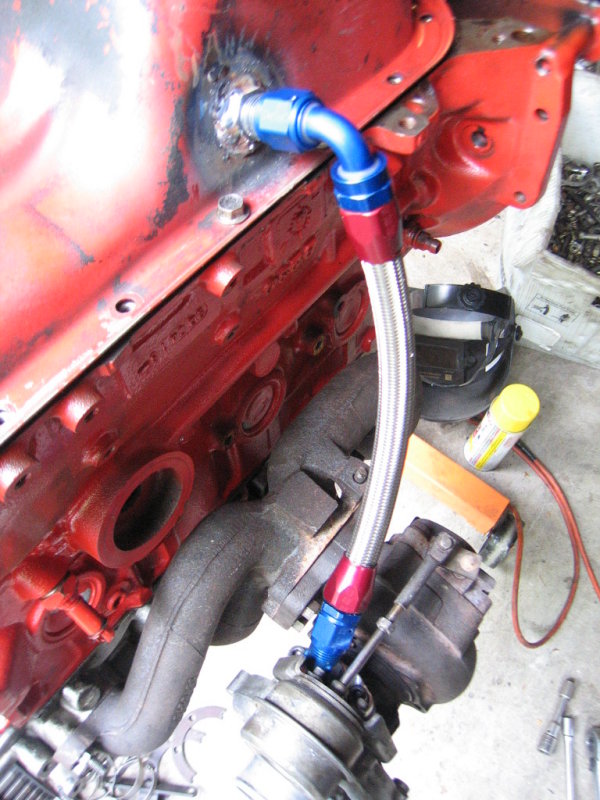
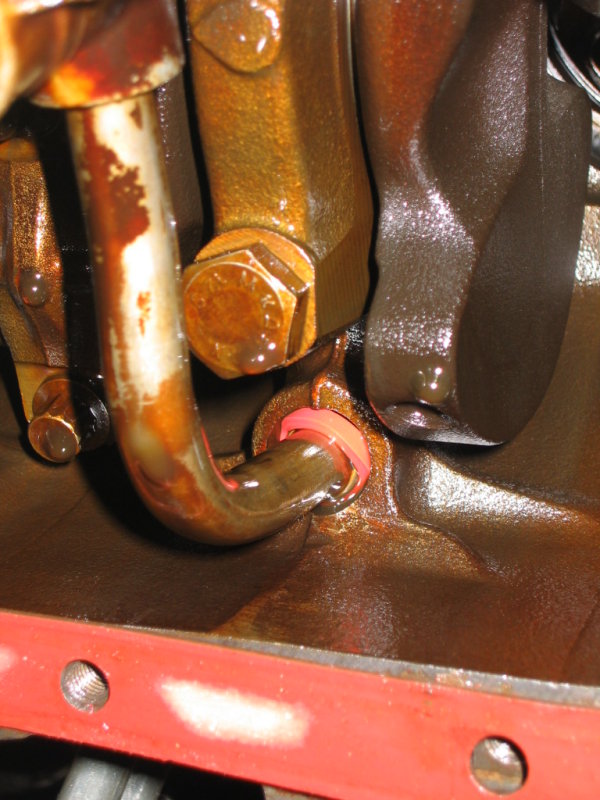
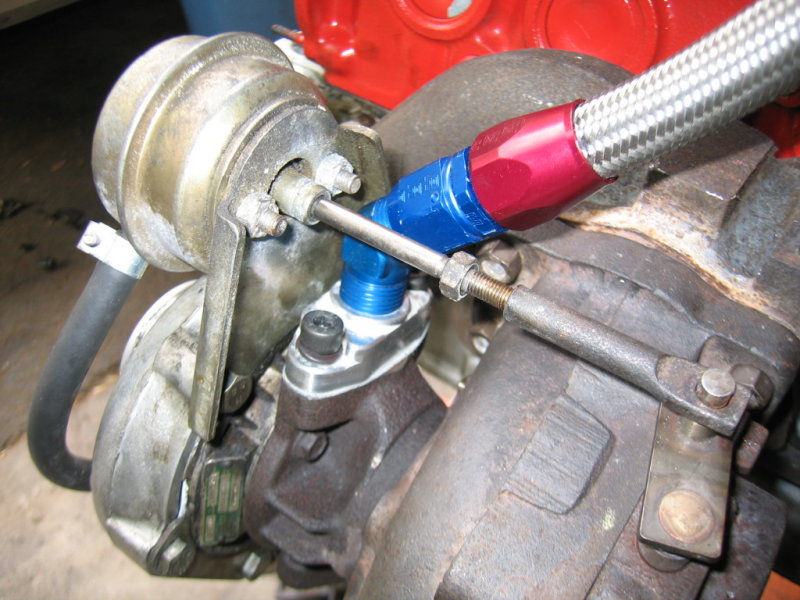
b. The flange will generally either be tapped for ?? NPT fitting, or will have a 10AN male fitting machined into it. The best method is to get the flat flange with the ?? NPT hole tapped into it. From here, you need a 45 degree aluminum fitting, ?? NPT going into the turbo and 10AN coming out. This will give you enough clearance to avoid contact with the wastegate actuator as shown in the picture below. 12AN line would also work, but the fittings are VERY big and most likely you will hit the wastegate actuator line.
c. You?ll need about a foot of braided steel hose
d. Alternatively, you can get a brass hose-barb fitting and use all-rubber hose for the oil return. I personally have never used it and like the safety of the braided steel hose for the high heat location. However others have used it and it works fine.
Your choices for the actual return.
1. Drilling the block.
a. Volvo designed the turbo cars for easy oil returns and cast an extra-thick nub on the outside of the block where they drilled it for the oil return. It?s still there on non-turbo blocks? with the exception of some 82-84 B23F blocks.
b. This is one of those things which is very controversial amongst turbobrickers. There is the drill the block crowd which says to hell with the iron shavings, then there is the ?what the hell are you thinking?? crowd. The drill the block with the pan on crowd says to drill the block, then pour in a couple gallons of mineral spirits (isoprobanol, acetone, whatever) to ?flush out? any iron shavings that enter the pan. Frankly, I think this is moronic as the iron shavings go? well, everywhere when you drill? especially when you poke through the block. Some say to put a lot of wheel bearing grease on the drill bit, but you run into the same problems? it just takes one iron shaving stuck in your oil gallery to f things up.
In this image, the drill bit is shown poking through the inside of the block. All of the little shiny things you see on the oil pump transfer tube are iron shavings. Your results may vary.
c. The oil way to safely drill the return is to take the pan off. See here for ideas how to get the pan off with the engine in the car. This way you can actually flush out any shavings that happen to (will) get on the crankshaft, oil pump, etc.
In this picture, you can see how much clearance you have to drill the return. This is in a 240.
Here you can see the hole completely drilled.
d. If you?re going to drill and tap the return, you need to do it in stages. Starting with a pilot hole, then going up in steps (preferably 5-6 steps) until you get to the 7/8? final size. Don?t think you can drill a pilot hole and then just use a 7/8? bit to get to the final size. Drill bits walk all the time.
e. Use sharp drill bits. This is what happens when you don?t.
f. Tapping the block is pretty straight forward. Go slowly. Use grease. Do a good job.
g. At this point, you?re looking for a fitting. If you?re using rubber hose, a 1/2NPT hose barb will do the trick. You might find a 45degree hose barb fitting to be your liking here.
h. If you?re using braided steel line, A
??NPT to 10an fitting will do you well. Most people find they have to use some type of Teflon sealant or even JB weld on the return fitting to keep it from leaking. (SUM-220047)
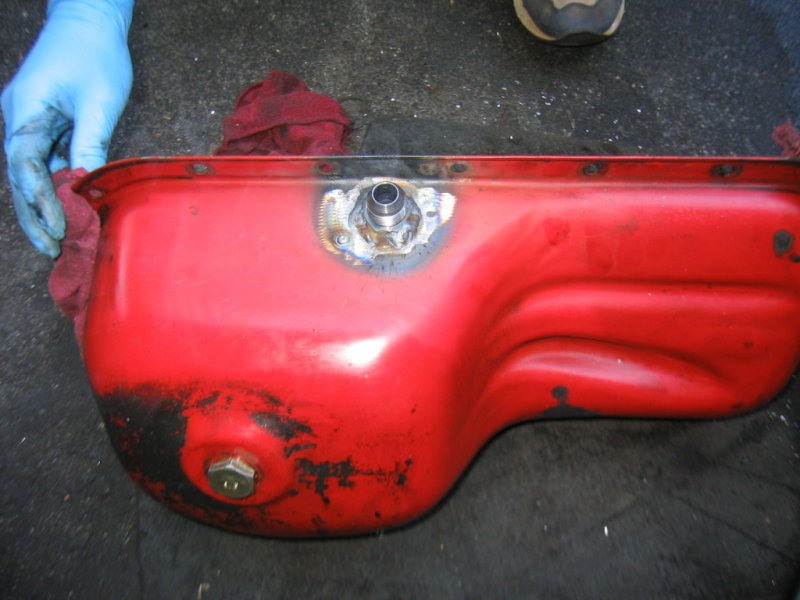
a. Frankly if you?re going to take the pan off, welding a fitting onto the pan is cheap, easy, and painless.
b. Pick up a steel weld bung from summit or ebay. I recommend the fittings with a 10AN male fitting cast into it. They're about $7. (
FBM2875)
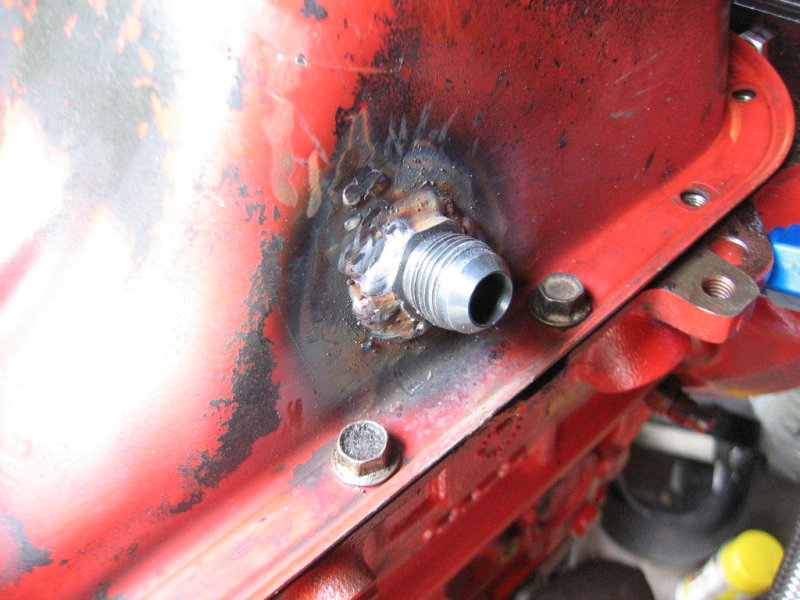
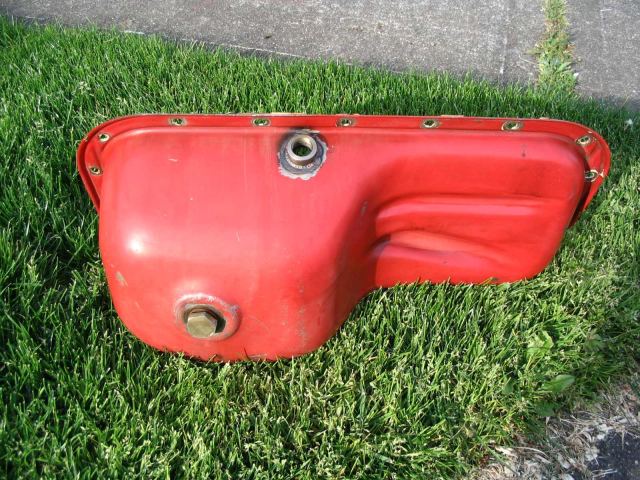
c. You?re looking to drill the hole for the fitting as close to the top of the pan as possible. Ideally, you want the return to be ABOVE the level of the baffle in the pan. I have drilled fittings below the level of the baffle before and they worked fine however. If you can get it near the area shown below, you're golden. It goes without saying that you can clean and paint the pan after you're finished drilling and welding.
this is right about where you want the hole and the welded fitting. It pops out right above the oil baffle in the pan. I would weld it higher, but I can't get the mig gun in between the fitting and the pan flange.
d. Grind/sand off the paint around the fitting and weld it on. Any competent welder can do this for you for $20. Mig weld it, tig weld it, flux weld it. Doesn?t matter.
e. If you?re using braided hose for your return, I recommend a 90degree 10AN to 10AN fitting. It makes the line more or less straight with no really tight bends.
f. The beauty of welding onto the pan is you get to replace the pan gasket if it was leaking, and you also get to check in on the pesky oil pump transfer tube o-ring in the block which has a habit of tearing or popping out after about 200,000 miles thus killing your oil pressure. See here for link on how to fix it permanently.
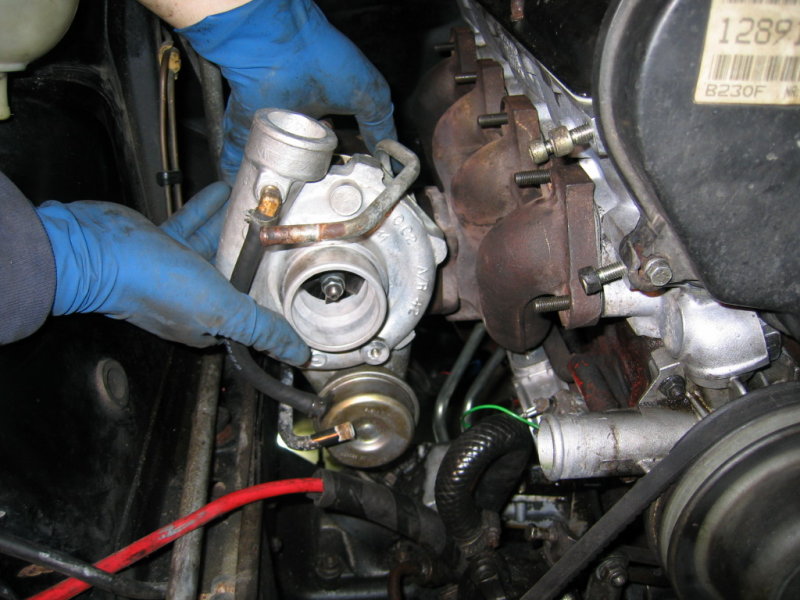
4. MOUNTING THE TURBO.
At this point, you should be staring at an empty passenger side of the block. You should scrape off any old exhaust manifold gaskets. Many times you will have to replace exhaust manifold studs. Use anti-seize on any new studs. I usually put the new gaskets in place first, then slide the turbo manifold on.
You should be using the 90+ turbo exhaust manifold as opposed to the older log manifold. The pic below shows the 90+ manifold.
Most people find it easier to mount the manifold first, then the turbo. Consider purchasing new copper nuts for the manifold.
Make sure the oil return line and wastegate are routed away from each other before you bolt the turbo onto the manifold.
Mount the turbo on the manifold studs. Connect the oil feed and water cooling lines to the turbo.
Consider mounting the oil return line to the turbo before you put it in the car. It makes it easy later than trying to reach up in there to get it connected.
Connect the downpipe to the turbo loosely at first. Connect the downpipe to the exhaust, then tighten the fittings at the turbo.
Connect the intercooler pipes, as well as the air inlet pipe to the turbo.
5. MOUNTING THE INTERCOOLER AND RADIATOR IN THEIR NEW POSITIONS
- You will need to remove the current radiator to make room for the new upper/lower intercooler brackets. Essentially, the new brackets you obtained from the JY will mount the intercooler, then in front of it, the radiator.
- You will need to shorten your existing radiator hoses by a couple inches, but wait until you have the radiator and intercooler in place.
- Drop in the new lower brackets, then place the intercooler in first. The weight of the IC will help hold the radiator in place. Then you can put the radiator (I like to find a 3-core radiator for +T swaps) in place in front of the IC. The upper IC/rad brackets will hold everything in place.
a. Keep in mind, these are not interchangeable between 240?s and 740?s. 240 people will need to get 240 turbo upper and lower IC brackets.
- If you are keeping the stock mechanical fan, now you can put the turbo fan shroud in place.
a. Again, 240-740 turbo fan shrouds are not interchangeable.
b. You do want to use a fan shroud as it drastically affects the cooling ability of the radiator.
- 5. Alternatively, for those who can?t locate the correct fan should, consider doing an electrical fan swap in place of the mechanical fan. Most electrical fan swaps will have an integral should and take up just as much room as the factory fan and shroud. Not to mention the few hp savings you will gain from not having to spin a mechanical fan. See here for e-fan swaps.
6. TURBO WATER COOLING
All factory turbo cars came with water cooling to the turbo. Put simply, ?cooled? water will circulate around the oil bearings in a turbo. Cooling the oil inside a turbo will prevent the dreaded coking of oil that occurs on shutdown. Water convection will continue to cool the turbo long after the engine has shut down. Furthermore, water cooling can promote longer life of the turbo?s bearings.
That being said, water cooling does add to the complexity of a plus-TEE swap.
In a nutshell, of the two water cooling lines to the turbo, one line will tap into the lower radiator hose, and the second will tap into the expansion tank hose. It?s really not that difficult, but for a first-timer looking to get the turbo swap done as fast and simply as possible, it might seem like an over-arching complexity.
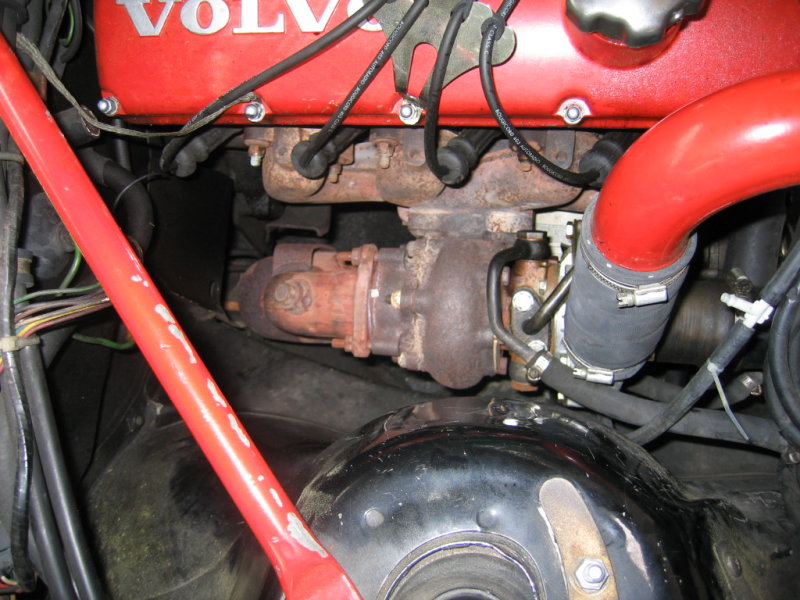
One of the upper water cooling lines is shown in the following picture running across the turbo.
The 740 turbo cars come with a lower radiator hose with built-in water cooling attachment. Furthermore, 740 turbo cars expansion tank hose also has the water cooling attachment added. If you have plenty of time, it?s not terribly difficult to do this additional swap as it does have performance and financial benefits.
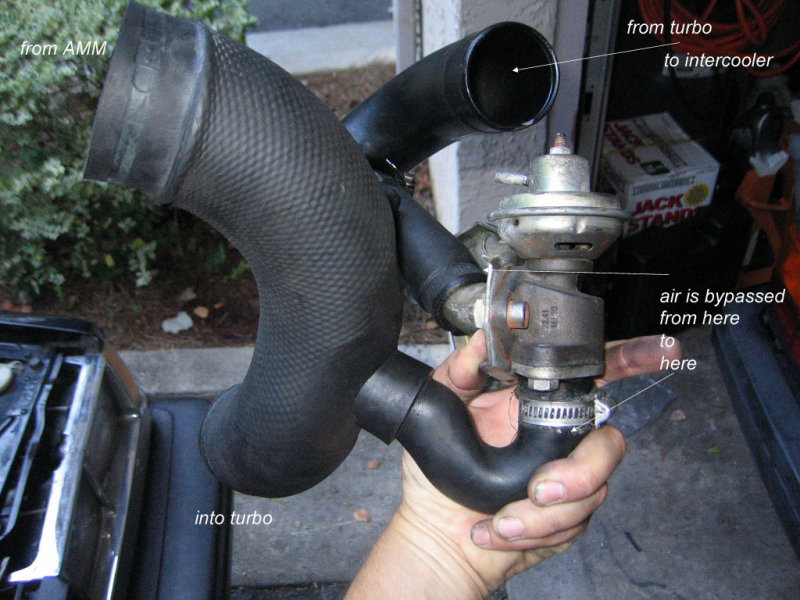
7. COMPRESSOR BYPASS VALVE
All turbo cars with the exception of the early 240 turbos had a compressor bypass valve. Imagine if you will a turbo at speed making boost, sending the compressed air down the intercooler pipes, past the throttle body, into the engine. Imagine now letting off the gas, the throttle body closing and all of that compressed air slamming into the closed throttle body and essentially backing up all the way back to the turbo. The effect we?re referring to here is likened to spraying a jet of water at a fan in the opposite direction the fan is spinning. The effect on the fan is to slow it down and the exact same effect is observed on the turbocharger. The sound you would hear if this happens to your car is a ?psh-sh-sh-sh-sh? as the turbo slows down. Thus, the compressor bypass valve to take this misdirected high pressure air and shuffle it back into the turbo. On cars equipped with air mass meters (read, all Volvos), this is critically important that it is put back into circulation as AMM equipped cars ?measure? the amount of air entering the system. If the air would be to diverted to atmosphere, it would cause the engine to run ?rich? as it expected to have a certain amount of air, but did not. The AMM tells the fuel ECU how much fuel to be delivered for a certain mass of air. If the air isn?t there, the engine runs richer than it should.
That being said, your choices of CBV are limited to either the Pierburg CBV for garrett turbo cars, or the integral CBV found on Mitsubishi turbos.
Pierburg CBV
If you simply must have the ?pshh? sound when you let off the throttle as a calling sign that ?hey, I have a turbo?, you can use a ?Blow-off-valve? which is nothing more than a CBV, but bypassed to atmosphere.
8. CRANKCASE VENTILATION HOSE
Turbo cars have a slightly different crankcase ventilation system than NA cars. You will need to remove the flame trap, but put in place the Y-adapter found on turbo cars. The thick part of the Y should get routed across the engine (either along the back or along the front) to the hose going into the turbocharger. The second smaller hose shown in the pic below gets routed to one of the ports on the intake manifold. This is a decent setup for a beginner and is as how Volvo designed it. More advanced users will consider making the addition of a crankcase oil reservoir to capture the large amount of oil vapors from being pulled back into the engine. The ?catchcan? should have something in it to allow oil vapors to stick, and condense out of the gas phase. Oil has an effective octane rating of 48 and very old Volvo engines will tend to have a good deal of ?blowby? combustion gases making it past the rings into the crankcase? thus lots of oil vapors. Oil catch cans don't have to be fancy... You can make one out of PVC and some hose barbs.
In summary, even if you don't have a catch can, EVERY TURBO CAR MUST HAVE A FUNCTIONING CRANKCASE VENTILATION SYSTEM to avoid excessive crankcase pressure pushing out oil seals.
9. MODIFYING THE IDLE VALVE HOSE TO FIT THE INTERCOOLER PIPE
The NA idle valve extends under the intake manifold behind the engine to the plastic air inlet pipe. Turbo cars have the idle valve inlet in front of the throttle body. You will need to re-route this hose, or better yet, simply replace it with the hose that came from a turbo car.
Make sure to check the hose carefully as they tend to dry and crack with age. A cracked hose that only opens under boost can make tuning and diagnosing a nightmare.
In a pinch, you can use large heater hose drawn down to the size of copper pipe to bridge the gap between the idle valve and the intercooler pipe.
Furthermore, you will need to add hose-clamps to all sections of the idle valve. First time turbobrickers will be enjoying their newfound boost only to have the upper idle valve hose (the j-shaped hose) pop off the intake manifolds. Hoseclamp everything rubber.
10. RE-ROUTING THE AMM WIRES
The air mass meter will need to be repositioned on the passenger side of the engine. To do this, you will actually need to cut some wires. Don?t worry, it?s not many wires and you can always put things back the way you found them. Take the existing AMM terminal end and cut it with about 4-5 inches of wires left on the end. You will be splicing in new wire to get it to mount on the passenger side. You will need about 7 feet of new wire. You can use all the same color if you?re brave. Simply splice the new wire, preferably by soldering and shrink-wrapping, in between the existing harness and terminal end. Use corrugated wire insulation or, flexible-expandable loom to protect it and route it around the back of the engine. 240-740-940 people have large clips on the firewall to hold the existing engine harness in place. If you do yours right, no one will notice the difference and it will look stock.
11. CHOICES. BALLAST RESISTOR AND LOW IMPEDANCE INJECTORS, OR JUST HIGH IMPEDANCE INJECTORS?
OK. Your new turbo will require bigger injectors to meet the new fuel needs of your engine. Education time. There are two types of fuel injectors? high impedance and low impedance (this is a gross simplification as there are actually many types of fuel injectors). Your stock NA engine came with high impedance injectors. Turbo 740-940?s use low impedance injectors coupled with a ballast resistor pack to bring the overall impedance back up. If you will be using the Volvo turbo injectors? either the 756 or 804 315cc greentops, you will need to splice in the ballast resistor pack. It?s not a big deal, but it may be uncomfortable for the newb digging into his/her wiring harness for the first time.
Alternatively, you can find higher flowing high impedance fuel injectors. The most commonly used set equivalent to Volvo ?greentops? are the injectors found on Volvo 850 turbo vehicles? either the 330cc ?redtops? or the other injectors shown here. These injectors can simply be swapped in place of your existing injectors without need for the ballast resistor pack.
If you eventually plan on upping the power a bit, you can safely use 420-440cc injectors in place of the 330cc units. 440cc injectors (44lb/hr) will give you a bit more headroom than the 330cc units and will not adversely effect the fuel injection computer?s tune of the engine.
The injector style you need to fit is the EV1 Bosch shape. There are so many higher flowing injectors out there that it is tough to recommend one, but buying new brings peace of mind. You can find a set of 4 new injectors for about $200. When factoring in the cost of cleaning old used injectors (about $25 per injector), you can often buy a new set for little more. It is sometimes impossible to tell externally that your fuel injector is faulty. Sticking injectors look the same as non-sticking injectors. A stuck open injector can ruin a cylinder as it washes down the oil. A stuck closed injector can melt a piston. Your choice here. Here is a great source for inexpensive, reliable fuel fuel injectors. 440cc (44lb/hr) units shown here.
http://www.diyautotune.com/catalog/delphi-42-lbhr-ev1-style-fuel-injector-hiz-p-274.html
12. HOW TO SPLICE IN THE BALLAST RESISTOR PACK.
240
740/940
13. 2.5 VS 3BAR FUEL PRESSURE REGULATOR
Many non-turbo cars came with a 2.5bar fuel pressure regulator. You will need to replace it with the 3-bar regulator found on turbo cars. These aren?t that expensive new, so consider buying new rather than using old. Unbolt the old one, pop in the new one.
14. WHAT DO I HAVE TO DO ON THE ECU SIDE OF THINGS?
MOST PEOPLE will simply swap the turbo version of the computer in place of the non-turbo computer. You will need the turbo fuel and ignition computers. Don?t just do one, no matter what your buddy says.
HOWEVER. If you have an older LH2.2 equipped 240 with the Chrysler ignition system, you will need to splice in the EZK117 ignition system wires. The Chrysler ignition system is ?way too hot? for a turbo car as a non-turbo engine will require more ignition advance than turbo. The EZK117 conversion is not painful and can be done in a couple of hours. See here for more information.
http://www.turbobricks.com/forums/showthread.php?t=129382
http://www.turbobricks.com/forums/showthread.php?t=100448
NOTE? for those of you looking to do the swap in stages, you can swap in the turbo ecu?s and injectors BEFORE the car is turbocharged. When I did my first +T swap on an 88 740, I ran the turbo ecu?s and injectors with ballast resistor for about a month before the +T happened. It won?t give you any additional performance without the turbo but it will help to eliminate any confusion and stress when you?re ready to stomp on it the first time. Knowing that when you turn the key on your new turbo setup for the first time that it will start and run is big peace of mind.
15. CAN I SWAP FROM LH2.2 to LH2.4?
In a nutshell yes, but there a few key differences that will require attention.
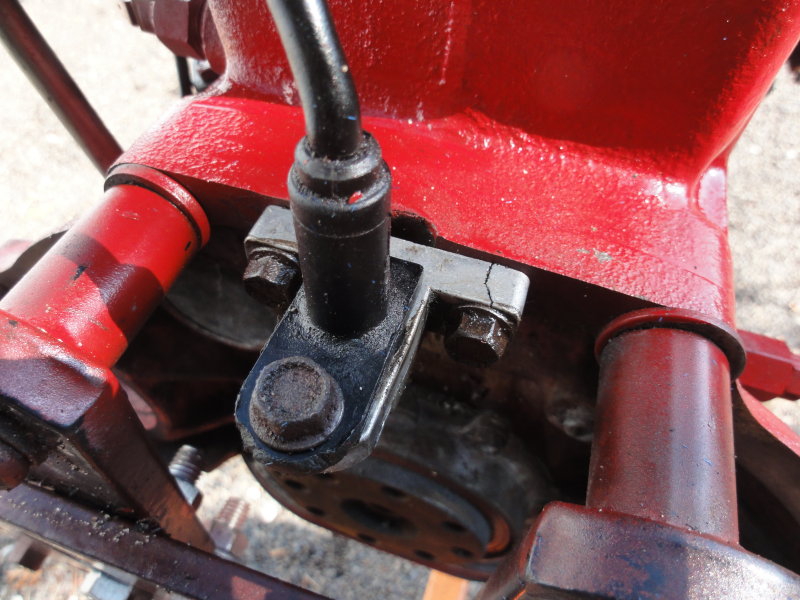
- LH2.4 uses a magnetic crank sensor mounted on the back of the engine over the flywheel/flexplate , LH2.2 uses a hall sensor in the distributor. You must swap to the crank sensor in order to use LH2.4
The crank trigger is shown here mounted to the back of the block.... (incidentally, this is a crank sensor installed on an older b21/b23 series block. I drilled the mounting holes a little too far apart and the bracket cracked... did not affect performance.)
- FLYWHEEL/FLEXPLATE> LH2.4 uses a ?toothed wheel? system with holes cut into the perimeter of the flexplate or flywheel and the crank sensor counts them. LH2.2 uses a similar flexplate/flywheel with no teeth cut into them
- Ignition amplifier is slightly different
- Air mass meter is different
- Fuel and ignition ecu?s are slightly different and have different pinouts on their harnesses.
- An adept swapper with the correct parts could swap over from lh2.2 to lh2.4 in a day?s worth of work.
- 240 people might have it easier because all late model 240?s 1989-1993 use an integral engine harness that has ALL lh2.4 and EZK116 systems connected to one harness. If you?re careful, you can remove a complete lh2.4/ezk116 harness from a 240 in about 20 minutes. If you also got the computers, sensors, AMM, crank sensor, flexplate/flywheel, it would greatly simplify your swap.
16. WHERE ARE THE FUEL AND IGNITION COMPUTERS?
240. 1985-1988. LH2.2 fuel ecu and Chrysler ignition ECU.
? Fuel ecu located to the right of the passenger?s right foot behind the kickpanel.
? Ignition ECU located in engine compartment bolted to windshield washer fluid tank* you will have to upgrade to EZK117K ignition system.
See article here.
? The following part numbers will work
240. 1989-1993 LH2.4 fuel ECU and EZK 116k ignition ECU
? Fuel ecu located to the right of the passenger?s right foot behind the kickpanel.
? Ignition ECU located to the left of the fuel ECU mounted on the firewall.
? The following part numbers will work
740 1985-1988 LH2.2 fuel ECU and EZK117 ignition ECU.
? Fuel ecu located to the right of passenger?s right foot behind the kickpanel
? Ignition ecu located above driver?s right foot behind and below the steering wheel. Mounted upright. ?frustrating to access? at best.
? The following part numbers will work
740/940 1989-1995 LH2.4 fuel ECU and EZK116 ignition ECU
? Same as early 740.
? The following part numbers will work
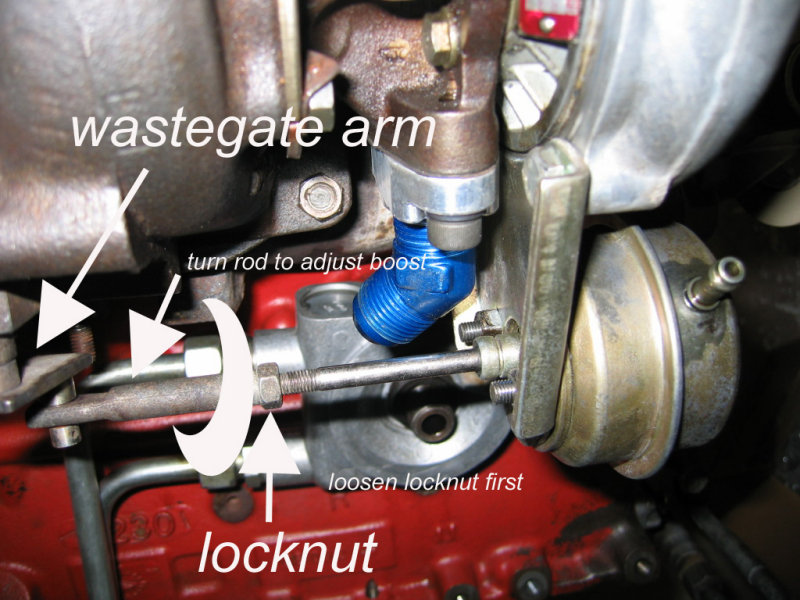
16. HOW DO I SET THE WASTEGATE?
In theory, if you purchased a used turbo from a junkyard, the wastegate is already set at the factory 5-7 psi boost. If you are concerned about this, simply loosen the adjusting nut and turn the rod so it is as ?loose? as possible. You can set the wastegate by using a vacuum pump like you would use for bleeding brakes and set the open pressure when it starts to crack the wastegate open at 5-7psi. A garrett turbo wastegate actuator is shown below. Mitsubishi turbos are adjusted the same way.
This is one of those things the newbie should respect and make sure their wastegate is set up before they stomp on the gas the first time. When the boost needle wraps around past 20 on your first try, it?s too late to go set it. You may have caused some engine damage.
17. DOWNPIPES AND EXHAUST
740/940 people have it easy here as all you have to do is use the 740/940 turbo downpipe. You will have to have someone weld in approximate 5 inches of pipe to connect the downpipe to your existing exhaust. Alternatively, leave the exhaust in place and have material welded onto the downpipe. That way when it comes time, you can simply bolt in your new downpipe and take off instead of waiting.
You can comfortably use the existing non-turbo exhaust. While it is going to be smaller in diameter than the turbo exhaust, you will in no way regret the decision. If you are truly concerned about performance, simple scavenge the entire turbo exhaust from a 740/940 turbo car and swap it in place? assuming you can find a set that is not rusted out. Later when you seek more performance, consider upgrading to a full 3? exhaust from turbo to tailpipe. The stock system will run fine up to the 12-14psi area. Only after that will it start to be constrictive.
18. CAN I STOMP ON IT YET?
Not quite. Make one or two round of double checking fittings for tightness. Especially check the fuel injectors that they are not leaking. Check that all of your intercooler pipes are firmly attached.
Make sure you have premium gasoline. This will be your fate from now on? no more 87 octane regular.
Make sure you have the turbo fuel and ignition computers in place.
Make sure there?s oil in the car.
Make sure the oil feed and return lines are connected and tightened. You?ll know quickly when there?s a gushing river of oil coming out from underneath your car.
Drive normally for the first few minutes. Check the fluids. Check for oil and coolant leaks. Check for engine codes.
Make sure your boost gauge is functioning.
Give it a little boost and verify that the boost does not accelerate to infinity.
Stomp on it. And listen carefully for detonation. It will sound like rocks being shaken in a coffee can. Consider hooking up a set of detcans so you can hear more clearly what?s happening.
Get used to your new car. Start small on the boost. 5psi initially can feel like a million. Take some time before you crank it.