
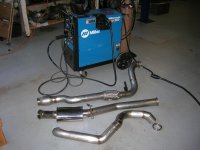
Almost done building a full 3 inch stainless exhaust for my 240. It ended up being over the axle because my resonator ended up pointing that way. I like the look better as it is more stealthy and looks cleaner but making all the extra bends was a bear. I used a 8" flex pipe, Vibrant metallic core cat, Vibrant ultra quiet resonator and MRBP 3" in dual 2.5" out muffler along with 2 vband clamps. Need to pull down the 3 sections and finish welding all the seams and trim the dual outputs. Still a couple a of days before I get to hear it. I will take a few pictures of the sections when there off the car.
-
Hello Guest, welcome to the initial stages of our new platform!
You can find some additional information about where we are in the process of migrating the board and setting up our new software hereThank you for being a part of our community!
You are using an out of date browser. It may not display this or other websites correctly.
You should upgrade or use an alternative browser.
You should upgrade or use an alternative browser.
240 3" stainless over the axle exhaust
- Thread starter yama
- Start date
DanielRogers
New member
- Joined
- Jun 14, 2006
- Location
- Hollywood, CA
very nice!
S
smokeyfan1000
Guest
I like the dual exit pipes from muffler. Cool.
Pulled off the downpipe today and finished seaming all the joints. Also reinforced the front mount which is made from an NA bellhousing bracket with some 3/8 stainless rod. The bracket has some high temperature barbque paint on it. Tomorrow I hope to finish welding up the resonator and over the axle pipe. That's my old downpipe in the back. yuk!!
Attachments
aussyvolvo
Will stalk for money
- Joined
- Jul 12, 2007
- Location
- South Australia
weres your project thread, I wana see more!
- Joined
- Aug 7, 2003
- Location
- San Francisco
PM sent
fisky52688
broken down 240
- Joined
- Nov 14, 2007
- Location
- Cape Cod & Rhode Island
Looks awesome. this is pretty sweet and nice work with the pipe before the cat to tuck it up in the space. I need to hear this
badvlvo
Bad for Babies
- Joined
- Feb 14, 2006
- Location
- Marina, California
Looks pretty good so far.
The Aspirator
It's a girl!
- Joined
- Apr 7, 2003
- Location
- Vinemount, Ontario CANADA
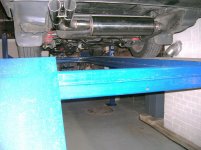
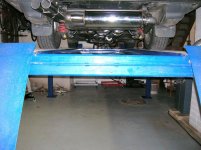
I love the bend up before the cat, I'm sure that helps with ground clearance! I'd love to see a side shot of the clearance when it's all done. Great work dude.
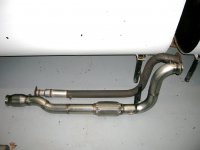
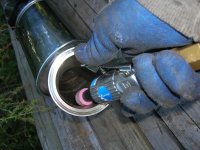
Today I finished welding the seams on the resonator section. The resonator mount is cut from a stock NA resonator. Not shown in the picture but I also cut the not needed corner off the mount and painted it with high temperature barbque paint as its not stainless. My original plan was to make the resonator section and axle section one piece. It wasn't possible to drop the pipe in one piece(bummer) so I had to add an additional vband on the resonator output. Finished welding all the seams on the over the axle pipe but still need to refit the pipe and cut the last V section again due to the added vband. Going over the axle uses 2 extra bends so I had to make 2 of them out of V sections. This is the first time I welded stainless and I was surprised to see that my tank of tri-mix is almost empty with running almost 2lbs of 308L wire. I don't normally like to take a hammer to the sheet metal but adding an additional 1" of clearance for the exhaust was to tempting. I did nice to it after by giving it a fresh shot of undercoating.
Attachments
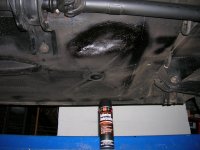
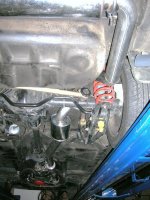
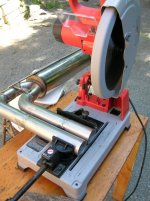
Some pictures of this mornings progress. Labor of love grinding out ridges. Trimming tips with a 14" dry cut saw. Not related but a bottom shot of turbo feed/drain with remote oil filter adapter. Bottom shot of downpipe installed.
Attachments

Last edited:
boosted12a
weapon of mass detonation
- Joined
- Nov 14, 2002
- Location
- gloucester Va
looks great! a bit to clean under there tho. no active rust prevention either.
- Joined
- Sep 18, 2002
You started out ok on the downpipe, but the rest...
You shouldn't just cut the pipe on a miter like that. Cut perpendicular to the bends.
I'd be tempted to re-do the overaxle section personally, that ain't gonna flow well...
You shouldn't just cut the pipe on a miter like that. Cut perpendicular to the bends.
I'd be tempted to re-do the overaxle section personally, that ain't gonna flow well...
fisky52688
broken down 240
- Joined
- Nov 14, 2007
- Location
- Cape Cod & Rhode Island
its 3" how can it not flow well? im guessing there is like no back pressure in this system
FunkyStankyChicken
Rad Panda
- Joined
- Mar 20, 2006
- Location
- Ithaca NY
I think Bondo was refering to the sharp transitions
fisky52688
broken down 240
- Joined
- Nov 14, 2007
- Location
- Cape Cod & Rhode Island
I bet that because the inside of it is so smooth since its polished, that there is very little friction on the inside surface of the pipe. There are no 90 degree bends, the sharpest bend I see looks like 45 excluding the DP
boosted12a
weapon of mass detonation
- Joined
- Nov 14, 2002
- Location
- gloucester Va
no radius, only angles, bondito hasa good point indeed!
- Joined
- Sep 18, 2002
im guessing
Yeah, no ****.