• Hello Guest, welcome to the initial stages of our new platform!
    You can find some additional information about where we are in the process of migrating the board and setting up our new software here

    Thank you for being a part of our community!

The DIY Panhard and Torque Rod Thread

240 Series Adjustable Torque rods:
Tools needed:
right angle drill
1/2 drill bit
3/4 wrench and 3/4 socket
Welder (not really needed on the car, you can do this ahead of time)
Cutoff wheel

Parts needed:
I used link rod and threaded adapters from www.hrpworld.com You'll need 4 1/2X20 threaded inserts and matching rod. This is what I used You'll need about 3 feet of rod.
4 1/2X20 Heim Joints I used these (CM8s)
4 bolts, I used 1/2X20 Grade8 3 or 3.25" long, 4 nuts and washers. Grab a few extra nuts just in case. Also, you'll need 4 Jam Nuts for the rod ends, but any normal nut will work.
Something metal and tubular that is atleast 1/2" ID. 6" is plenty.

Install:

OK, so I bet your wondering why you want to do this. Well, when you lower a 240, it throws the rear suspension geometery off. Everyone knows already about the panhard, but the torque rods also have a negative effect. When the suspension compresses (or is lowered) the torque rods fixed length causes the axle to rotate back, or up if you look at the driveshaft. This not only moves the driveshaft closer to the floor but it also causes the wheels to be moved further back in the wheel wells.

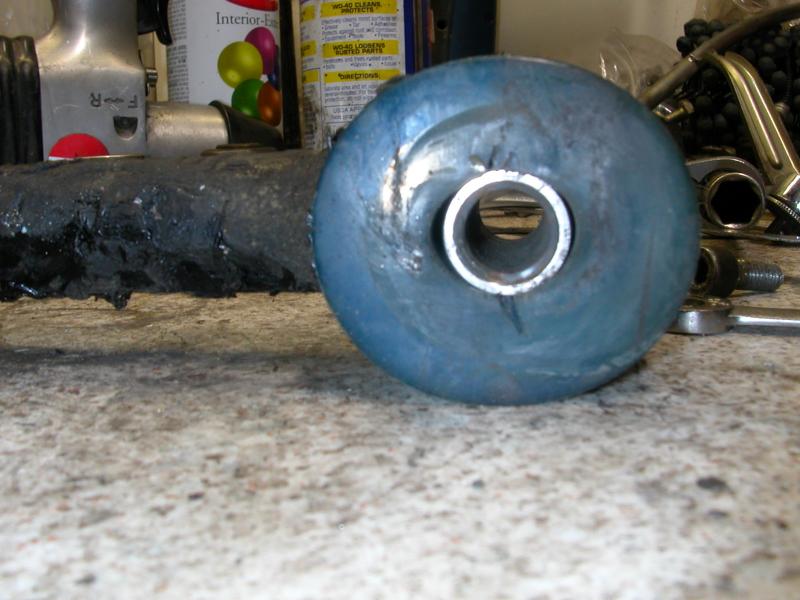
The other benifit is you get rid of the sloppy bushings and replace them with solid heim joints. If your abusing the car at all you've no doubtly turned what was a round bushing, into this:
large.jpg


Mine were not only ovalized, but the mounts were completely cracked through on both sides and both ends!

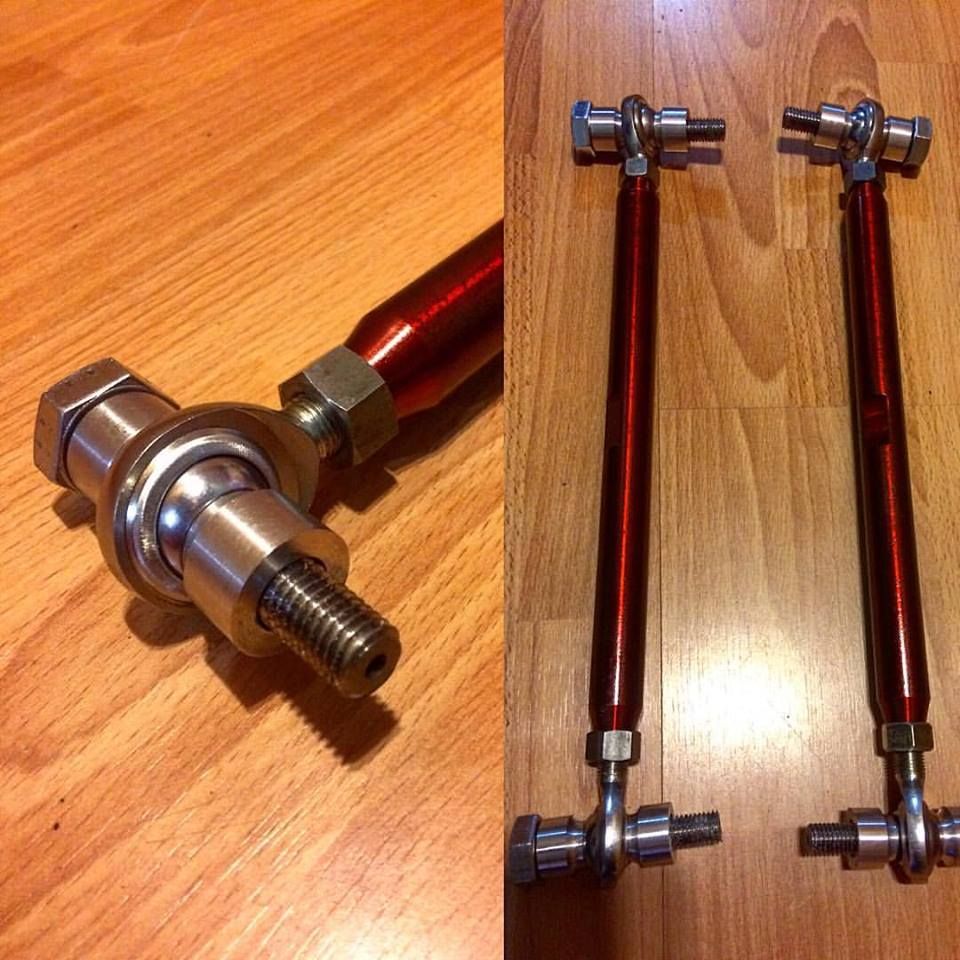
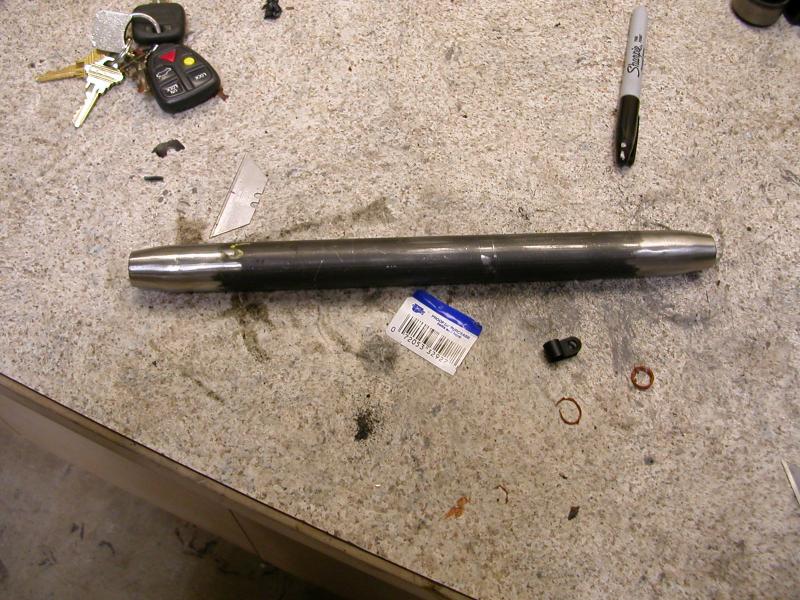
So heres what you need to do. When you get your parts from HRP your going to get the rod in uncut form. What you need to do is cut the rod so that your total length from threaded insert to threaded insert is 12.5". I found this gives plenty of adjustment. Now, you dont cut the rod this long, you adjust for the inserts at both ends.

Then slide the inserts in and have them welded up. You should end up something like this
29255568.jpg


Now like I said, the TOTAL length is 12.5, the adapters you use may vary so be sure to adjust. +/- 1/2 inch or so shouldn't be a problem.

Now, I bet your wondering why you need all the standard stuff. Well, our cars torque rods use Metric bolts, or 12mm's. Problem is, the heim joints are made for US standard, 1/2 which equates to 12.8MM. This gives .8mm slack in the joints. Do NOT think this is acceptable, it will quickly turn the bolt into a pretzel if you try to run it this way.

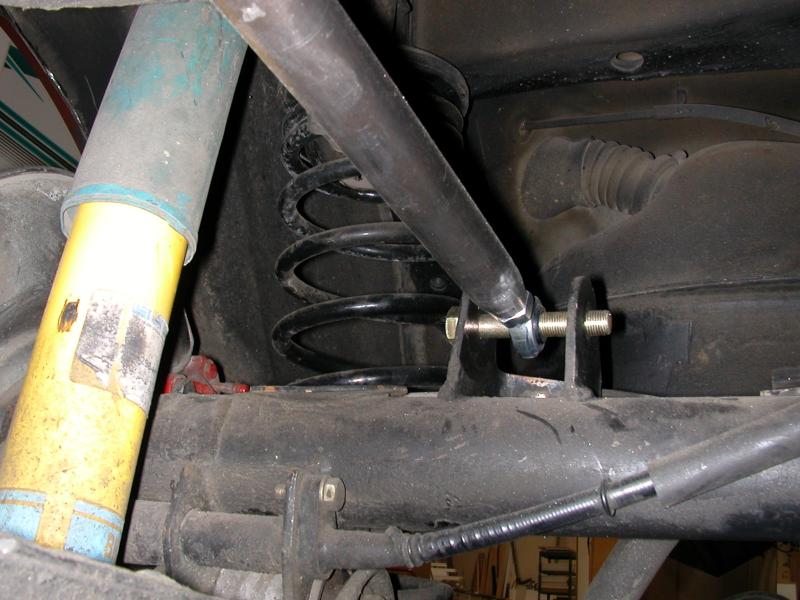
So, heres where the drill comes in. You will have to slightly open all the holes that the former bolts went through. Piece of cake. You should be able to slide your bolt through like this.
29255571.jpg


The car side is a bit more challenging. Obviously, the bolt threads into the frame rail. The outter bracket is easy to modify, so just drill out the frame with the 1/2" drill through the threads. You could probably actually rethread this with a tap for 1/2X20 threads.

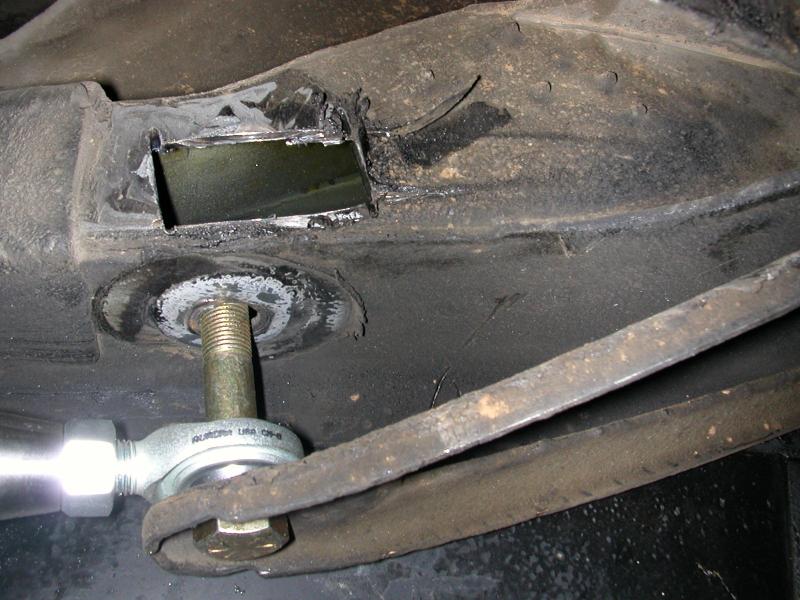
Or, the threaded insert will break out of the frame. This happened to me on one side before doing this anyways. So, what I did was take a cut off wheel and cut a rectangle hole out of the bottom of the frame rail like so:
29255569.jpg


Then, I slid the bolt through, using fender washers on both side and just put a nut on the other end.

Now, before you do this, you can obviously see that theres some "slack" between the rod end and the bolt ends. What you need to do is make some "spacers" to take up the slack. Obviously, your sizes will vary so just do your best.

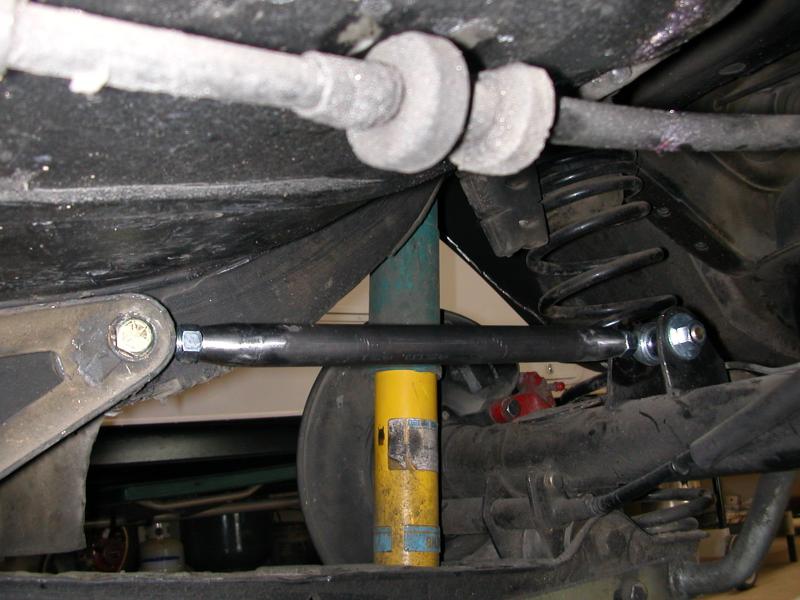
Then, just tighten everything up and you should have this:
29255572.jpg


Adjusting the torque rods:

I found the best techique is to leave one side completely off. Mount the one rod and adjust it where you think you need it. Jack the axle up to just before it picks the car off the jack stands. Look at the side of the car and see abouts where the wheel falls in the well. When you think you've got it close, lower the car on to the ground and see if it looks good. When it is adjusted right, install the other torque rod to the same length.

You should be able to go from this:
29256408.jpg

to this
large.jpg


or even more centered if you want.

Doug

stolen from http://forums.turbobricks.com/showthread.php?t=18565
 
PANHARD ROD:
This critical steel tube keeps the chassis from swaying from side to side as it links the rear axle to the chassis so movement to one another is relative over a wide arc. Trailing arms, torque rods and springs assist the axle attach squarely to the chassis. Therefore, its most important panhard rod bushes are in top condition with no play whatsoever.
Standard Volvo rubber bushes are good hard and rigid, no argument. Polyurethane bushes are an alternative and offered by Noltec, SuperFlex, with Nylon offered by SAM - racecars use uniballs/rosejoints. Tech hint - if upgrading the chassis end panhard bush to a poly unit with steel sleeve, it is recommended you check the play/clearance between the steel sleeve and the securing bolt. A tighter tolerance steel sleeve might need to be made eg. 12.0 mm ID. Tech hint - For the axle attachment end bush, if upgrading to a poly unit with steel sleeve (where a standard rubber bushes are vulcanised to the steel sleeve), a point to consider is the poly bush is free to slide along the fixed steel sleeve and will most likely butt up against the axle which itself is OK, but this means the sleeve is then too long (ie the poly is not being clamped into position. A remedy is to shorten the sleeve a bit and put a larger outside diameter washer at the nut end. From an alignment perspective, if you lower the chassis with shorter spring height, the panhard rod sits closer to a level position, meaning the rod is at its optimum position, moving the chassis a little further left, relative to the axle.

For more precise side positioning of the chassis-to-tire location, an adjustable panhard rod can be fitted that uses a L&RH thread system (eg. 3/4" dia) sourced from a suspension manufacturer/shop, (in Australia - Whiteline #KTB180). Before modification, do your math then hacksaw out a section on the large dia tube (eg 80 mm length), suggest near LH end for adjustment accessability. Machine 2 off supplied nuts on the O.D. for most of their length so they press into ends of rod tube (27.1 mm dia) and have welded-in professionally.
A suggested adjustment reference point is the chassis-rail near the top of rear spring hat, measure inside of tire/tyre to square chassis rail (not inside of guards), make equal, and if required obtain a thrust wheel alignment.I tried a 4 mm shorter rod length and noticed a handling improvement. The Dana diff centre offset is to the right with an offset from chassis centre of approx 32 mm (don't centre the diff, leave as is and use the tire to chassis rail left to right comparison). Hint: to reduce the chance of the nut undoing, secure a wide nylon tie around the shaft thread(s).
 
Keeep in mind there are different ones
TORQUE RODS (REACTION Rods / Upper trailing arms) and BUSHES:
240 series rear suspension is very similar to a four link design being quite reasonable for differential control. Newer style - later model torque rods when fitted with stiffer poly bushes do give increased security on higher speed corners, and offer better diff location control when accelerating out of corners.

Two types of Volvo torque rods exist and function to keep the rear axle/differential square to the chassis and to limit diff windup or rotation.
a) The older type rods, (1975-83?) are fitted with very flexible small diameter curved bushes (also called butterfly or dog-bone due to shape). Replacement butterfly bushes are expensive and very tricky to press in, but the problem is, there's far too much compliance in this small bush for performance use.

b) Newer style torque rods, 1983 onwards, feature a much larger rubber bush of stiffer design. For further bush upgrades, IPD offer an excellent two piece polyurethane unit that features generous side wall diameters, ideal for keeping the axle better located in dynamic use. Super Flex and Energy Suspensions also offer poly torque rod bushes. An option to fitting poly bushes is much harder rubber bush for newer torque rods as used in Volvo Cup competition (x4 req'd) are available from SAM #1273622RF
It's really worth upgrading to the newer rods - a parts recycler being a good source.

Adjustable torque rods - If lowering your car more than usual, the diff nose will be pointed down more than is acceptable for efficient rear uni joint function (do you hear a grumble sound when de-cellerating). You will need to shorten the torque rods to bring the nose up again - an adjustable threaded section is the solution (you want to make the rod shorter by say 5-10mm) and there are many suppliers for Volvo. Under sudden acceleration the diff nose rises a (disturbingly) large amount.
 
Timing.

I'm just about to order a set of Fluro motorsport rod ends (M16) for the torque rods. One end rod ends, other end some kind of rubber bushing. Making the spacers on the lathe to make sure it fits perfectly.

The poly ones in my car are stupid. The ends of the rods are oval now so the poly stuff wont last long.

Still looking for good hardware that one can weld. Just welding some kind of high strength bolt is a no-no for me. Right quality/spec can be welded but need to find a place where I can just buy a few, not 200 in one box.

One can buy rubber boots for rod ends too. I used them before and it helps to make the joints last longer and the annual inspection over here doesn't see shiny motorsport parts.
:nod: YES!
14516411_1128723470551317_3490414896234863140_n.jpg

14517351_1128723473884650_601354753326223922_n.jpg
 
There is also THESE KITS which would work for torque rods.

I'd prefer a larger rode end with adapters to fit down to the 12mm (or 1/2") bolts.

JW240, you should be able to source metric threaded ends in your area.
 

Cool, didn't see those before!

Now I see those I think I could have gotten away with no adjustment on the bushing side but oh well, I ordered LH thread rod ends now (RH was sold out). 30 euro a piece, could be worse for Fluro GALXSW (see google).

JW240, you should be able to source metric threaded ends in your area.

Yes, metric is super easy to find here. Only looking for the weldable 4.6 grade. 4.6 only specifies yield/breaking tension but not how it is attained. Some variants are made from weldable steel, some not. Some will get brittle, some will be fine. Some quick calculations show me that the weld is probably the weakest part in the rod itself, so I want it good.
 
While the Kaplhenke rods are really nice, I think they are overkill for my application (price and tech), and I've read that the IPD rods are a pain due to the fact that they cannot be adjusted without unhooking one side.

Serious question here,

If the Kaplhenke rods are overkill, and the IPD rods aren't worth the hassle... What are you actually looking for?
 
Serious question here,

If the Kaplhenke rods are overkill, and the IPD rods aren't worth the hassle... What are you actually looking for?

By "overkill", I meant that the Kaplhenke stuff is oriented towards the racing/track crowd, whereas my need is more practical. Cost is the main issue, really.

I have a spare set of suspension parts that I acquired from TB'er K-Jets on a Plane and am in the process of re-finishing and pressing new bushings, so it seems like a cheaper option than the commercially available ones. I figured others are in a similar situation, with spares acquired from pick n pull or who have projects that provide the time to pull the parts and do the work.

If money was not an issue, I'd consider the Kaplhenke rods, but then again, I am a tinkerer at heart (as many of us are), and get a certain satisfaction from working with what I have vs. buying something new.

The responses thus far have been fantastic.

There is a new set of torque rods that are being prototyped that is a hybrid setup. It's adjustable without uninstalling and has rubber on one end and the a rod end on the other.

The results so far have been great and they are much stronger than the factory torque rods that tend to oval the eyelets.

They will go on sale as soon as VWtechnician does his up coming drift event in his LS powered welded diff 240 with them on it. Just want to make sure they hold up to some torture.

<blockquote class="instagram-media" data-instgrm-captioned data-instgrm-version="7" style=" background:#FFF; border:0; border-radius:3px; box-shadow:0 0 1px 0 rgba(0,0,0,0.5),0 1px 10px 0 rgba(0,0,0,0.15); margin: 1px; max-width:658px; padding:0; width:99.375%; width:-webkit-calc(100% - 2px); width:calc(100% - 2px);"><div style="padding:8px;"> <div style=" background:#F8F8F8; line-height:0; margin-top:40px; padding:34.212962963% 0; text-align:center; width:100%;"> <div style=" background:url(data:image/png;base64,iVBORw0KGgoAAAANSUhEUgAAACwAAAAsCAMAAAApWqozAAAABGdBTUEAALGPC/xhBQAAAAFzUkdCAK7OHOkAAAAMUExURczMzPf399fX1+bm5mzY9AMAAADiSURBVDjLvZXbEsMgCES5/P8/t9FuRVCRmU73JWlzosgSIIZURCjo/ad+EQJJB4Hv8BFt+IDpQoCx1wjOSBFhh2XssxEIYn3ulI/6MNReE07UIWJEv8UEOWDS88LY97kqyTliJKKtuYBbruAyVh5wOHiXmpi5we58Ek028czwyuQdLKPG1Bkb4NnM+VeAnfHqn1k4+GPT6uGQcvu2h2OVuIf/gWUFyy8OWEpdyZSa3aVCqpVoVvzZZ2VTnn2wU8qzVjDDetO90GSy9mVLqtgYSy231MxrY6I2gGqjrTY0L8fxCxfCBbhWrsYYAAAAAElFTkSuQmCC); display:block; height:44px; margin:0 auto -44px; position:relative; top:-22px; width:44px;"></div></div> <p style=" margin:8px 0 0 0; padding:0 4px;"> <a href="https://www.instagram.com/p/BH4344tjmcq/" style=" color:#000; font-family:Arial,sans-serif; font-size:14px; font-style:normal; font-weight:normal; line-height:17px; text-decoration:none; word-wrap:break-word;" target="_blank">VOLVO / Hybrid / Race. How will you hold the torque? #Kaplhenke #volvo #volvo #volvo240 #swedishmetal #turbobricks #volvospeed #swedespeed #madeinusa #cnc #moriseiki #kaplhenkeracing #bnecomfort</a></p> <p style=" color:#c9c8cd; font-family:Arial,sans-serif; font-size:14px; line-height:17px; margin-bottom:0; margin-top:8px; overflow:hidden; padding:8px 0 7px; text-align:center; text-overflow:ellipsis; white-space:nowrap;">A photo posted by Kaplhenke Racing (@beigepower) on <time style=" font-family:Arial,sans-serif; font-size:14px; line-height:17px;" datetime="2016-07-15T16:21:50+00:00">Jul 15, 2016 at 9:21am PDT</time></p></div></blockquote>
<script async defer src="//platform.instagram.com/en_US/embeds.js"></script>
 
There is a new set of torque rods that are being prototyped that is a hybrid setup. It's adjustable without uninstalling and has rubber on one end and the a rod end on the other.

The results so far have been great and they are much stronger than the factory torque rods that tend to oval the eyelets.

They will go on sale as soon as VWtechnician does his up coming drift event in his LS powered welded diff 240 with them on it. Just want to make sure they hold up to some torture.

Wow, nice!
 
Adjustable torque rods - If lowering your car more than usual, the diff nose will be pointed down more than is acceptable for efficient rear uni joint function (do you hear a grumble sound when de-cellerating). You will need to shorten the torque rods to bring the nose up again - an adjustable threaded section is the solution (you want to make the rod shorter by say 5-10mm) and there are many suppliers for Volvo. Under sudden acceleration the diff nose rises a (disturbingly) large amount.

This is backwards, shortening the torque rod will lower the nose of the diff more.
 
Ben, i have a question for you. The rods you produce, what size rod ends do you use? In my experience I've only been able to find imperial measured ends. (Ie. 1/2", 3/4" etc) This being said, our volvos use metric hardware. what do you do to fix the play?

im a machinist by trade, and did a bunch of research on here before i set to my build.

what i came up with was this
I used 7/8" dia. 4140 steel. I faced them to 12.5" and tapped them to 1/2-20 on one end and 1/2-20 LH on the other. i put a 15* taper on the ends to give clearance around the jam nuts. i then milled a couple flats on the rods for easy adjustment.

but this is where i got fussy, the rod ends i used were 1/2" (0.500") and the hardware on the car was m12 (0.472 usually a little under as a bolt) so thats .028" of slack. I figured sleeves would be too thin, so i went to the fastener shop and picked up a bag of 16mm x 70mm hardened bolts. i threw them in the lathe and turned them down to 0.500". i made them essentially a "tap fit" to eliminate and possible slack. once i had the fit on all four, i simply turned the extra 0.030" off and spun the metric pitch on them. once that was done i machined some spacers with some clearance for the joints.

after putting them in, Im amazed at the difference, any bounce, or axle wrap is just gone! I'm not scared to keep my foot down over the bumps anymore

14359210_10154661974167952_8704578234498715205_n.jpg
 
I mostly use standard sized rod ends because they are much cheaper to source and I can get higher quality units then the comparable metric offerings.

I then pair them with stainless steel reducer bushings to make them the correct diameter for the factory hardware. This works out for the best anyways because the rod ends themselves are not wide enough so you will need a spacer anyways.

what size ends do you put in the ones sold on your website? just curious how thin the bushings are. i realize what i did would not be a very lucrative idea for mass production.
 
240 is 1/2" bore to 12mm bushing but i used a 5/8 shanked rod end so its much stronger than a normal 1/2" shank rod end

takes some skill to make bushings that thin ;-)
 
Back
Top