- Joined
- Feb 2, 2007
- Location
- Falls Church, VA
http://www.turbobricks.com/maint.php?content=art0031
Note: Pics can be enlarged by clicking the thumbnail. Just so you know.
Do you have a 1991+ 740 or 940 with instrument cluster problems? The problems may be intermittent or permanent and generally appear to be electrical. Symptoms may include, but are not limited to, non-functioning gauges, warning lamps that do not light up when the car is started or the key is in position II and SRS light that stays on without throwing any codes.
If you feel your car has symptoms of this nature and you want to repair them, this article will assist in guiding you through the repair.
As a known Volvo certified technician, I've received numerous PM's asking about 1991+ instrument cluster electrical mysteries which I myself could not answer off the top of my head. I've got a long time customer that has been driving with a non-functional fuel gauge for 3 years now. I work on the car often and every time wonder why the fuel gauge and cluster warning lights act the way they do (or don't act at all).
The victim is a 1993 940 Turbo sedan with 240,000 miles on it. The car is in pristine condition and is maintained like a new born child. Ever since I started attending to this customer's vehicle, the fuel gauge has not worked and the cluster warning lamps haven't lit. Sometimes the SRS light will stay on, sometimes it won't come on at all and the only warning light to come up is for the seat belts. The customer had been quoted an exorbitant amount of money by another shop to replace the fuel tank sending unit and remedy the gauge issue. I never questioned this diagnosis because the customer was not interested in further diagnosis. However this week, I let curiosity get to me. I asked if it would be okay if I attempted to repair the cluster under the pretense that if the problem was not remedied the customer would not be charged. We told them that if the problem could be repaired we could charge a minimal amount of labor to cover it. The customer agreed and off I went on a hunch. My hunch was that, like all other Volvo electrical items, a bad solder joint was to blame. The question was just, where?
Here is the cluster showing symptoms before removal. The fuel gauge does not register and the warning lamps do not light, except for the seat belt reminder.


To remove the cluster, pop the metal trim around it out and remove the two screws securing the frame with the cluster in it. The frame and cluster can be removed together and with some careful handwork it will come out. Disconnect all of the connectors from the rear carefully and note which connector belongs in each position. Once the cluster is removed this is what you will see on the rear of it. A printed circuit board with numerous distribution strips and solder joints is present. The arrow points to the affected area which is magnified in the next picture for clarity.

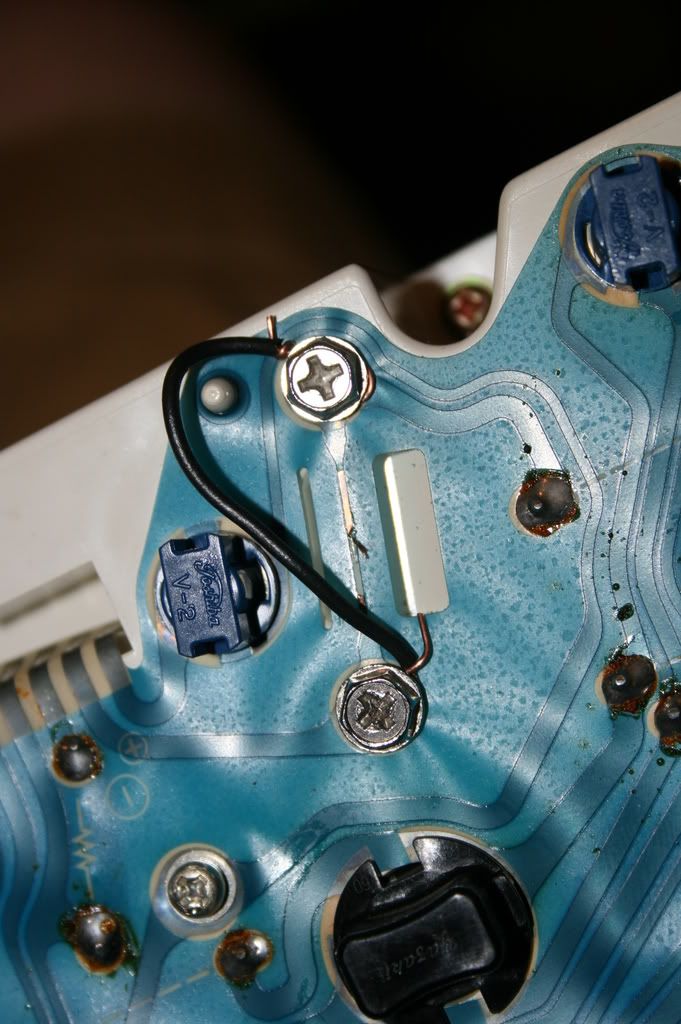
If you have good eyes you may not need one but I recommend a magnifying glass to inspect the solder joints. You are looking for joints that have a break in the solder that prevents a connection from being made on the circuit board. These breaks occur from heat soak and poor solder composition as well as just plain age of components. When I removed the cluster from the 940 and examined it closely, it did not take long to identify the culprit. Here in this picture, the bad joint has been circled for identification.

What needs to be done is simple. Go around the board and reflow a small amount of fresh solder over each of the joints. There are also a few solder joints on the bottom of the circuit board so make sure to get them as well. A pencil soldering iron is all you need and can be had at Radio Shack for about $12, solder is available there as well. Wait for the soldering iron to pre-heat and then touch it lightly up to a joint while lightly touching a bit of new solder to the tip of the gun. Wait for the solder to cleanly flow over the entire joint and make a clean connection. Be careful not to bridge (let the solder expand to another joint, creating a short) any joints. You also do not want to leave a cold solder joint which is an area that is not fully heated to allow the solder to completely flow over the connection. Cold solder joints create resistance and sometimes don't make a connection at all, they also do not last as long if they work at all. After soldering all of the joints, carefully examine your work to make sure all the new solder has flowed over the joints in a clean fashion and that none of it has bridged over to any other joints that it was not supposed to. Take a picture beforehand for your own reference if you would like to see what it looked like before any repairs. This picture here shows a semi-close view of the rear part of the cluster after solder has been flowed over the joints.

Here is the picture of the previously broken solder joint after repairs. Again, a closer view and circled for identification.

So now that the repair is complete, time to test the cluster. I reinstalled the cluster and connected all of the connectors but did not screw it down in case something didn't function or wasn't connected fully. EPIC WIN! All of the cluster warning lights work and BAM gas gauge works! Sweet, I am happy, the customer is ecstatic and if you do this, you will be happy too.
EPIC WIN!

Note: Pics can be enlarged by clicking the thumbnail. Just so you know.
Do you have a 1991+ 740 or 940 with instrument cluster problems? The problems may be intermittent or permanent and generally appear to be electrical. Symptoms may include, but are not limited to, non-functioning gauges, warning lamps that do not light up when the car is started or the key is in position II and SRS light that stays on without throwing any codes.
If you feel your car has symptoms of this nature and you want to repair them, this article will assist in guiding you through the repair.
As a known Volvo certified technician, I've received numerous PM's asking about 1991+ instrument cluster electrical mysteries which I myself could not answer off the top of my head. I've got a long time customer that has been driving with a non-functional fuel gauge for 3 years now. I work on the car often and every time wonder why the fuel gauge and cluster warning lights act the way they do (or don't act at all).
The victim is a 1993 940 Turbo sedan with 240,000 miles on it. The car is in pristine condition and is maintained like a new born child. Ever since I started attending to this customer's vehicle, the fuel gauge has not worked and the cluster warning lamps haven't lit. Sometimes the SRS light will stay on, sometimes it won't come on at all and the only warning light to come up is for the seat belts. The customer had been quoted an exorbitant amount of money by another shop to replace the fuel tank sending unit and remedy the gauge issue. I never questioned this diagnosis because the customer was not interested in further diagnosis. However this week, I let curiosity get to me. I asked if it would be okay if I attempted to repair the cluster under the pretense that if the problem was not remedied the customer would not be charged. We told them that if the problem could be repaired we could charge a minimal amount of labor to cover it. The customer agreed and off I went on a hunch. My hunch was that, like all other Volvo electrical items, a bad solder joint was to blame. The question was just, where?
Here is the cluster showing symptoms before removal. The fuel gauge does not register and the warning lamps do not light, except for the seat belt reminder.


To remove the cluster, pop the metal trim around it out and remove the two screws securing the frame with the cluster in it. The frame and cluster can be removed together and with some careful handwork it will come out. Disconnect all of the connectors from the rear carefully and note which connector belongs in each position. Once the cluster is removed this is what you will see on the rear of it. A printed circuit board with numerous distribution strips and solder joints is present. The arrow points to the affected area which is magnified in the next picture for clarity.

If you have good eyes you may not need one but I recommend a magnifying glass to inspect the solder joints. You are looking for joints that have a break in the solder that prevents a connection from being made on the circuit board. These breaks occur from heat soak and poor solder composition as well as just plain age of components. When I removed the cluster from the 940 and examined it closely, it did not take long to identify the culprit. Here in this picture, the bad joint has been circled for identification.

What needs to be done is simple. Go around the board and reflow a small amount of fresh solder over each of the joints. There are also a few solder joints on the bottom of the circuit board so make sure to get them as well. A pencil soldering iron is all you need and can be had at Radio Shack for about $12, solder is available there as well. Wait for the soldering iron to pre-heat and then touch it lightly up to a joint while lightly touching a bit of new solder to the tip of the gun. Wait for the solder to cleanly flow over the entire joint and make a clean connection. Be careful not to bridge (let the solder expand to another joint, creating a short) any joints. You also do not want to leave a cold solder joint which is an area that is not fully heated to allow the solder to completely flow over the connection. Cold solder joints create resistance and sometimes don't make a connection at all, they also do not last as long if they work at all. After soldering all of the joints, carefully examine your work to make sure all the new solder has flowed over the joints in a clean fashion and that none of it has bridged over to any other joints that it was not supposed to. Take a picture beforehand for your own reference if you would like to see what it looked like before any repairs. This picture here shows a semi-close view of the rear part of the cluster after solder has been flowed over the joints.

Here is the picture of the previously broken solder joint after repairs. Again, a closer view and circled for identification.

So now that the repair is complete, time to test the cluster. I reinstalled the cluster and connected all of the connectors but did not screw it down in case something didn't function or wasn't connected fully. EPIC WIN! All of the cluster warning lights work and BAM gas gauge works! Sweet, I am happy, the customer is ecstatic and if you do this, you will be happy too.
EPIC WIN!

Last edited by a moderator: