• Hello Guest, welcome to the initial stages of our new platform!
    You can find some additional information about where we are in the process of migrating the board and setting up our new software here

    Thank you for being a part of our community!

Air box mod for 240's

Status
Not open for further replies.
Your not being serious are you?
Yes, I am most certainly serious. A 12 year old could have figured it out by now, by just looking at where the preheat heat pipe goes Jacob. Get real.If you're in college surely you have some common sense.

Several members told you it's best to remove it but you refuse to read or listen.

Either you have absolutely no mechanical aptitude or you're trolling. In either case just put the airbox lid back on.

You're likely not ever going to be observant enough/performance oriented enough, to notice the difference until the AMM fails anyway.

No offense, just being honest.


Your actually the one who's trolling. You also were calling me rude things in those pm's which is messed up. Can we please stop? Both of us?
 
Get real Jake, I haven't called you anything rude. You bought something from me, and much like in this airbox mod thread, you had no idea how it worked or how to install it. Mainly because you failed to read the FS thread and do not have mechanical experience or skills.

That's nothing to be ashamed of, there are plenty of things I know nothing about. But I leave them alone too.:lol:

I have tried my best to explain how this air box flapper works, and help you understand exactly in what manner it operates and what it's intended purpose is/was.

But you still don't understand it, so, IMO, you would be best to leave it alone.Before you mess something up & hurt your nice 240.

If you are not a mechanically inclined person, just take it to someone who is. Problem solved.
 
I never called you a bad seller bro. If I recall correctly I have bought things from you in the past. I wouldn't even talk to someone if I thought they were a bad seller, in fact I'd probably go ape ****.
 
I never called you a bad seller bro
Yes you did Jake, in a PM. And you know it. Quit fibbing.

And I do not recall ever having sold you anything before the shift knob adapter. And I'm not sure why you turn on people that try to help you.

now that that is settled. Quit screwing up the OP's thread on airbox mods.
 
Last edited:
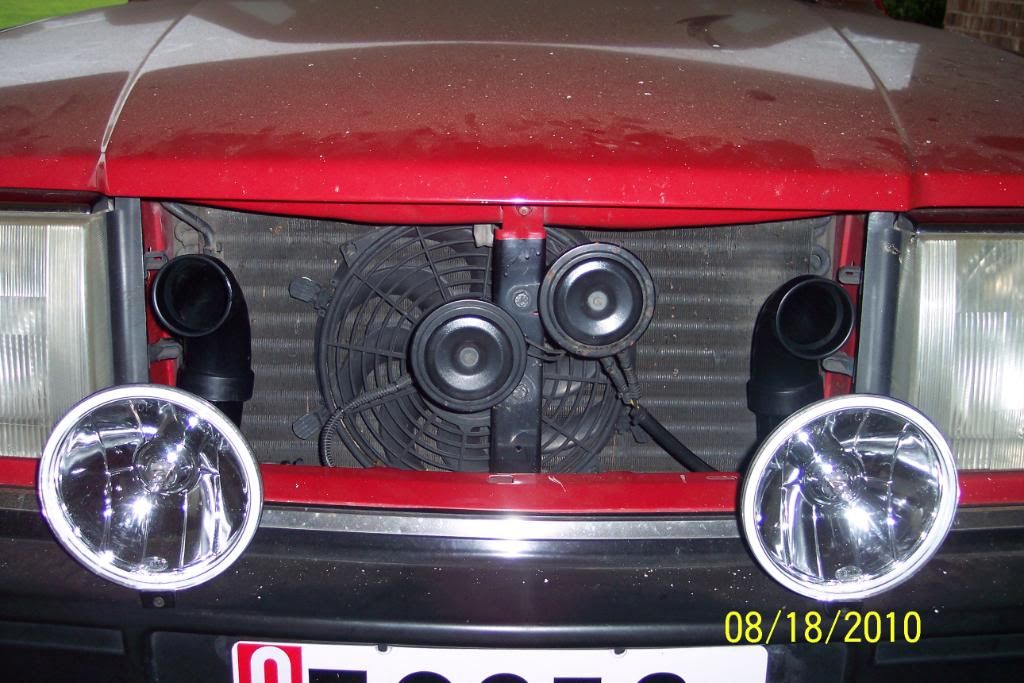
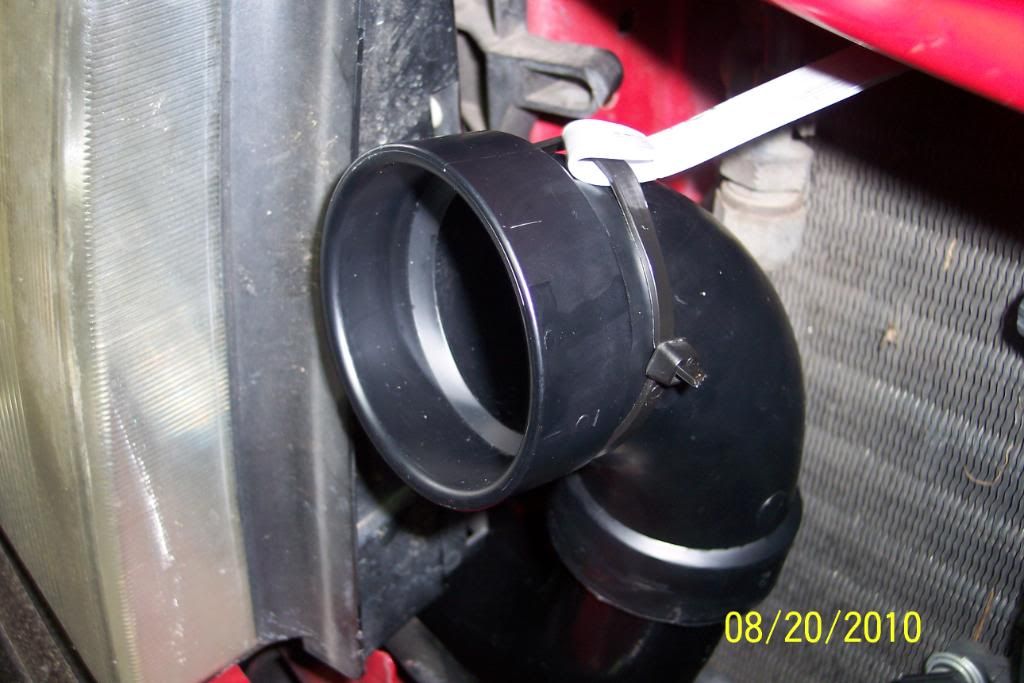
I ran the pre heat hose to here...but i'd like to add the splash pan back on so I may have to cap that hole off..any suggestions though? I tried by the passenger light but it seemed to pinch the lower radiator hose...

If trying by the passenger light, some 240s have a hole that has a plastic plug there.

IINM it is the aibox/intake hose hole for RHD models. Use the same pieces that come off the airbox & through the rad support on the DS, just use them on passenger side.

You'll have to route your old preheat hose in a large arc, and attach it to the pipe at rad support plastic pipe piece with a 140 FI intake plastic hose.

I did a piece on this in showroom a while back. Works OK. (last pics)And ya can still keep the belly pan on as it won't interfere. Or you could keep what you have and cut a U shapeed hole for the pipe in the bellypan..

My 91 240 n/a has the turbo radiator air scoop in the airdam vents. I am currently working on this set up.(pic below).

I used several of the 90* "snorkles" , some early ,which were larger ID on the big end than the 86-93 snorkles)and some late model ones, & cut them to slide inside each other.

I'll have to seal them together with black RTV sealant & use small screws to fasten them securely to each other. I'll have to make a U shaped hole in belly pan to run this set up. The radiator scoop does have a slot in the center where there is not vent in airdam.This positions the open end of pipin pointing up towards the hood, at the base of the radiator/A/C coil That is where it goes through

.Still undecided on this set up though. Ground clearance might be a problem here. not sure yet.

Beneath these pics below is my first set up. And there is two ways you can do it. Notice in the pics underneath these.

100_6304.jpg


100_6305.jpg

This pic is showing the DS pieces used on PS where there is already a big hole in rad suport on my 91 240. I suspect 86-93 is like this

Pic of before installing the DS intake pieces on the passenger side

100_2315.jpg

100_2317.jpg


Behind the grille view.

100_2316.jpg

100_2316.jpg


This way seemed a bit less effective, but was more compact. Again...These are all 240 intake pieces used.
100_2319.jpg


100_2337.jpg


This way worked a little better and seemed to make better power(due to better flow, less 90 elbows I think) & used the 140 snorkle I just happened to have saved.

It needs to be wrapped in a heat protective sheathing to keep it cooler though for best possible results. It's a bit closer to ex. mani.

100_2346.jpg


100_2346-1.jpg


Then later, I cut both snorkles off shorter & RTVed a 90* ABS black elbow on the ends to catch more of the cooler air, and less warm air near the radiator & to give a little "ram air" effect.

100_4918.jpg


100_4919.jpg


How I braced them. I used a 10mm head bolt & existing holes in top radiator support. Aluminum material from Lowes

100_4928.jpg
 
Last edited:
^ It's that car your daily driver? That engine bay is clean

Was my DD up until last year (summer) when I started to rebuild/ repair all it needed to be 100% working again & go another 178,000 miles, only handle much better & be a little cleaner. It was quite clean when I bought it. But it is even cleaner now. When I'm done it will return to DD status.

I've always kept my favorite vehicles in this type of condtion. my 79 245 was this clean at one point.

If I'm going to do all the work on them, I'd rather get really greasy all at one time, and get greasy one time only. You can literally eat off anything under the hood & front suspension. All of it.No lie. Ask percussionist or propav8r. They have seen it "in person".
 
Last edited:
Nice, that is how the inside of my car is starting to be. I have taken apart 95% of the interior, cleaned each piece with aerospace cleaner (one of the best cleaners on the market) followed by steam washing them and re-installing. Clean 240's>any new kind of volvo.
 
I performed this mod here in Illinois where there are no emissions or safety standards. All I have to do is prove that I own the car to drive it which is fine by me! That being said, I just capped off the hot pipe with a pvc cap that I had in my basement. Then I gorilla glued and siliconed it in place. I'll drill a drain hole in the cap tomorrow in case I get rain or snow stuck in there. I also did away with the restricting pipe and replaced it with two 90 degree pvc elbows with the inlet pointing down toward my air damn. No more puddle sucking cone filters and better mpgs and throttle response!

Volvo240airboxmod2_zpscfaa4d97.jpeg


Volvo240airboxmod1_zpsd6f160ac.jpeg

I went a little crazy on the glue, but you can't tell when everything is put together.

Volvo240airboxmod3_zps1dc4d46c.jpg

Painted this black so it doesn't look like I have a toilet in my engine bay anymore.

This is such an easy mod that anybody can and should do to their 240. Just be careful around your inspectors if your car needs to go in!
 
Last edited:
FWIW, A Gerber Baby Food lid, off a small jar of Gerbers, will thread right on the existing lower preheat pipe inlet on the airbox.
 
Yeah I remember you saying that earlier in the thread but I don't have any babies around here. lol I had these leftover pipes though and the cap was about the same exact size as the inlet. It wasn't ideal, but it was free, it functions, and you can't see it.
 
In the cold winter months , the preheat pipe and air box with properly working "flapper valve" will increase the car's gas mileage a bit.

I'm in process of just making another stock "winter duty airbox" and preheat pipe set up. This way I can swap it back and forth as a complete deal. I'll use the stock set upin winter, and my modded one in summer.
 
FWIW in California there's no functional test of the Thermostatic airbox flapper, and inspectors aren't allowed to open up your airbox to look inside.

Mine is glued shut with some flat plastic and the flex hose in place to look stock. Has been for five years, no smog issues whatsoever.
 
I've thrown my pre-heater hose into the trunk but I haven't found a cap for the airbox inlet, is it really necessary to cap it?

I would think that the belly pan would be good enough at keeping junk from getting into the inlet.
 
I've thrown my pre-heater hose into the trunk but I haven't found a cap for the airbox inlet, is it really necessary to cap it?

I would think that the belly pan would be good enough at keeping junk from getting into the inlet.

You can use a piece of the preheat hose attach? to bottom snout on airbox (like stock) BUT routed to the behind the grille area to place a 2nd CAI pipe next to the other/stock one.

That's what did for summer use. Or you can cap it off.

I chose to add the 2nd intake pipe for additional cool air to air box. It seems to help a little in the 3500-5200rpm range but don't expect huge HP gains

Scroll down on both of these links to see how I did it...........

http://forums.turbobricks.com/showthread.php?t=203083&highlight=smokeyfan1000&page=4

http://forums.turbobricks.com/showthread.php?t=203083&highlight=smokeyfan1000&page=5
 
Last edited:
You can use a piece of the preheat hose attach? to bottom snout on airbox (like stock) BUT routed to the behind the grille area to place a 2nd CAI pipe next to the other/stock one.

That's what did for summer use. Or you can cap it off.

I chose to add the 2nd intake pipe for additional cool air to air box. It seems to help a little in the 3500-5200rpm range but don't expect huge HP gains

Scroll down on both of these links to see how I did it...........

http://forums.turbobricks.com/showthread.php?t=203083&highlight=smokeyfan1000&page=4

http://forums.turbobricks.com/showthread.php?t=203083&highlight=smokeyfan1000&page=5

Geez, I was just wondering if I have to cap the hose or if I can just leave it be. I've read most of the articles on your build, and I have little to say that you'd like to hear.

EDIT: I found the answer myself via Google, you only need to cap the hose if you're going in for emissions.
 
Last edited:
Geez, I was just wondering if I have to cap the hose or if I can just leave it be. I've read most of the articles on your build, and I have little to say that you'd like to hear.

EDIT: I found the answer myself via Google, you only need to cap the hose if you're going in for emissions.

Unsure why or where you caught the bad attitude dude.. but it's your car ....fix it like you want to.

I don't care how you do it.:rofl: BTW let's see some pics of your 240
 
Last edited:
Unsure why or where you caught the bad attitude dude.. but it's your car ....fix it like you want to.

I don't care how you do it.:rofl: Nor do I care what you think of my 240............

I didn't mean it negatively, just that I had a pretty basic question and I got a bit of an unexpected answer, but I've read up on your build already.

I think I'll just replace the main snorkel with something bigger, a bit concerned with colder weather though.

I'll get some pics up at some point, for now its not a big looker, needs a cleaned headlight and new weather stripping among smaller things, nowhere near as clean as your car.
 
Last edited:
Status
Not open for further replies.
Back
Top