• Hello Guest, welcome to the initial stages of our new platform!
    You can find some additional information about where we are in the process of migrating the board and setting up our new software here

    Thank you for being a part of our community!

Kjet air flow sensor plate malfunctioning?

QueenTheCar

New member
Joined
Dec 18, 2020
Hi guys,

This is my first post here, but yall have been a great resource since i started restoring my 1979 245 dl. I'm new to working on cars, not to mention k-jet. haven't found the need to post until now simply because there seems to be a thread about everything anyone would want to know. Since this car hasn't ran in 18 years and was very leaky before that I decided to replace the head gasket and do a valve job while i'm at it.

here's my question:
The air sensor plate in the air-fuel control unit isn't lifting up when I pull on it (seems like the plate may be hitting the edge of the venturi), but does go down slightly when I press it. I know on b21fts and v6 engines the plate goes down, but on b21f engines, shouldn't the plate lift upwards bc the airflow is upwards?

qRP9FTz

4Y49vMm


Basically i'm wondering whether there's something wrong with the afcu or if my understanding is flawed.
 
The inside of the fuel distributor where the plunger is for the fuel is completely gummed up from sitting all those years. So it won't let you lift up the plate and it's best not to force it. It is possible that the airflow plate needs to be centered. Your best bet is to remove the fuel distributor and clean where the plunger moves. Be very careful not to drop the plunger when you get it out after cleaning the gunk out. Buy an assortment of sealing washers for all the fuel connections. It's best not to reuse them. You may also have clogged injectors from sitting as well. So get a set of injector seals, too. And test the injectors for spray pattern. Don't forget a new fuel filter. The fuel distributor is held onto the airflow box with screws after you remove the fuel lines. Good luck with it.

You'll want to get or make the fuel system pressure test rig for kjet. It'll help diagnose any fuel problems with pressures in the system.
 
@dl242gt thanks for the quick response. It was crazy helpful! Probably would've taken me weeks to realize that the problem is in the distributor. I'll take ur advice on getting new sealing washers too. I originally was planning on using the old ones, but don't want any leaks! I think ur right about the distributor plunger being gummed up but if that's not the problem I'll try re-centering the plate. Thanks again.

didn't know the Grp A volvos used kjet!
 
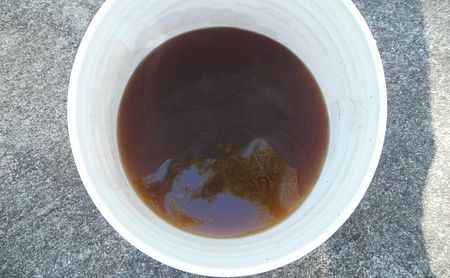
I've lived the life you are beginning resurrecting a '81 PRV after 19 years in a hay barn. DO NOT ATTEMPT TO START this car before flushing the fuel system from the tank through the filter.

What may lurk in the tank will destroy everything ahead of it.

045982e2-519a-4e52-8c8b-fce827949d6f.jpg


That is the last gas pumped out of the tank by jumping the pumps.

PB181388.jpg


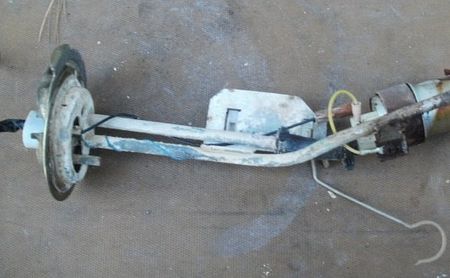
That is the last gas poured out of the tank after removal. Elroy, the previous mechanic bent the pick up tube on the lift pump so there was always this at the bottom of the tank.

PB101373.jpg
 
Last edited:
Man, that fuel is nasty!

Glad to know you've rescued a car that was sitting even longer than mine. That makes ur advice super valid! :)
No way am I gonna start this car anytime soon, just by disconnecting the fuel distributor hoses I could smell that stuff smells nothing like gasoline anymore.
I was planning on siphoning out the gas and then dropping the tank to clean it outside of the car. Would u say thats a safe plan?

Also, should i replace the fuel lines even if they look fine?
 
First step depends on how much gas is in the tank. If you can remove the tank with whatever is in there that would be best. If it is too much weight to handle remove the hose from the back of the pressure pump and jump the lift pump to pump it dry.

You are going to want to replace that pump anyway. May, probably, end up replacing both pumps. I ended up replacing everything from the gas cap, since it was lockable and I didn't have a key, to the injectors. Except for the fuel lines.

I have lots of documentation on what I went through. Start here:

http://forums.turbobricks.com/showthread.php?t=269630

After I got tank and pumps replaced I pumped several gallons of gas up to the filter and into a white bucket to confirm that there was clean gas coming through.

Here is link to the whole restoration thread. On the first page are links to a number of daughter treads but a lot of information is buried in the 751 posts.

https://forums.turbobricks.com/showthread.php?t=256460

I hope this is a labor of love for a hobby project because you are going to dedicate a great deal of effort to this.
 
Last edited:
Yeah man! Again, thanks for all the info. I'll definitely be referencing ur 262 build throughout this restoration. I'm starting to learn that everything takes longer than u think it will. With every step of the way emerge a bunch of other problems.
I would like to say this, however. The more I work on the car, the more attached to it I become! So, it's definitely become a labor of love of some sort.

I dealt w/ old fuel issues on one of my cars I stored over the winter. Picked up an inexpensive hand syphon(siphon) device which worked great for removing 12+ gallons of stinky fuel. I also purchased an extra length of clear plastic tubing for the job. Very handy device that was under $10.

;-)
 
Also, look at the bottom of the tank. You might find something that looks like a phillips screw somewhere in the middle. That's your drain plug. Get a large pan underneath, then unscrew that. Expect the varnish to start pouring out of the hole.
 
Also, look at the bottom of the tank. You might find something that looks like a phillips screw somewhere in the middle. That's your drain plug. Get a large pan underneath, then unscrew that. Expect the varnish to start pouring out of the hole.

Been a while since I owned a pre-86 240, I forgot about that drain plug. No drain plug on my 1992(nor the 1980's BMW)

:-P
 
Been a while since I owned a pre-86 240, I forgot about that drain plug. No drain plug on my 1992(nor the 1980's BMW)

:-P

Good to know! I checked the bottom of the tank a while back but didn't see a drain plug, so either i missed it or for some reason there isn't one even tho it's a '79. A drain plug would definitely make the job easier. Thanks to your reccomendation I now have a siphon pump ready to go too.

In the meantime, I was finally able to get the last of the three fuel distributor screws loose after 4 days of soaking it in penetrating oil. Turns out the plunger is completely frozen in place just like dl242gt said.
 
When the 75 came to me, it was running but not great. It sat for years somewhere before the previous owner got it. The fuel system was a mess and the tank was rusted out. I literally swapped out everything in the fuel system. Not worth the headache of having some clean"ish" parts that will eventually foul up the distributor again. I swapped out all the lines also. Even though they are polylines that can probably just be cleaned out with spirits. The distributor has very small filters covering the tiny slots, they clog up pretty easily if you do not maintain it. Just me experience with kjet cars.
 
Back
Top