• Hello Guest, welcome to the initial stages of our new platform!
    You can find some additional information about where we are in the process of migrating the board and setting up our new software here

    Thank you for being a part of our community!

YASVT (Yet Another Sixteen Valve Turbo) - now 16V Whiteblock (LS)

Certainly no desire to see an aluminum oil pan hanging down below the crossmember.

This won't be a very fast project, I'm just going to take my time pulling the heads and pan, gapping the rings, swapping the cam (and bearings?), replacing the valve springs, ARP head studs and MLS gaskets.
 
Certainly no desire to see an aluminum oil pan hanging down below the crossmember.

This won't be a very fast project, I'm just going to take my time pulling the heads and pan, gapping the rings, swapping the cam (and bearings?), replacing the valve springs, ARP head studs and MLS gaskets.

Have you seen dirty mechanics stuff.... going for 4 digit power ?
 
I would just use stock head gaskets and bolts, I will say this, get a new cam retainer plate, oil barbell and rear cover gasket. that is what ended up being my low oil pressure issue which caused 2 spun cam bearings. I wouldn't mess with the rings unless youre looking for massive power
 
I'm not sure if I will be able to use the oil pan on it or not. I think the Hummer pans are used a lot in swaps into old cars that need small rear sumps, but it might be a little too tall still.

OILPAN_HUMMER.jpg
Using the STS mounts, the Holley pan is exactly even with the bottom of the crossmember. You want the Holley pan :nod: 
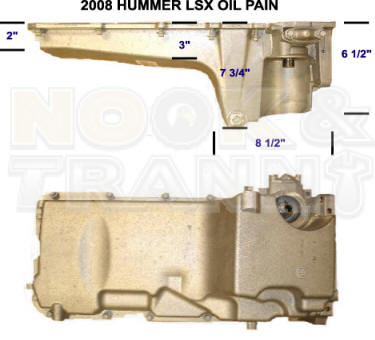
(otherwise, you'll still need to shorten and reweld the H3 pan, just like people do with truck pans, or notch your crossmember to use an F-body pan). The H3 pan will probably work though, as long as you aren't too low to the ground or find anything to high center on.

Fake edit: Related, in a Chevelle: https://ls1tech.com/forums/conversions-hybrids/1884174-holley-302-1-vs-302-3-a.html
 
Last edited:
Certainly no desire to see an aluminum oil pan hanging down below the crossmember.

This won't be a very fast project, I'm just going to take my time pulling the heads and pan, gapping the rings, swapping the cam (and bearings?), replacing the valve springs, ARP head studs and MLS gaskets.

Why? Honestly, if it ain't broke, don't fix it. Make sure anything that's designed to keep oil in, looks good, then slap it in there.
 
I always wanted a ride in this car with redblock power. Not gonna fault you for going LS tho.

I'll probably leave the redblock in it until late summer/fall of next year. Probably. Maybe. The 16V is all together again and running pretty well.
 
Why? Honestly, if it ain't broke, don't fix it. Make sure anything that's designed to keep oil in, looks good, then slap it in there.

Maybe I need to go read the sloppy wiki. I thought a little gapping of the rings was a good idea if you were going to throw some boost at it.

I'm not planning on anything crazy, just modest levels of boost, maybe 500 - 600 hp. Of course, the general pattern in the past is that you gradually get used to a certain level of HP, and then you want some more.

EDIT: And I looked, it does have 799 heads. I guess the LH8 is a sort of mutt. It was an early Gen 4 that still used some Gen 3 parts. Basically a Gen 4 bottom end (58X, bigger rods) and Gen 3 heads/cathedral intake. And none of the more complicated Gen 4 stuff like variable valve timing or cylinder deactivation.
 
Last edited:
E85 is not hard to find around here at all, I've been running the 16V on it for years.

From what I read/see the Nissan CD009 shouldn't have any real issues with that level of tq/hp. There are some really high HP cars still running stock CD009's.
 
Pulled the intake and exhaust manifolds off. Two exhaust bolts on the driver side were already broken off, one on the passenger side was still there but broke off at the *slightest* nudge with a wrench. So 3 broken off bolts to work with. Yay. :/

All on the ends of the manifolds. And apparently not causing any leaks - even on the driver side where they'd (from the looks) been broken off for a long while.
 
Yeah, it seems to be a pretty common occurrence.

One protrudes by a good 1/4 inch, easy peasy. One is flush, easy enough. One is somewhat down in the hole, I'll be mildly nervous on that one.
 
Pulled the intake and exhaust manifolds off. Two exhaust bolts on the driver side were already broken off, one on the passenger side was still there but broke off at the *slightest* nudge with a wrench. So 3 broken off bolts to work with. Yay. :/

All on the ends of the manifolds. And apparently not causing any leaks - even on the driver side where they'd (from the looks) been broken off for a long while.

they're m8x1.25 bolts, but they have like 10mm heads on em iirc.
 
Certainly no desire to see an aluminum oil pan hanging down below the crossmember.

This won't be a very fast project, I'm just going to take my time pulling the heads and pan, gapping the rings, swapping the cam (and bearings?), replacing the valve springs, ARP head studs and MLS gaskets.


don't touch the cam bearings, they all look like ****. don't look at em, just swap the cam and keep going. (unless of course, a bearing comes out with the cam. then, I dunno)

don't touch the rings. I didn't fool with it on mine, no pcv, virtually no blowby even after a couple high boost mistakes. My engine came to me with a reported 120k, and it looked good on the inside. Should've replaced the lifters tho.

DO:
replace the lifters/trays
springs/retainers

I used arp head bolts with mine, got em cheap from a local(new)
 
Back
Top