• Hello Guest, welcome to the initial stages of our new platform!
    You can find some additional information about where we are in the process of migrating the board and setting up our new software here

    Thank you for being a part of our community!

Volvo 122S Build Thread: Scope-creep the Sequel

<iframe width="560" height="315" src="https://www.youtube.com/embed/fD8TTDJZuD4" frameborder="0" allow="accelerometer; autoplay; encrypted-media; gyroscope; picture-in-picture" allowfullscreen></iframe>
 
In a typically Canadian fashion - Sorry for the delay. Updates? This one is more like scrambled eggs than fine cooking, but here it goes.

We left off with the following done:

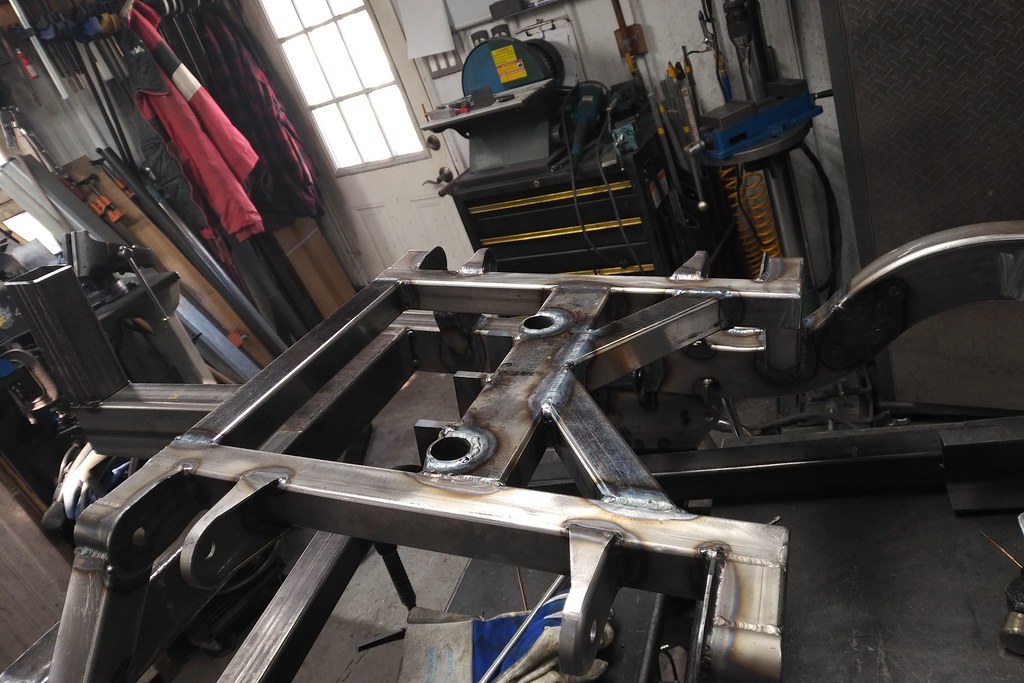
I had fabricated these diagonal parts to further strengthen the K member.

40584212933_5709c23200_k.jpg


Clearance is just what I was after - so I'm happy (a rare emotion in the last month).

40584212953_da62626255_k.jpg


But I ended the episode by saying that I wasn't going to pull the frame to weld it all up until I was done with the details. You'll always miss a few details in a build, but I do try to get things wrapped up in a more orderly fashion these days. So there were/are a million things to address.

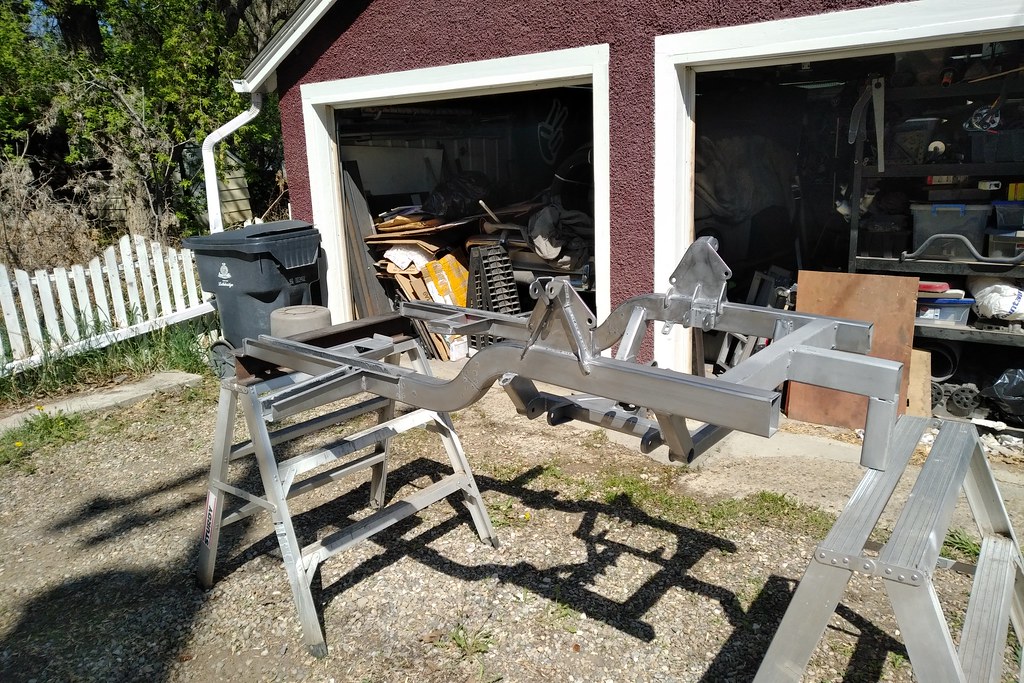
The first was to actually get this frame perfectly centred. Now, when it went in before, the outriggers to the A pillar were keeping the frame from squaring perfectly. It was 1/16" but it would have kept me up at night. So I had to hack the end of them off. Recall, I made these parts - you can jack the car on them - but they should have been installed once the main rails were squared not before - my bad.

Here's the before.

32607820947_6794867a0b_k.jpg


And after - dead on 12.5":

47550193331_133c39f5ad_k.jpg


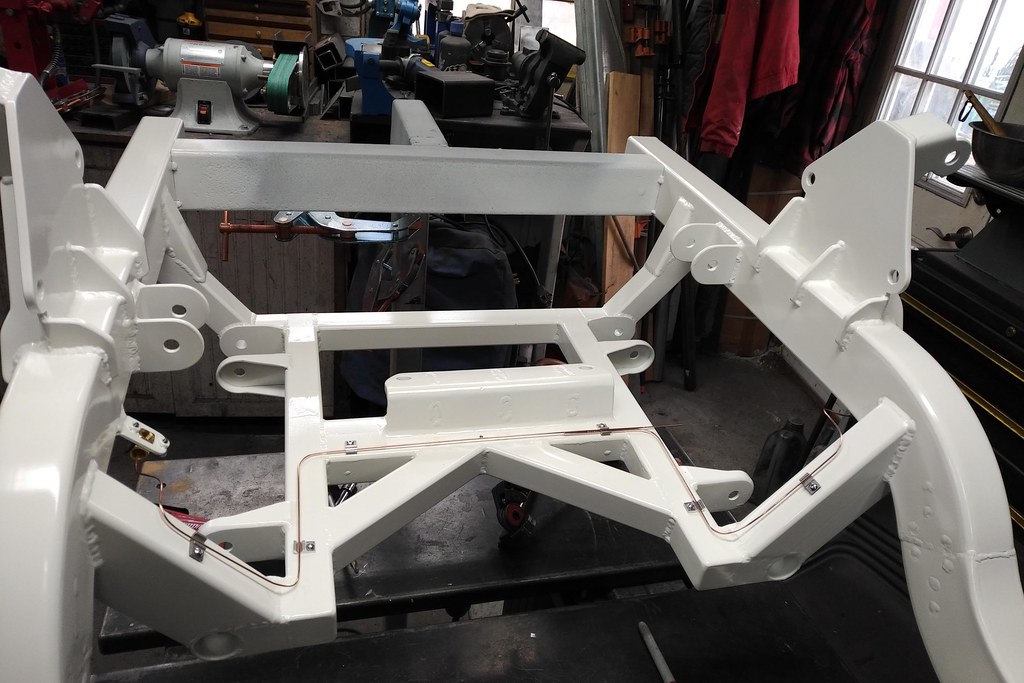
Now the outriggers are a little short (the plasma will do that). So I fabricated these extensions because I don't believe in gobby nasty MIG welds. They fit up inside the outrigger and slide out to the sill.

47550193691_0c4aa8d1e0_k.jpg


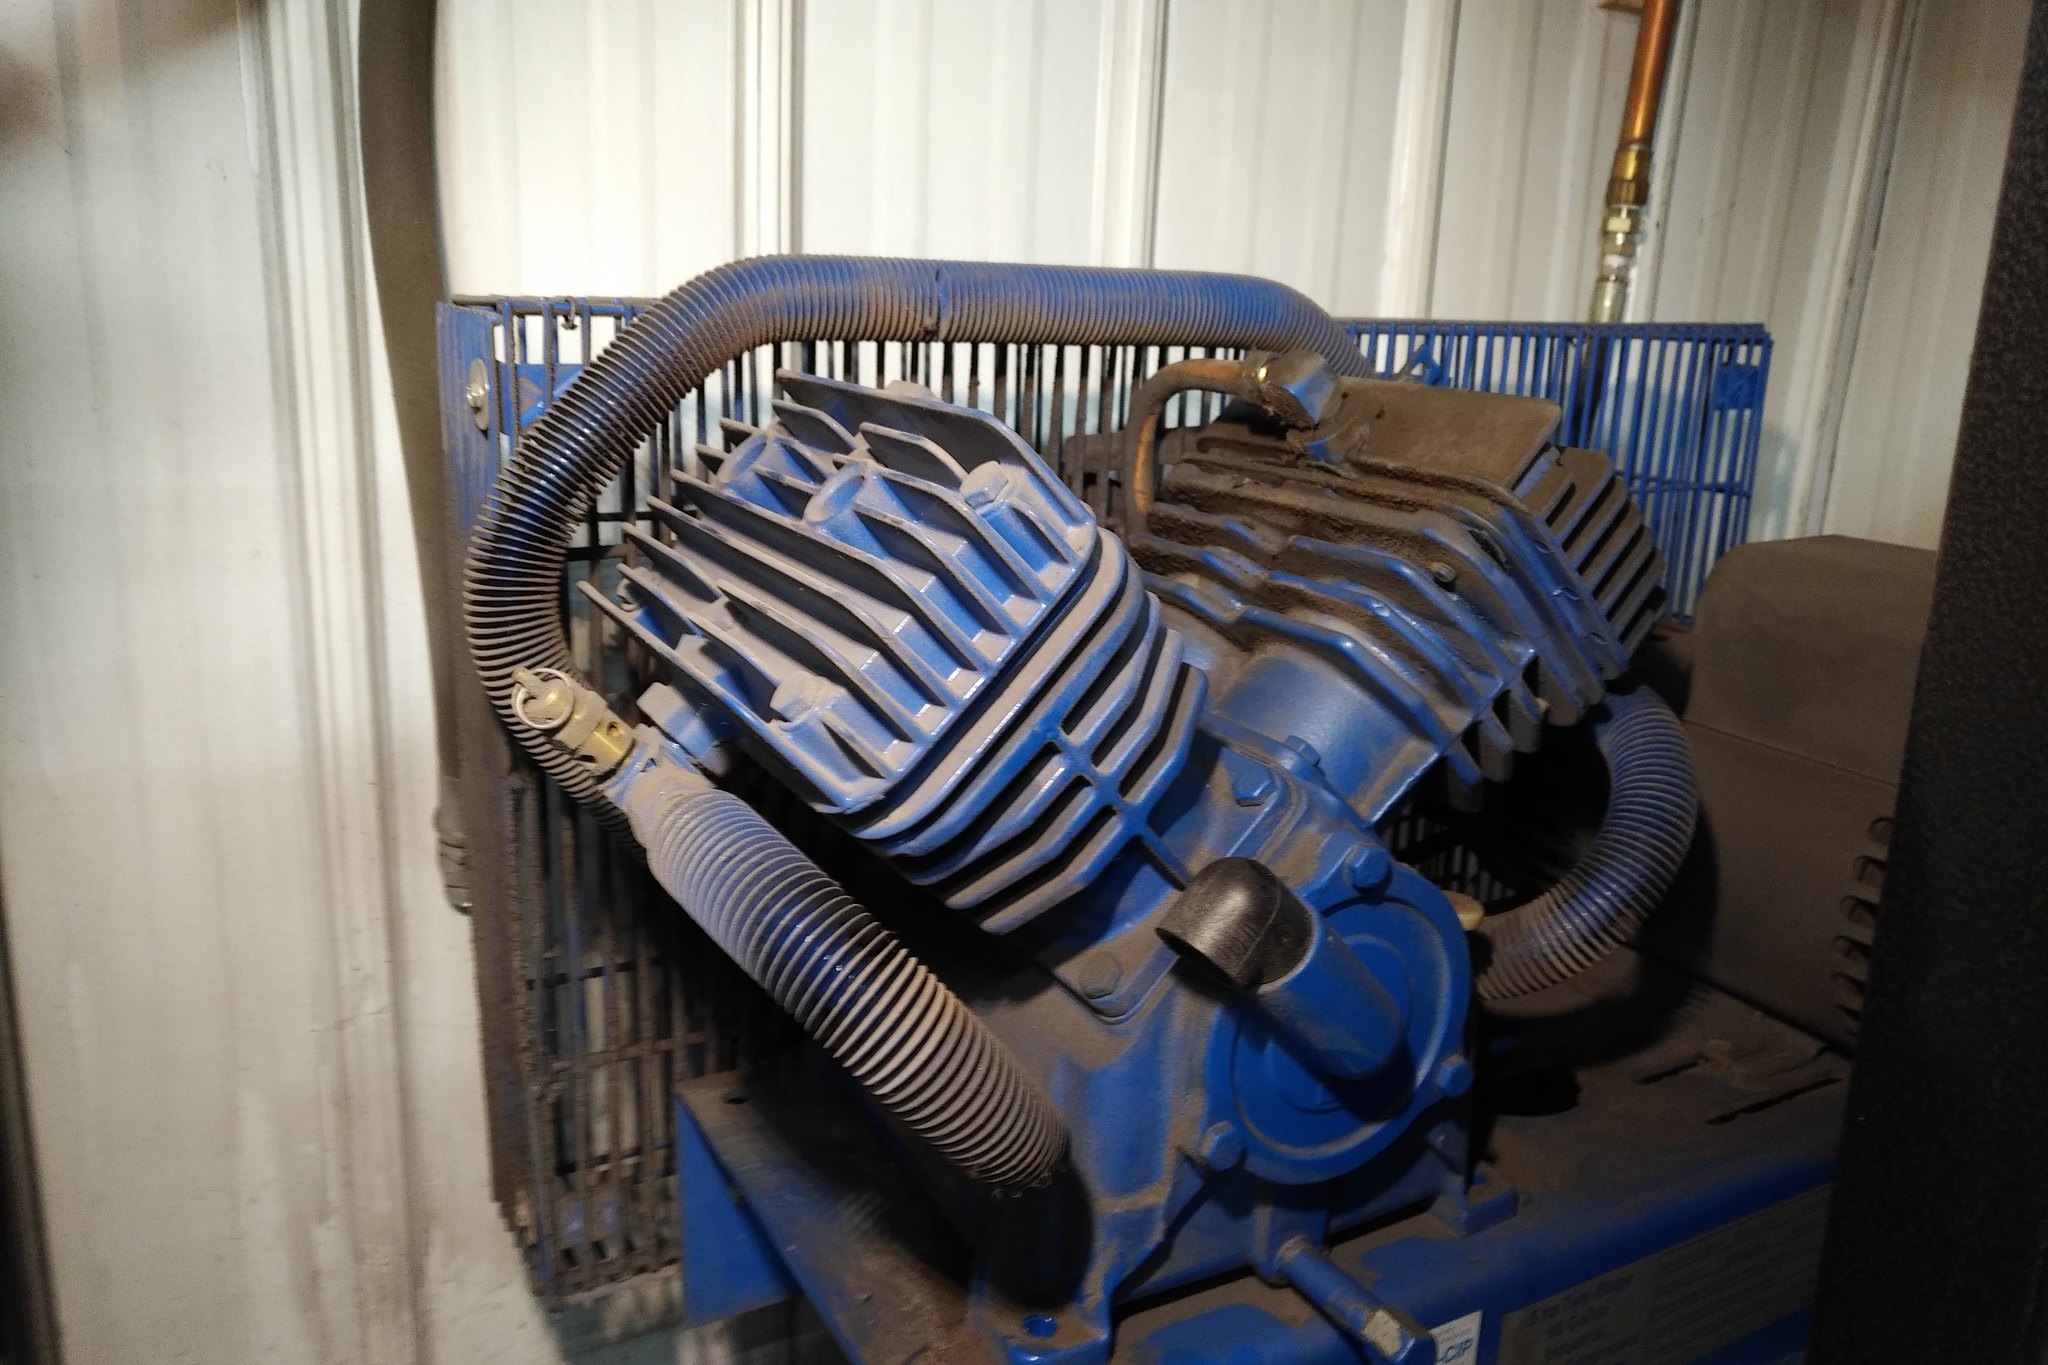
Then this happened...

47550191941_766b1dbe7f_k.jpg


My "Made in the USA" Quincy QT-54 - 50,000 hour compressor pump took an epic dump. FFS - I can't work without air. It filled the garage with an oily mess that landed on top of my already dusty nightmare.

So I had to ditch that junk (probably 2000 hours on the pump by the way - so about 48,000 short of the promise. The pump is made in China - go figure).

This meant a weekend was killed cleaning stuff and getting the new Rolair Chinook K28 (made in Italy - you can tell by the care taken with the paint - LOL) industrial pump.

47550191131_273e191229_k.jpg


Somewhere in all of this, the ARB brackets got welded.

40584212763_f772a819c5_k.jpg


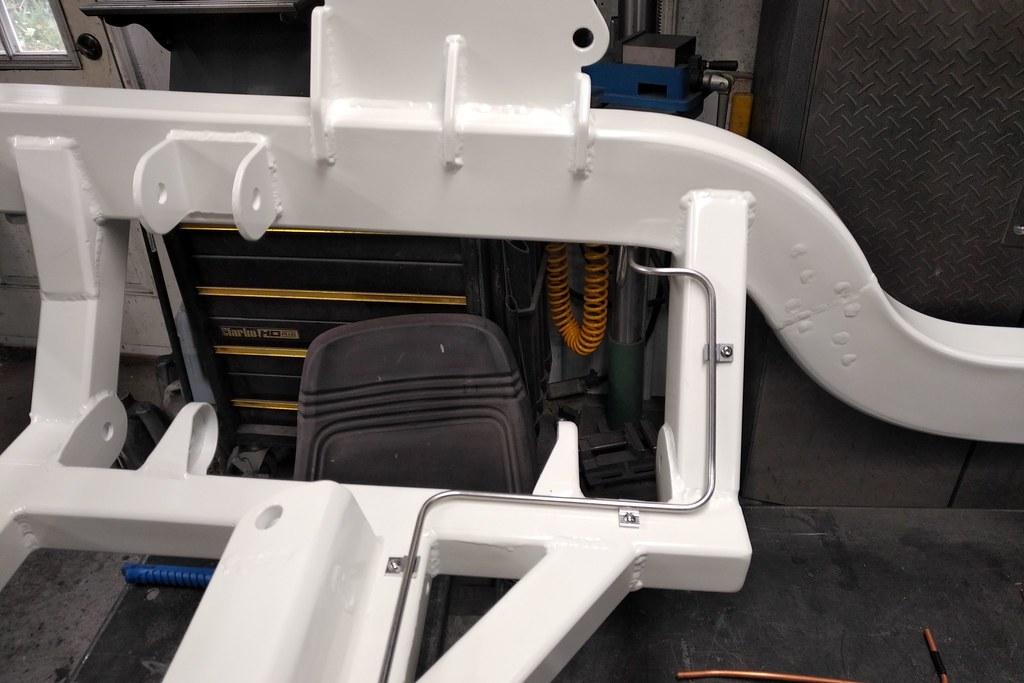
Then when waiting for parts and the snow to melt, I started finishing off the details - like where is the plumbing going. That meant I had to find my spare bell housing, hydro throw out bearing, adapter and trans snout. The lines have to go somewhere. Then there was waiting for the brake lines to come in.

The All Star off the shelf brackets to hold these lines didn't fit the damn clips - seriously - I tried folks. Takes time to build your own brackets. but here they are.

47550193081_b08f54686d_k.jpg


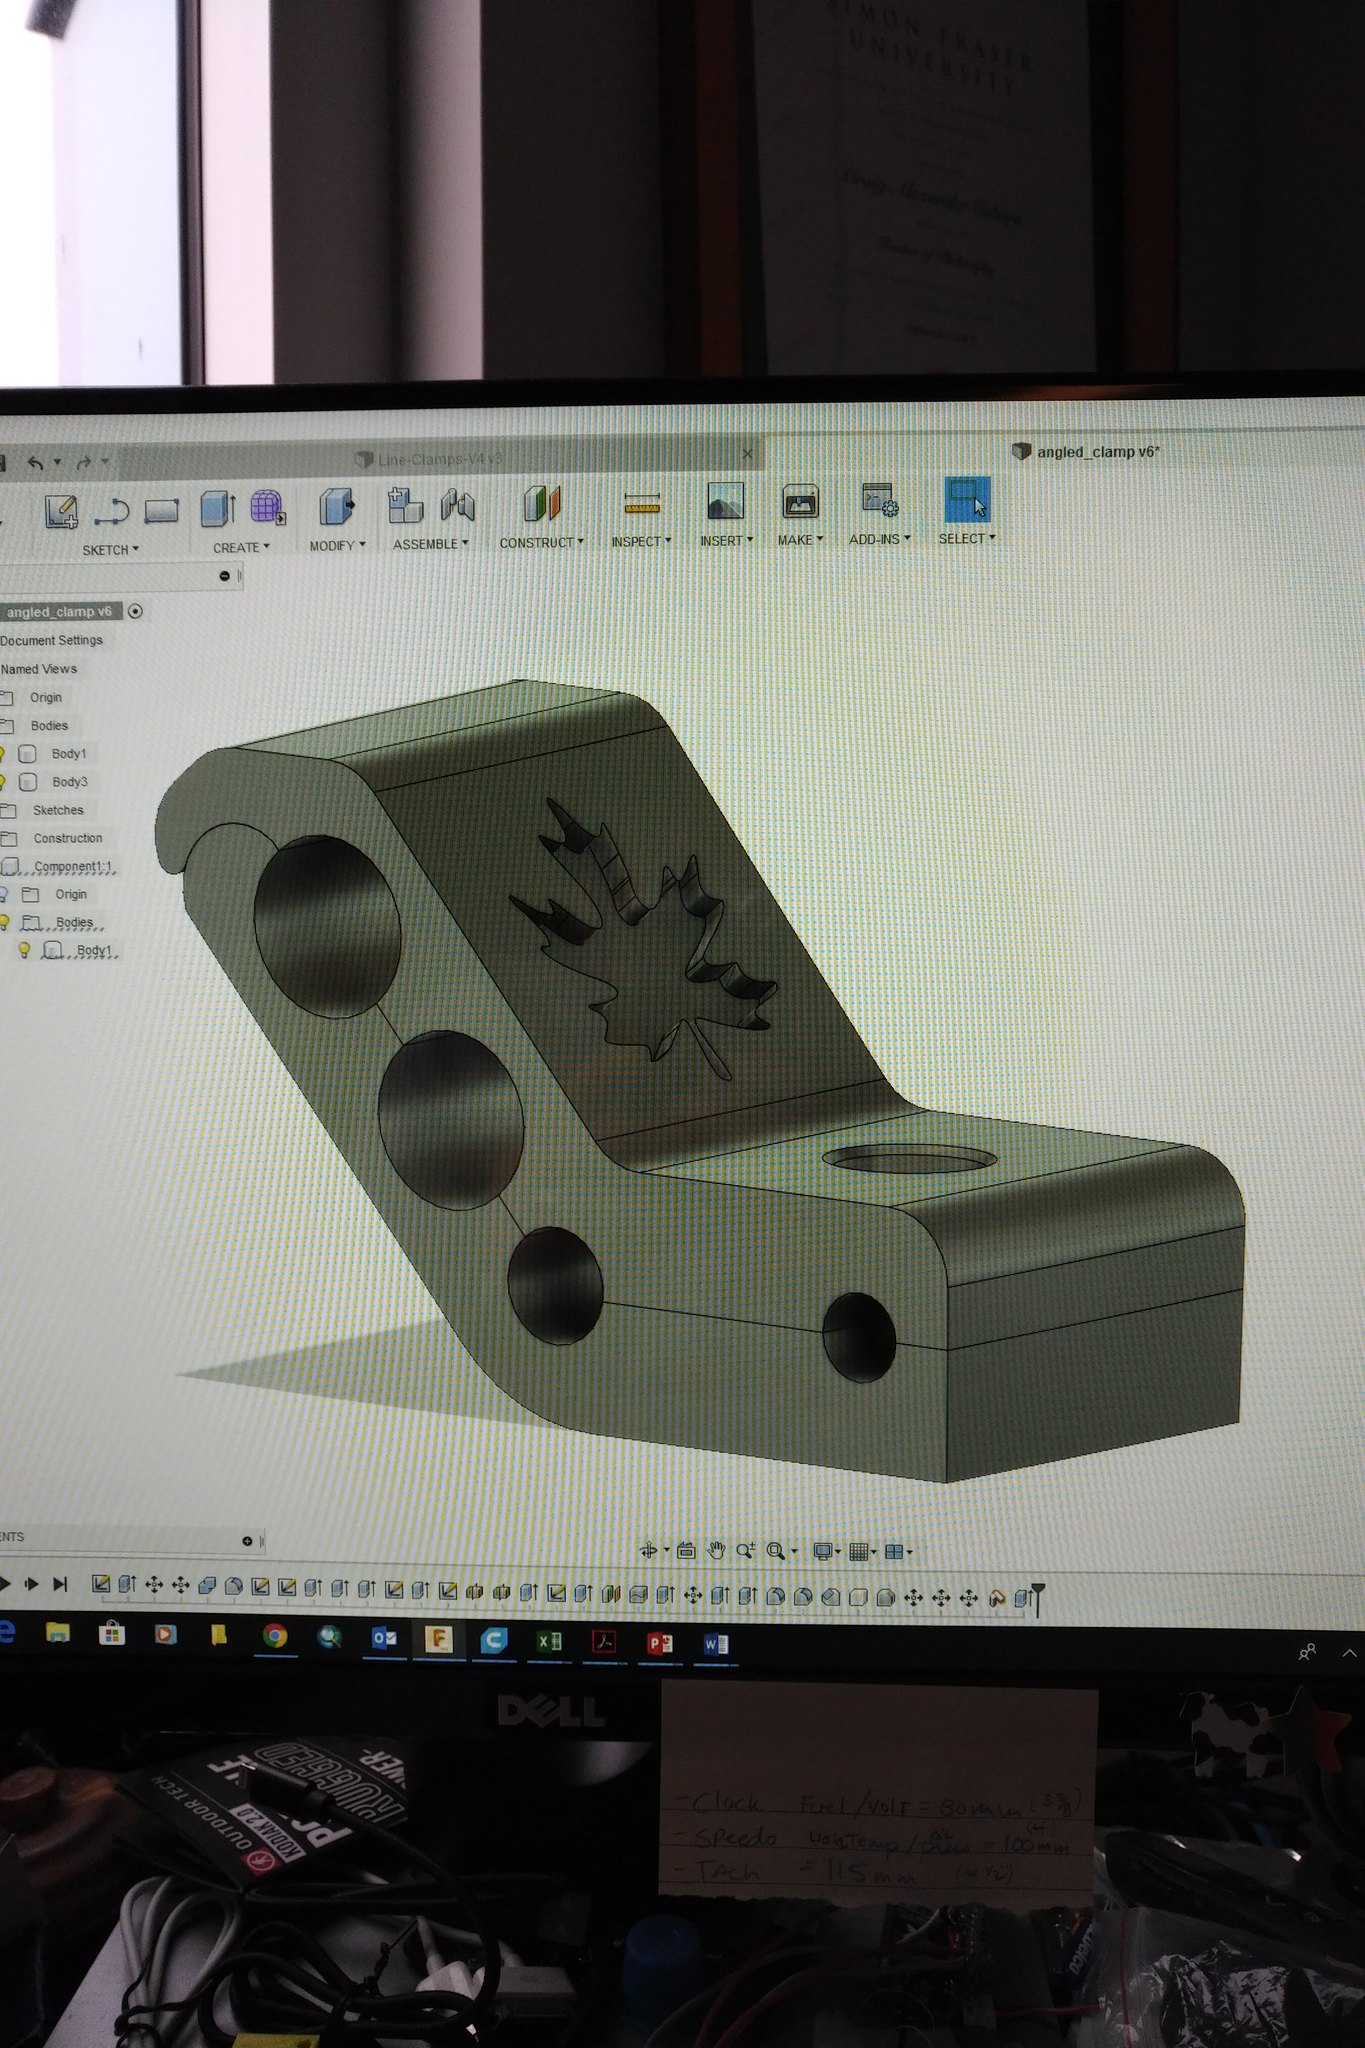
I've also designed my own line clamps - doesn't take 5 minutes.

47550192731_6fddf81bde_k.jpg


Had to do them for every possible line combination that I think I'll have under this car. That one fits along the rear seat pan.

47550192111_d6a4913956_k.jpg


These are just the prototypes - so not 3D printed with a lot of care or resolution.

47550192031_eb23860f48_k.jpg


You get the idea. Next, I wanted to epoxy fill the leaf motif. Worked pretty well.

47550191861_bf8ef0acb3_k.jpg


47550191581_cddb8c1ada_k.jpg


The leaf is from the original "Made in Canada" Volvo badge. You'll be seeing it again on this build.

So today I put my garage back together and am just getting ready to pull that frame and weld it up.

Mic drop update?

I also developed a little merch - if anyone is interested.

32607820647_d6268b8ef3_k.jpg


https://teespring.com/en-GB/throttle-stop-garage-volvo-can?tsmac=store&tsmic=throttle-stop-garage#pid=46&cid=2745&sid=front
 
Very, very cool! Love watching your updates. Very miticulous!

Meticulitus is a Canadian disease! I mean .067" (1.5mm) was going to keep him awake at night! :rofl: Craig, you know I'm just amazed at your attention to detail so I have to give you a hard time. I'm just jealous that you have mastered Fusion 360, too! I'm starting Fusion 360 for imbeciles for about the eighth time, I'll never get it to do what I want, and you have a 3D printer, too! Damn man, where do you find the time and brainpower?
 
I'll go over the development of the brackets in the next video - a lot of trial and error. Fusion 360 is fantastic - you can do it. Watch Lars Christiansen on YouTube - he'll fix you up. As for the printer, I'm busy building a new design. I need these things at work, so I've designed a couple in the past few years. The next one should produce much better prints. So we'll have more accurate parts printed much faster when I need them.
 
I'll go over the development of the brackets in the next video - a lot of trial and error. Fusion 360 is fantastic - you can do it. Watch Lars Christiansen on YouTube - he'll fix you up. As for the printer, I'm busy building a new design. I need these things at work, so I've designed a couple in the past few years. The next one should produce much better prints. So we'll have more accurate parts printed much faster when I need them.

I started with Lars but have since switched to Paul McWhorter. But I'm having the same issue with both of them. As I follow along they'll say "click on this and then hit enter, and voila, there you go". Problem is when I do as the say and hit enter my screen does something totally different or nothing at all. I think this is simply an issue with settings in the task bar but I really have no clue, and there's no one to ask. I would like some blue cheese with this whine!
 
<iframe width="560" height="315" src="https://www.youtube.com/embed/HuJWIjScw7I" frameborder="0" allow="accelerometer; autoplay; encrypted-media; gyroscope; picture-in-picture" allowfullscreen></iframe>
 
I'm starting to hate making brackets. Like really dislike the work. I took the time to ensure that I added some tabs to each bracket to hold the brake lines so I don't have to have two wrenches to tighten the lines.

Then I had to build brackets for the brake tee's. Yup - couldn't find M12 ISO bubble flare tees with mounting tabs. So I had to make them. And it got out of hand. I know it's not worth reporting all this stuff - but you either hack this stuff together and say screw the details or you do every detail and it seems to take forever. I know there is a moment that things start moving faster, but this is not that moment. I'm spending a lot of time attending to details. Like when I put the bell housing away, I had to cut a stainless Allen head cap screw to the right length, get a good thread start put on the fastener, clear the hole in the bell housing, pack it all up and put it away.

I've done this on every build I've ever done and I can report that while it seems like I'm moving at a snails pace, I drive these cars out of the garage and assembling them is a treat. It doesn't mean that it doesn't test my patience. I'd rather drive my cars than do what I'm doing, but it's a philosophy.

So for this update - a single photo. I present, the frame. Out for the second to last time. The next time it comes out, the mock up engine and transmission will come out and I'll finish it all in one push. I need to get the intake, radiator, and exhaust done. Now if I could find a CNC machine shop that wasn't flakey as frig to make an exhaust flange I'd be over the moon.

Three hours to get this done - three more hours to clear the garage so it could happen. Working in a phone booth sucks.

40688172893_555d0edc63_b.jpg
 
Here's the latest installment.

<iframe width="560" height="315" src="https://www.youtube.com/embed/uIkxwxu_hgk" frameborder="0" allow="accelerometer; autoplay; encrypted-media; gyroscope; picture-in-picture" allowfullscreen></iframe>
 
The welding is done - two days of bouncing from side to side and flipping the frame over and over to keep the distortion to a minimum and it's finally done.

46810815475_1566639cf3_b.jpg


Had the usual fight trying to get everything welded and looking good. TIG on the flat with parts is one thing...TIG for frames when you're always out of position is another beast entirely.

Brake tab going nowhere now.

40760762163_252924120f_b.jpg


More frame details.


32783969347_e2f2f9419b_b.jpg


What a PITA this was to weld up. The steering brackets were so hard to get welded. Got things a little hot - didn't care. The LCA holes are still all in line!

40760761293_604e11f46b_b.jpg


That's it for now. Still more to come on this frame before it's done.
 
Well, I've staggered out of the garage and left behind a freshly welded frame.

Progress!

<iframe width="560" height="315" src="https://www.youtube.com/embed/Rk5NPla4Pc0" frameborder="0" allow="accelerometer; autoplay; encrypted-media; gyroscope; picture-in-picture" allowfullscreen></iframe>
 
Long weekend of getting the frame finished up. Many, many hours of getting the mill scale cleaned off the frame rails.

46868480145_d12723316b_b.jpg


Then a final fit up of the transmission mount. This took a lot longer than I expected as everything starts to tighten up when you stop working with clecos and fit ups that can shift a bit.

33907833458_a2af7e1881_b.jpg


These extensions are now welded on and ground and sanded.

46868479565_6566aaac8e_b.jpg


The transmission mount seemed to have a bit too much flex - so after a few hours or so of messing around, it's fixed.

33907832438_df516c7620_b.jpg


Then it was on to welding up the rest of the steering bracket. Complete PITA to weld these corners. A little work with the die grinder and they're in fine shape.

33907832858_e8a5d9d156_b.jpg


Next up is getting the foot pedal plate welded in place. Then I have to grind the inside of the rails...I hate mill scale.
 
So after last weekend, I had the frame sandblasted. It solved most of the problems with cleaning the nooks and crannies that are hard to get to but leaves a pretty rough finish. So another 8 hours of sanding and I've got then entire frame sanded again and prepared for epoxy primer tomorrow.

40862868833_9017d44f2b_b.jpg


The idea with the blasting was that even if I can't get at the area to smooth out the finish - it's still got a clean steel finish to bond to and all the little areas on this frame it made things easier. It would have been nice if the sandblast guys cared about their work a little more as they missed quite a bit inside the open channel at the rear of the frame - but at least they got it done.

32885560097_cfefd534ca_b.jpg


So now I have to get the holes threaded for the brake like clamps, clean it and then get the PPG epoxy hammer on.

40862869083_7a95da3d90_b.jpg
 
The frame was a tough birth, but here it is.

Took most of a sleepless night to work out that it was actually pretty simple to mount the frame for priming.

47048350934_af7b1a74c2_b.jpg


Sometimes the obvious takes a little time to become clear.

With all the angles and tubes, it was never going to be easy to paint. But I gave it my best.

I broke out my new Anset Iwata W-400 for this effort. The primer is the PPG that I've been using. Love this stuff - my bank account doesn't - but it's only money.

47048349794_a7b646e44f_b.jpg


Sunday is the best day to paint in the alley in my city - no one moves because they're all in church.

47048349144_97d013160d_b.jpg


It was a paint to get this thing painted - but only a few runs and you can't see them or I will fix them before we do this all again.

32893928067_a91e89fda7_b.jpg


Some effort expended to get the insides done nicely.

47048347944_76fb545bee_b.jpg


Pretty stoked with the result.

32893927367_b0f85787d4_b.jpg


47048346864_811e2c9f97_b.jpg


32893926937_c464c23b34_b.jpg


Lovely day for a change - we switch from winter to summer pretty quickly...but I had to rush the frame inside before it rained.

The frame can cure in the garage for the week - safe and sound. Next - trying home brew powder coating.

47048346284_0d7d7e2fc8_b.jpg


Until next time.
 
Thanks NONHOG!

Here's the vid of getting the job done.

<iframe width="560" height="315" src="https://www.youtube.com/embed/lRKNQPIBLXU" frameborder="0" allow="accelerometer; autoplay; encrypted-media; gyroscope; picture-in-picture" allowfullscreen></iframe>
 
While the frame is sitting on the welding table, it seemed like a good time to get the front brake lines sorted out. There will be lots more of this to come. It takes me a long time to work with stainless lines. They don't bend easily or work easily. So these two lines were an entire day to sort out.

Not including the patterns. I make those from welding wire.

47106432174_8e9d2f5be8_b.jpg


It's important to sort out the routing and get the patterns right before touching the stainless. You really get just one shot at getting it right.

47895721721_5cd9a5eeda_b.jpg


Then I started to get these lines committed to stainless. It's fun as the patterns really do help get the 3D angles right when using the bender. These are also bubble flair on one side and the other has to be double flare...so with the AN fittings at the brake master, that's the complete trifecta of flare options on this car. Good thing I've got the tools to do all of these.

47895721411_3967386104_b.jpg


47106431534_b1082f56f0_b.jpg


47895721121_e2b4aedb73_b.jpg


This little transition took a full hour to get right...stainless won't bend like steel or Cu-Ni lines. it's either right or it won't go.

47895721011_a4bd383518_b.jpg


Not sure what's going to make it into the next episode - I should probably get a little more done this week to finish that off.
 
<iframe width="560" height="315" src="https://www.youtube.com/embed/9fLKVNBSzdk" frameborder="0" allow="accelerometer; autoplay; encrypted-media; gyroscope; picture-in-picture" allowfullscreen></iframe>
 
Back
Top