• Hello Guest, welcome to the initial stages of our new platform!
    You can find some additional information about where we are in the process of migrating the board and setting up our new software here

    Thank you for being a part of our community!

Kyle242GT's 1959 5.044

Some progress. Back to measuring, thinking, engineering, reverse engineering, and always searching for Occam's Razor.

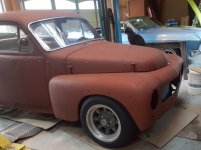
Obviously the radiator is too big for the inner sheetmetal of the nose. And the nose is bashed and full of bondo. So, deconstruction!

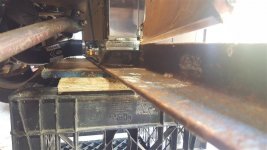
Once apart, I had to figure out how to support it. I think I have an idea - will use the bumper bracket mounts on the frame and T those into some pieces that attach where the nose bolts to the fenders. Should be plenty of adjustability.

Then it's a matter of how to fit a 19wx22h radiator into an area that's about 17" high. Width is okay, now that the nose is torn down. Initially I was going to remove the tube between the frame horns, but even that only offers about 21.5" of height, and leaves the radiator the lowest piece of the car. And it puts the upper radiator fitting smack into the alternator. Not good. So I think :x: that I can stick it 4" up the top of the nose, which will let me run the upper rad hose over the top of the alt.
 

Attachments

  • pyrS1Ti.jpg
    pyrS1Ti.jpg
    105.2 KB · Views: 212
  • CJJC5VC.jpg
    CJJC5VC.jpg
    78.9 KB · Views: 212
  • qZadwHC.jpg
    qZadwHC.jpg
    95.1 KB · Views: 210
  • iZvBvx1.jpg
    iZvBvx1.jpg
    96.2 KB · Views: 214
  • m4B1LhX.jpg
    m4B1LhX.jpg
    94.8 KB · Views: 211
Last edited:
measuring and thinking. Thinking I might just have to learn to weld aluminum, because that'd really simplify things.
Lower hose is into the steering gear. Might be able to get under with a little angle. Haven't tried going over the steering yet, since moving the radiator back and up makes the upper hose worse.
Upper hose is into the alternator and tensioner. Moving it forward and down would help.
But even that "good" a fit has the radiator hanging out a bit. I can massage the depth of the panel, I think. Maybe even another inch so I don't look like I'm trying to pretend to have an intercooler.

Brackets to hold the nose (and thereby the rest of the front body) came out really nice.

Now to do something about the horrid state of the sheetmetal, a sad victim of lazy bodywork.
 

Attachments

  • xoinGdd.jpg
    xoinGdd.jpg
    83.3 KB · Views: 184
  • HiG3j3C.jpg
    HiG3j3C.jpg
    73.3 KB · Views: 182
  • mhqCcve.jpg
    mhqCcve.jpg
    88.3 KB · Views: 184
  • bxXxvPx.jpg
    bxXxvPx.jpg
    63.2 KB · Views: 181
What I see is that the radiator, on the right side near the petcock. angles upwards. I'll assume it does the same on the left side as well. I'm wondering if you could cut a hole in that area and then, having learned to weld aluminum, install an elbow into that hole. Said elbow could be clocked to point in the right direction. Just a thought.
 
Yeah, I really need to learn to weld the silver stuff. That would open up lots of options.

However! Another day measuring and thinking yielded some progress. My cat is helpful in that regard.

The whole thing is kind of a catch 22^2. Can't go back, I run into the tensioner and steering. Can't go forward (much) because the nose sheetmetal doesn't hang that low. Can't go up, the lower hose is smack into the swaybar. Can't go down (much) because the radiator is already almost the lowest point.

But! I found a sweet spot where everything just barely fits. Even better, an off-the-shelf lower hose that dances around the steering box and drag link nicely. The upper hose will have to be a two-piece affair (probably okay, since I can put in a remote cap and make that the high point for bleeding).

The lower support (2x3 angle iron?) is BEEFY. Will weld that to the frame horns, triangulating for side-to-side and front-to-back. Should be able to take a pretty good hit without hurting the radiator. I can also cheat it forward just a smooch, which will make clearance better for both hoses and a fan.

Not thrilled by how low the lower support sits, but not a whole lot I can do about that. Once the car's back on the ground, I'm hoping it won't be a big deal.
 

Attachments

  • YZs8KlM.jpg
    YZs8KlM.jpg
    174.1 KB · Views: 171
  • zhaDfj5.jpg
    zhaDfj5.jpg
    68.1 KB · Views: 170
  • qCVtTvF.jpg
    qCVtTvF.jpg
    54.5 KB · Views: 170
  • YE4s2Aj.jpg
    YE4s2Aj.jpg
    68.5 KB · Views: 169
  • uWtRJBp.jpg
    uWtRJBp.jpg
    82 KB · Views: 168
Moving forward! In the process of lining things up (measuring and thinking as always) found the driver's side front wheel about 3/4" further back than the passenger side. Crossmember skewed as well. I wasn't that surprised - it took a pretty good hit at some point, but from the little bit of buckling on the frame, I figured it was frame damage. But, lo and behold, the frame horns themselves are the same distance from the body shell. I won't say "square" because I didn't really work that hard at it. Just trying to find a way to get the rad support square to the body/frame of the car.

Getting a little better at TIG welding. They don't all look like this, but it's nice to know I can do it in theory.

Next step is to get a fan, really should make sure that it'll fit before welding the support onto the frame.

I think I'll be removing the heater hardpipes from the engine in the process, and ditch the V70 overflow tank I've been using for an inline cap setup.

Gave the front valance a little massaging, the support isn't sticking down too badly now.
 

Attachments

  • gcwD0YM.jpg
    gcwD0YM.jpg
    96.9 KB · Views: 144
  • UFqUNlS.jpg
    UFqUNlS.jpg
    113.5 KB · Views: 142
  • OBPja4H.jpg
    OBPja4H.jpg
    45.9 KB · Views: 145
  • hJARVfo.jpg
    hJARVfo.jpg
    113.2 KB · Views: 143
Slow motion is better than no motion.

Radiator support welded in and done.

Radiator frame welded together, but bolt-in. That way I can get it clear of the car when removing the engine. One of my main design goals was having the radiator attached to the frame, not the body. But I always try to keep an eye on servicability. Makes the engineering side take a lot longer!

Put the efan in, worked and fit great. Couldn't figure out why the sender wasn't grounding... :lol: so I swapped things around and put it in the manifold (where the heater pipes used to attach) and put the ECU temp sender (two wire, doesn't need ground) in the hose.
 

Attachments

  • ihe803P.jpg
    ihe803P.jpg
    67.4 KB · Views: 560
  • 6JQXBZZ.jpg
    6JQXBZZ.jpg
    109.7 KB · Views: 557
  • 9ljgkJp.jpg
    9ljgkJp.jpg
    102.2 KB · Views: 555
  • lA6nItV.jpg
    lA6nItV.jpg
    77.3 KB · Views: 555
  • eIjEl2K.jpg
    eIjEl2K.jpg
    93.6 KB · Views: 561
Last edited:
I then patched the nose at the top where I'd previously cut it out. It lays on top of the radiator frame. So, the radiator supports the frame supports the body supports the frame supports the radiator. Nice!

Drove it around a bit, not real smart in the rain with no lights and wipers. But felt good to stretch its legs a bit.

The upper rad hose with inline filler neck worked great. Steam is just the radiator drying off after the t-stat opened.

You can see how little room there is between the tensioner and upper hose, pulley and fan, etc etc etc. Quite a feat getting everything in place. Also kind of funny seeing the exhaust all in one piece with the fenders off. What kind of madman built this thing? :lol:
 

Attachments

  • 63VojiY.jpg
    63VojiY.jpg
    112.7 KB · Views: 563
  • Nnd4QOs.jpg
    Nnd4QOs.jpg
    81.6 KB · Views: 561
  • mpGTM8S.jpg
    mpGTM8S.jpg
    93.6 KB · Views: 564
  • ZOR7wkP.jpg
    ZOR7wkP.jpg
    114.8 KB · Views: 585
If "art" includes the drunken doodles of a maniac, then I concur! :ahoy:

Shook it down some today, got gas, antifreeze, oil change stuff for V70. Zero drama, except that created by the freak in the driver's seat.
Steering is excellent (as excellent as 60 year old draglink can be, anyway). Still wiggles a little bit on vicious throttle changes, maybe I'll see if the panhard needs adjusting.

Onlookers at the FLAPS loved it. Left much rubber.

Hope to put the front end back on tomorrow. May investigate running the grille flipped again; it didn't fit well before, but the fenders have been MUCH reworked, so you never know.

Fun as hell running around without the sheetmetal. Halfway tempted to hang the nose and grille on it, remove the rear fenders, and try to get arrested for excessive tomfoolerying.
 
Last edited:
Sheetmetal back on. The interface between nose, fender, hood is a little wonky on the passenger side; I have a gap of about 1/4". Trying to decide if I want to take things apart and massage a little more, hence leaving the lights and spikes off for the time being. Overall, though, the metal fits together pretty nicely, worlds better than before.
 

Attachments

  • BEDvBM8.jpg
    BEDvBM8.jpg
    125.2 KB · Views: 505
Here's a short video, sorry about the audio quality.
<iframe width="560" height="315" src="https://www.youtube.com/embed/uh2X-er2JQo" frameborder="0" allow="accelerometer; autoplay; encrypted-media; gyroscope; picture-in-picture" allowfullscreen></iframe>
 
NASA - came from Woodenpudden, nice surprise, and while "remove before liftoff" doesn't really work for an ignition key, the nuance is there at least.
 
NASA - came from Woodenpudden, nice surprise, and while "remove before liftoff" doesn't really work for an ignition key, the nuance is there at least.

Ah interesting, I assumed it said 'Remove Before Flight' because I see about 400 of those every day.

If you want a flight one I'll snag one for ya!
 
Bro took the car for stress testing, commuted about 200 miles over the course of a couple weeks. Steering and radiator did fine, in fact the whole car did pretty good. He did remark on the lack of a heater.

Until I got a text: "call me. soon."

hh2Up35l.jpg

KSxUxQxl.jpg


One of the rear control arm mounts separated from the pan. Kind of funny, since accel torque would push forward, not pull backward. But who knows, maybe fatigue/rust/age and the stress of the 265-section tires pushing and pulling just was too much.

Haven't had a chance to get it up on the lift, still putting a headgasket in an orphan Miata.
 
Tire shake on a spirited acceleration. The cyclical stress on the attachment points as the tire loads and unloads violently will do this.
 
Is it rusty underneath there?

The PV rear suspension has all 4 arms attaching in a fairly small area of the body at the rear end of the driveshaft tunnel. BTW the PV44 didn't have the upper torque control arms, the axle was more firmly bolted to the lower... only control arms, for torque control Yes, that would feed drivetrain torque into the rear suspension, but I guess a B14 didn't have enough HP to make it much of an issue?)

I've seen them in junkyard before with the entire rear axle ripped off due to a fairly small amount of rust.

These things are NOT overbuilt like the 122-on models were.
 
Not too much rust, other than some surface stuff. Haven't yet seen *exactly* how it was originally welded... the cellphone pics look like a single bead on one side of the control arm mount. Makes sense that huge tires, (relatively) huge power, and not-sympathetic piloting would break something. Frankly, kind of pleased to have something let go in a non-terminal way.

John - you mention four arms, but I have three - two long trailing (one of which broke) and an upper single(ish) arm going from the top of the diff to the body. And a panhard.
 
Back
Top