• Hello Guest, welcome to the initial stages of our new platform!
    You can find some additional information about where we are in the process of migrating the board and setting up our new software here

    Thank you for being a part of our community!

Bad Banana in SoCal

Went to the junk yard today and scored a complete A/C system out of an '89 244. It was an interesting experience and not as difficult as I had feared. The biggest issue that I had was that I forgot that the '89 donor vehicle was metric. My 145 is SAE and I didn't take any of my metric tools along with me to the junk yard. The good news is that Volvo uses quality hardware. The donor car hadn't been worked on previously by trolls so all of the hardware was still in good condition. And 1/2" and 9/16" 6-point sockets will work in a pinch on 13mm and 14mm nuts and bolts. The only adjustable wrench that I had along with me was a giant 12" piece. I used it to remove all of the 10mm screws. That was not too much fun on the 4 screws that secure the fresh air inlet to the cowl! I just kept reminding myself that patience is a virtue. It is also very nice of Volvo engineers to have used so many Phillips head screws everywhere in the dash assembly.

By complete system I mean the following:
1) Heater box complete
2) Heater / firewall junction panel
3) A/C to Firewall junction panel
4) Defroster ducts
5) Dash ducts
6) Cowl / heater box rubber gasket
7) Heater control panel w/ switches
8) Floor vent ducts
9) Vacuum valves for ducts - complete set
10) Receiver - Dryer w/ switch
11) Condenser
12) A/C compressor
13) Compressor mount bracket
14) B21 crank pulley off of the donor car (not sure if this is gonna work on my B20)
15) A/C hoses (all 3)
16) All securing hardware, hangers and grommets

Tomorrow I will start to clean up and inspect all of my treasure.

Now that I have all of the basics I am still going to need a few B20 or B30 specific items:
1) B20 Compressor mount bracket (or pictures of same as I can fabricate a new one if necessary)
2) B20 2-row crankshaft pulley
3) B20 Idler pulley

Can anyone point me to a source for these parts or pictures of the above 3 items?
 
Today I have been cleaning up the dirtiest of the A/C parts that I collected at the junk yard yesterday. I use a water soluble driveway degreaser that I buy from my local DIY store. Very cheap, and handy too, in that it comes in a variety of sizes from 1-quart squirt bottles to 1-gallon jugs to 5-gallon pails.

Before:
50006362857_7173816436_b.jpg


After:
50006362842_fb446eebd5_b.jpg


Now it's safe to handle the parts without wearing a hazmat suit!

Maybe after lunch I'll start making some brackets to fit the condenser and receiver/dryer to the car.
 
Last edited:
Fixing up the Bad Banana is a long term project. Now that it is an operational car I'm tackling projects one at a time with the goal of keeping it operational as much as possible and going after those little annoying issues as time permits.

The rheostat for the dashboard instrument panel lamps has been dead since I bought the car. After looking through the usual sources I determined that a new replacement rheostat was no longer available. So as a temporary fix I simply jumpered the wires together on the back of the unit. A functional but annoying repair. When I was at the junk yard a couple of weeks ago extracting the A/C components from an '89 I had the opportunity to score the rheostat out of that donor. Maybe I could modify it to fit my '73?

Here is a sided by side comparison of the '89 rheostat vs the original unit out of my '73.

Front view:
50059631961_dc99ba3731_b.jpg


Top view:
50059875332_f08fdf57b7_b.jpg


Rear view:
50059875287_8eff24ec3d_b.jpg


As can be seen from the top view, the shaft of the '89 rheostat is too long to work in the '73 center stack. The later model rheostat is located in the top left corner of the instrument binnacle, just to the left of the instrument panel. A much more driver convenient location, but not a suitable spot on the stock '73 dash.

After a quick confirmation fit check I found that I could rotate the larger rheostat body to fit comfortably in the '73's center stack location. I also measured the shaft diameter and knob indexing flat 'diameter' I found that the original '73 knob would work on the new rheostat. So I went to work shortening the input shaft.

If you look at the pics, above, you'll notice a small circular groove about 0.340" from the knob end of the input shaft. This groove provided a snap ring locking feature for the adjustment knob. Basically this groove is what keeps the knob from falling off under normal operational vibration of the car. I initially marked the shaft where it would be cut off:

50059875267_91e74209a5_b.jpg


Next I clamped the end of the input shaft in a vise and used a small triangular jeweler's file to cut a new groove in the proper location. I then filed the new indexing flat on the shaft before finally cutting the shaft to length:

50059631916_3aaf3dabc3_b.jpg


Not a big or important project. But satisfying none the less to cross off one of the items on my project list.
 
The A/C parts are starting to come together. The basic engine side components are now in hand. The new condenser should arrive in the next couple of days. I have been able to source an OEM dual row crank pulley, idler pulley and York style compressor mount for the engine side components.

50089096077_64237362cf_b.jpg


50088856951_522bb88772_b.jpg


I cleaned them up tonight, at least enough for them to go into the blast cabinet tomorrow. It's amazing how nice the crank pulley is. It is very nicely preserved thanks to many years of oil and grime accumulation. I'll apply some shiny red powder coat after sandblast.

I plan to fab another bracket out of 1/4" steel plate to mate the Sanden style compressor that I got from the junkyard '89 244 and bolt it to the OEM York bracket.

I also want to source a new replacement bearing for the idler pulley. This one feels smooth, and it is reasonably grease caked. But a new replacement seems like a lower risk proposition at the end of the day. Hopefully it is a standard size. I'll press it out tomorrow and see what I can find out.
 
I pressed the bearing out of the idler pulley this morning and found that it is a standard size 6204 bearing. And I also found that I didn't have any suitable red powder coat on hand. So rattle can it is, then bake at 400F for about 45 minutes to cure.
50092873117_09b7e19135_b.jpg


The new condenser arrived via FedEx today. That's the good news. The bad news is that the package was damaged and there were parts missing.
50092872692_4024154f54_b.jpg


The condenser and its internal box was in excellent condition w/o any damage. Likewise for the receiver drier. However the 4 fittings, o-rings and switch were all missing. I sent an email off to the supplier. Hopefully they will sort it out and make this good.

Since the condenser was not damaged I did a trial fit to confirm that my initial measurements were correct. Fortunately my tape measure and the supplier's dimensions matched up:
50092873072_a7e5084e57_b.jpg


If I have time I'll fabricate some mounting brackets for the condenser tomorrow.
 
Today was pretty productive. I made the mounting brackets for the A/C condenser.

50095243638_0a2f7e1bfc_b.jpg


50095823186_6f18ff18af_b.jpg


They're in the oven with some black Hammerite paint curing. Once I get an electric fan mounted to the condenser I can install the assembly.
 
Thanks

Thanks for posting all of this. I've been a little unmotivated with my 145, but your thread got me back up and moving again.
 
Thanks for posting all of this. I've been a little unmotivated with my 145, but your thread got me back up and moving again.

Wow. Very cool. I've never thought of my automotive activities as being a motivator for someone else.

I ordered up an electric fan from Amazon yesterday. It should arrive in a few days. Once in hand I'll make mounting brackets and install the condenser assembly.

I'm starting to think about the A/C plumbing. I'm considering mounting the receiver drier way
up front on the passenger side of the condenser. Out of sight for a cleaner look. I'm researching charge fittings now. If I can find a clean block or blocks for the charge fittings that will be a big help.

Anybody have any suggestions?
 
Nice wagon! Looks like it's in good overall shape bodywise - perhaps a respray at some point? Looks like overspray on the door latch deflector/guide in one pic. Haven't owned a 140 since the 80's - I do recall the fun & games swapping 240 interior & trim parts and dealing with SAE/Metric overlap to make things work though.

Since you are going to the trouble of installing AC, I would suggest you use the accumulator/orifice tube and NOT the receiver/drier / expansion valve setup. It never did provide the best cooling. You can buy aftermarket orifice tube (Cold Hose, Nostalgic AC, Vintage AIr, etc.) assemblies that can be crimped into the #6 line, in place of the R/D.

The only thing I noticed in all the excellent bringing-it-up-to-snuff work you've done is the use of standard hose clamps on the fuel rail & injector hoses. I would suggest that is a bad idea long term. If they haven't already cut into the new hose, better to replace them with the closed clamps you have used elsewhere in the system, and/or use oetiker clamps, since you won't be touching them on a regular basis anyway.
 
Nice wagon! Looks like it's in good overall shape bodywise - perhaps a respray at some point? Looks like overspray on the door latch deflector/guide in one pic.

Thank you. Yes, the original owner had a lower body respray to deal with multiple door dings, etc., in single stage about 20 years ago. While decent, I would call that paint work about a twenty footer.


The only thing I noticed in all the excellent bringing-it-up-to-snuff work you've done is the use of standard hose clamps on the fuel rail & injector hoses. I would suggest that is a bad idea long term. If they haven't already cut into the new hose, better to replace them with the closed clamps you have used elsewhere in the system, and/or use oetiker clamps, since you won't be touching them on a regular basis anyway.

Xlnt observation. I too very much prefer the NORMA clamps over the typical US-style slotted screw clamps for the reasons that you have mentioned. I also like the spring loaded Oeticker screw clamps that maintain constant tension. When I started on the underhood effort it was simply to deal with the perished motor mounts. I had already ordered all of the miscellaneous bits and pieces (including all new NORMA hose clamps for the coolant lines) when I decided to renew the fuel lines. Basically I was too cheap to place another order for just the fuel line hose clamps so I used what I had on hand. I didn't want to pay as much for shipping the clamps as the cost of the clamps! I have since ordered up a fresh stock of NORMA clamps to keep on hand and replaced the slotted clamps.

As an aside it may be worth noting why most OEMs use spring clamps wherever possible on hoses:
1) Reliability. Spring clamps provide a reliable sealing force once installed. The sealing pressure of screw clamps is dependent on the tightening torque applied by the person on the assembly line doing the installation. Too loose and the hose leaks. Too tight and the hose can be damaged, or worse, the screw stripped leaving the connection unreliable.
2) Cost. Simple wire or stamped flat spring steel clamps are the cheapest, both in terms of part cost and labor cost, yet still effective way to ensure reliable sealing upon installation and eliminate human error WRT tightness.

Just something to think about the next time you're removing one of those cheap spring clamps and cursing the difficulty when using a pair of pliers.


Since you are going to the trouble of installing AC, I would suggest you use the accumulator/orifice tube and NOT the receiver/drier / expansion valve setup. It never did provide the best cooling. You can buy aftermarket orifice tube (Cold Hose, Nostalgic AC, Vintage AIr, etc.) assemblies that can be crimped into the #6 line, in place of the R/D.


Good suggestion and one that I had not considered. I'm going through the flush process on the compressor and evaporator this week. I'll take a look at packaging constraints and take a look at this option. The cost of an accumulator and orifice tube are certainly within reason.

FYI another xlnt source in addition to the hot rod aftermarket A/C suppliers is Arizona Mobile Air. Very helpful and a large selection of generic components.


Very nice looking MR2. You might appreciate checking out my friend's mid-engine toy, Midlana.
 
I was able to get back to work on the Banana today a bit. The fan came on Wednesday and I was able to draw up some mounting brackets. With the fan in hand I decided that the lower fan-to-condenser bracket could do double duty as the lower condenser-to-body mount as well.
50127281718_3a17996ed9_b.jpg


Here's what the fan brackets look like on the condenser:
50128070752_569fabdea1_b.jpg


I tried to minimize it but there is a little bit of air flow blockage. This is mandatory as the fan's mounting tabs are slip fit items that require compression between the fan body and the mounting surface for a secure fit. There are 2 pieces for each mount with the essentially straight piece for each mount being a spacer so that the actual mount has about 0.06" clearance to the condenser surface to minimize the risk of long term abrasion and subsequent failure of the condenser.

Here's the whole rig assembled ready for installation:
50127281853_2e326e5671_b.jpg


And installed. The brackets to mount the condenser use existing Volvo screw locations with the radiator mounting bolts and the lower front valance inner screws doing the job for the condenser. I replaced the radiator mounting bolts with 3" long studs with about 2" of the studs sticking through the radiator core support towards the grille. I cut tube nuts to length and installed them on the front side to set the fore/aft position of the condenser and also secure the stud so that the radiator and/or condenser and be removed independently.
50127281723_c3d6f5fd20_b.jpg


The original radiator duct cover fits back in place just as it came from the factory:
50127281753_838aca4844_b.jpg


Next up is to fit up the pulleys and fabricate a mount bracket for the Sanden style compressor.
 
I had some time available today so I rebuilt the Pick-A-Part HVAC assembly I pulled from the '89 240 sedan donor a few weeks back. The rebuild / overhaul consisted of a new heater core, blower and expansion valve along with cleaning everything up. I also flushed and pressure checked the evaporator along with new o-ring seals. Hopefully all of the old crud has been washed away. I re-coated the exposed copper plumbing at the evaporator and expansion valve using the 2" wide bituminous insulation tape that my local radiator shop uses for such things. If you haven't had the opportunity to work with that stuff, all I can say is that it sure is sticky!

The temperature is supposed to stay cool here, in the mid 80s, for the weekend. So tomorrow I'll start on the installation. I.e. I'll remove the dash and see how far I get on the new installation. I need it to be mobile on Monday to get back to work! Scope creep has set in even before starting. I bought several rolls of foil backed insulation, both thermal and acoustic. Since I'm removing the seats and carpet to make it nice and roomy while I'm removing the dash, there won't be a better time for that upgrade. Your basic 'While I'm in there.....' addition to the project.
 
[...] there won't be a better time for that upgrade. Your basic 'While I'm in there.....' addition to the project.
That's how the best projects work, I'm afraid.

I'm very pleased to see this car has ended up in the hands of a true craftsman. I well recall my reaction to the Craigslist ad, that such an original gem won't be for sale for long. I didn't expect anyone would have dared buy it sight unseen, but with every post you make, it becomes more and more obvious you made the right decision. Congrats!

PS. That's a helluva disk sander you've got in your metal shop... :omg:
 
Thank you for the kind words to both Toybox and Coupid.


That's a helluva disk sander you've got in your metal shop... :omg:\

If you look closely there are 2 of them; The smaller is an 18" diameter and the big fella is a 24" diameter. We call them disc mills! You always want to be very careful with them as the motors for both are fractional Hp and the discs themselves weigh 20 and 31 lbs respectively so there is a lot of stored rotational kinetinc energy in them once they are up to speed. They spin freely for several minutes after the power is turned OFF. When the 40 grit sanding discs are fresh they will remove metal in a big hurry!


I got back to work in the HVAC project this past weekend, installing the 'new' rebuilt combined module from the '89 donor car. I'm very glad to have had the initial experience of removing the unit from the junkyard car. :). I used the info, pictures and advise provided by Polaris as a guide. Kudos for the insight.

I considered using the entire lower panel setup from the '89 car but finally decided against it for 3 distinct reasons:
1) I would have had to relocate the dash lamp dimmer rheostat
2) I want to retain the original '73 appearance
3) I need 7 switch slots and the later cars only have 6 by virtue of the relocated cigarette lighter / power port socket on the new cars. Besides the normal hazard flasher, rear window defrost, and rear window wiper switches I also have switches for the driving lights, O/D on-off, intermittent windshield wiper control and the new A/C potentiometer.

During the changeover I found some interesting evolutionary changes to the combined unit from my '73 to the '89 unit.
1) The little spring/snap clips that hold the blower turbine housings and main body halves together are much nicer on the later cars as the newer style has return flanges on both sides that make them much easier to get on/off and easier to reuse.
2) The hot water valve is much simpler on the new unit. I actually prefer the old style as I think it may provide better thermal modulation. but I am sure that it is also quite a bit more expensive. So I'm guessing that the bean counters told the engineers that better is the enemy of good enough!
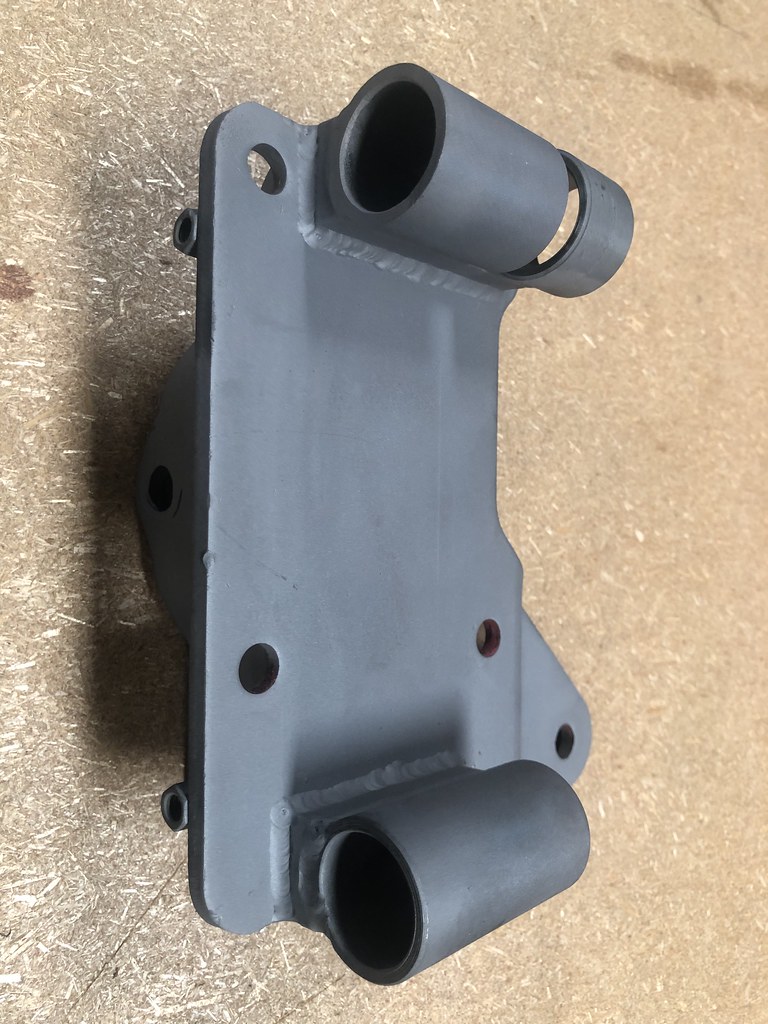
3) The firewall inlet outlet port manifold is a different configuration with different mounting screw location. It requires a couple of new holes to be drilled in the firewall. See pics below:
50216553016_f201c71a30_b.jpg

The later 240 style firewall heater hose manifold in the simple straight configuration on the left and the '73 configuration is on the right.

50215898438_96ac6245c0_b.jpg

This pic shows the different mounting hole spacing between the 250 manifold (left) and 140 version (right). The firewall thru-hole spacing for the water ports is identical on both manifolds.

50216651401_80a65d2a8e_b.jpg

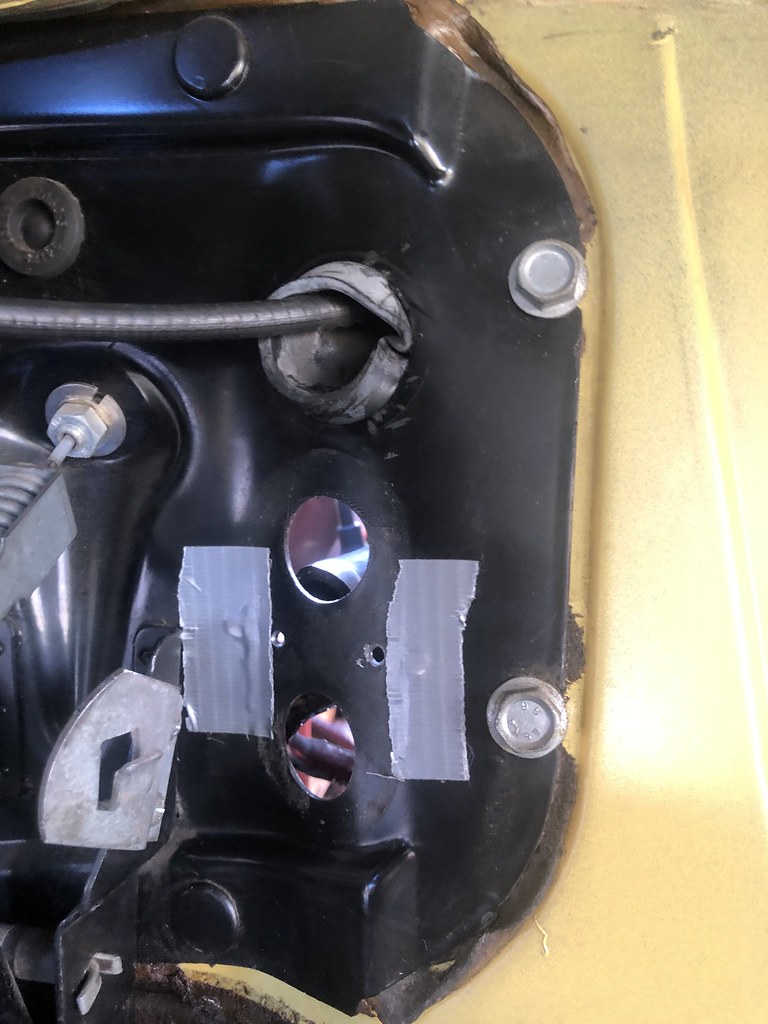
This pic shows the 2 new mounting screw holes with the original holes covered/sealed with duct tape.

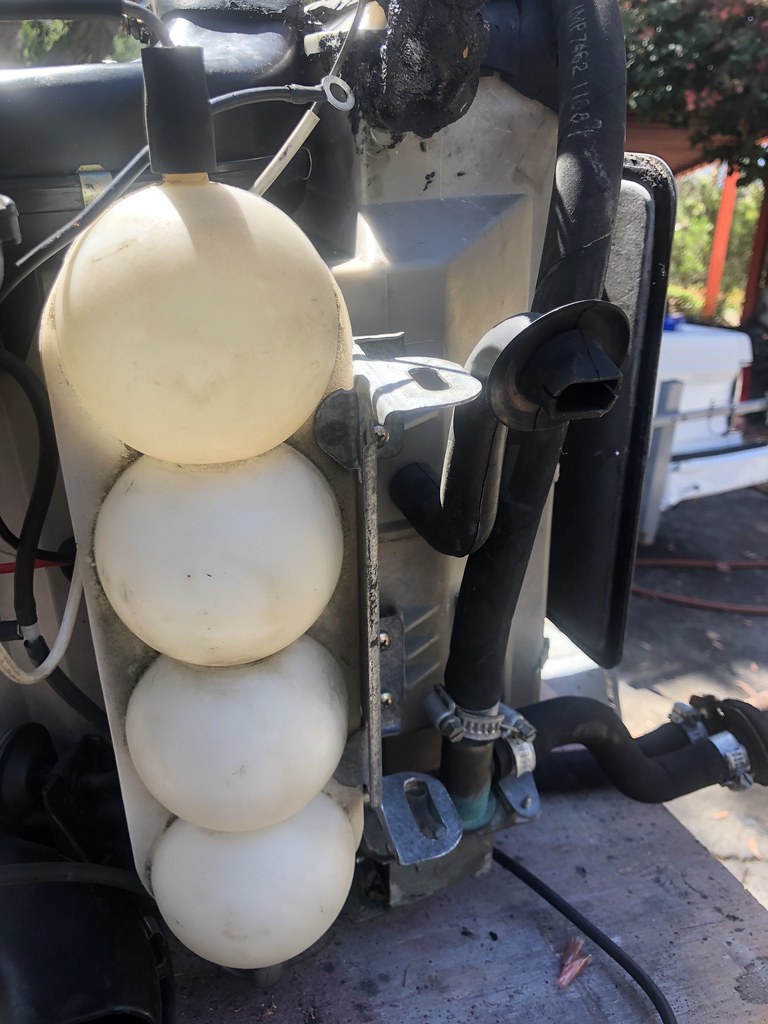
4) The '89 combined module incorporates a plastic vacuum reservoir in the lower support / mount bracket. The '73 system uses a kind of oval shape metal tank mounted separately from the combined unit behind the defrost/outer face vent ducting and glove box, above the passenger footwell.

50216876717_f287fe90eb_b.jpg

The 240 style vacuum reservoir, above.

50216651416_72c1049c5a_b.jpg

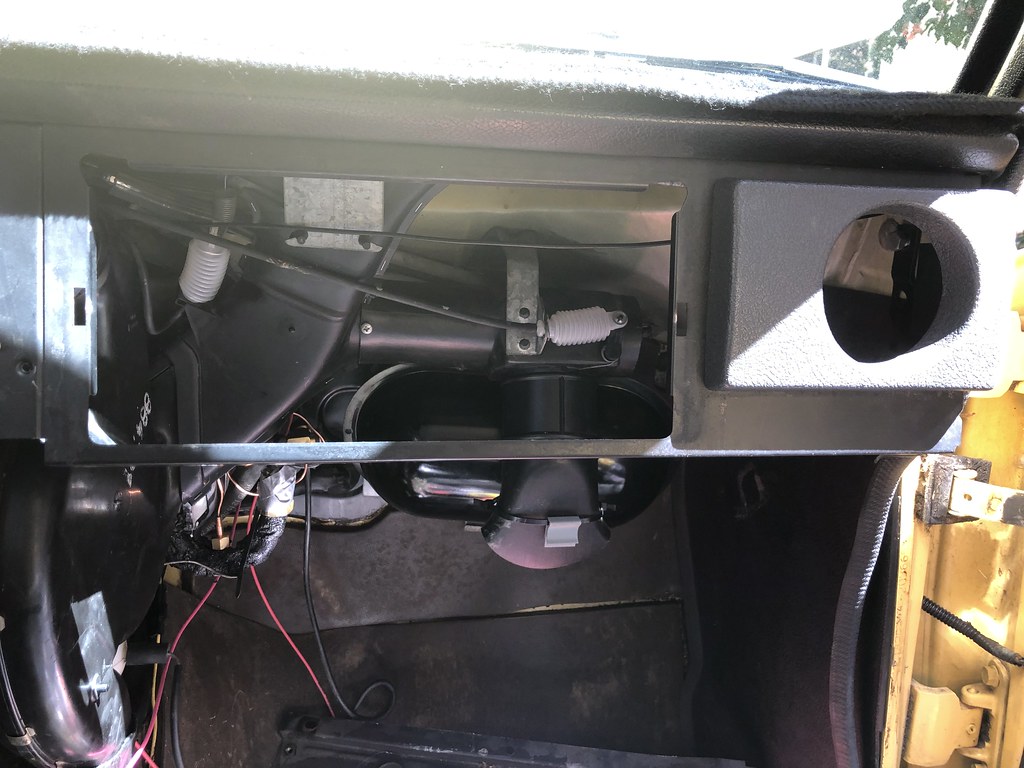
The 140-style sort of shiny black metal oval-shaped vacuum reservoir can be seen behind the footwell vent in this pic, above. Note the cute little whitish plastic bellows for controlling the vacuum operated duct flaps/valves. These are the 140 style vs the diaphragm-disc style used on the later cars.

5) While the upper mounts to the cowl are identical on both the 140 and 240 combined units, the lower mount that incorporates the vacuum reservoir mount on the 240 is different and requires modification for use on the 140. If you are going to discard the plastic vacuum reservoir the 140 lower mount bracket will mate directly to the 240 combined module and the 140 adapter tabs that mate the aforementioned support bracket to the transmission tunnel will match up perfectly. If however you wish to retain the 240 style plastic vacuum reservoir the combined unit lower support bracket must be modified.

50216877332_edd1d6837a_b.jpg

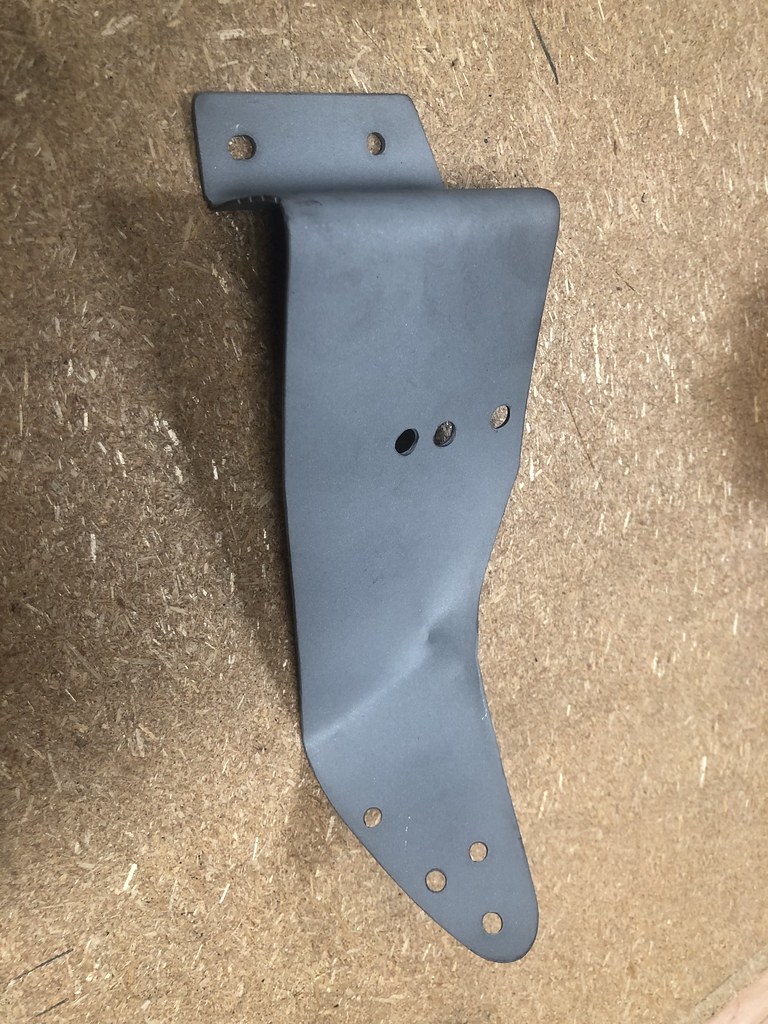
The combined HVAC module lower support bracket as used on the 240, above.

50215899248_b6f1678675_b.jpg

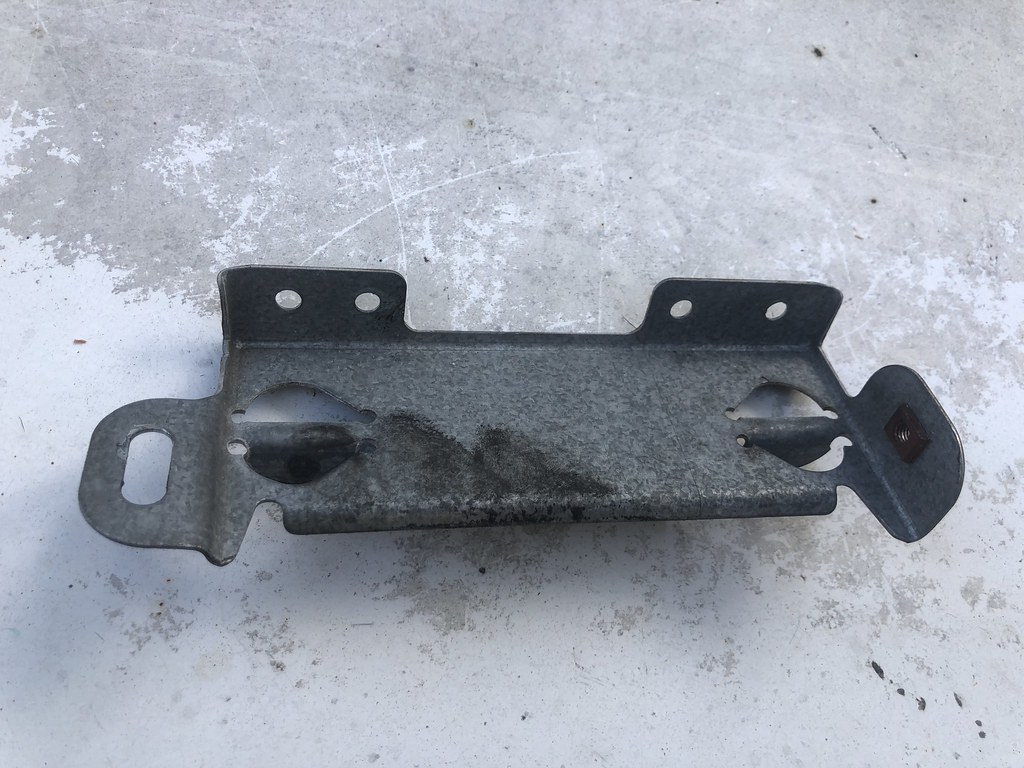
240 style lower support bracket modified to work with 140 style trans tunnel mount tabs. Note 2 changes to this bracket are required to work on the 140:
1) The slotted tab on the left has been folded to a 90deg angle.
2) The right hand tab has had the captive threaded insert punched out and then slotted to mate up to the trans tunnel tab.

6) The 240 heater assy only has a single condensate drain from the evaporator housing vs the 2 drains on the 140 unit. Fortunately the nice molded drain hose has the proper size O.D. to mate perfectly with the passenger side drain hole in the 140 transmission tunnel.

50215898453_53f71ed0be_b.jpg

This pic shows the single 240 drain hose on the bottom of the combined unit.

50215998288_f6d96b0a45_b.jpg

I didn't have the appropriate size rubber plug to close off the unused drain hole in the floor pan. So I used a double layer of duct tape instead.

50215898773_2b1ba593a2_b.jpg

7) A very handy feature on the 140 vacuum lines for all of the control valve/flappers was this central quick connect coupling. This is not found on the later style cars. It is also worth noting that each of the vacuum hoses is ink print labeled with a number to identify which port they connect to on the 3-pushbutton flow direction control on the dash panel. The pushbutton flow control switch ports have embossed numbers next to each port. This labeling is found on both the 140 and 240 1/8" I.D. vacuum lines.

50216651646_d2b58c7aee_b.jpg

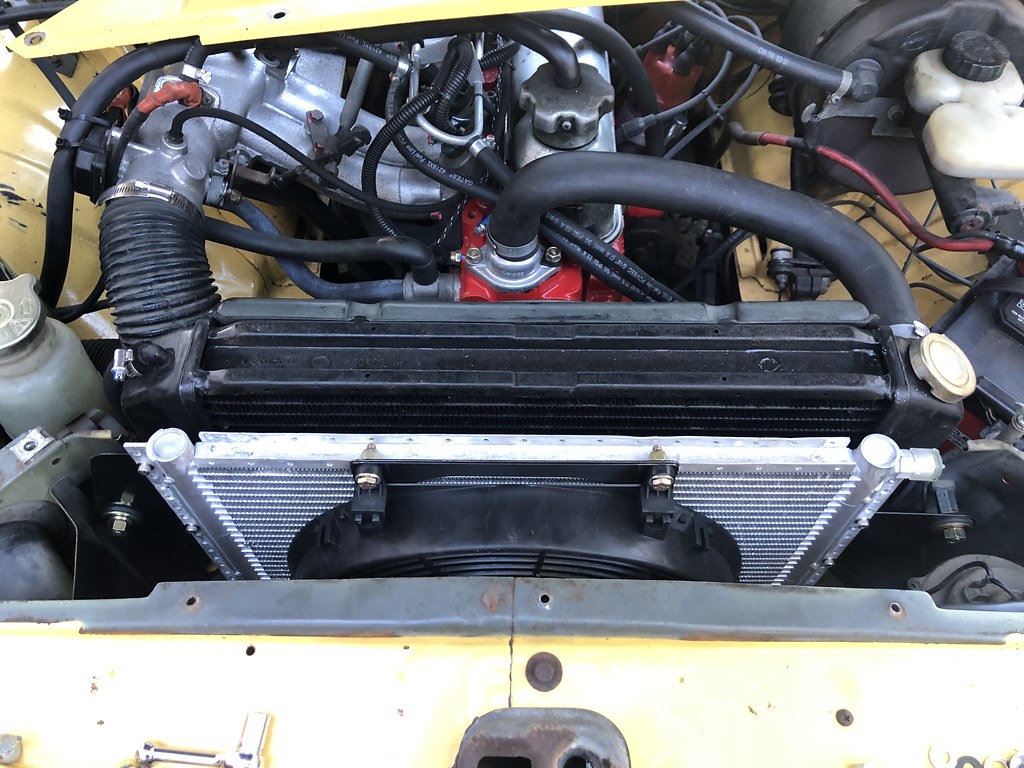
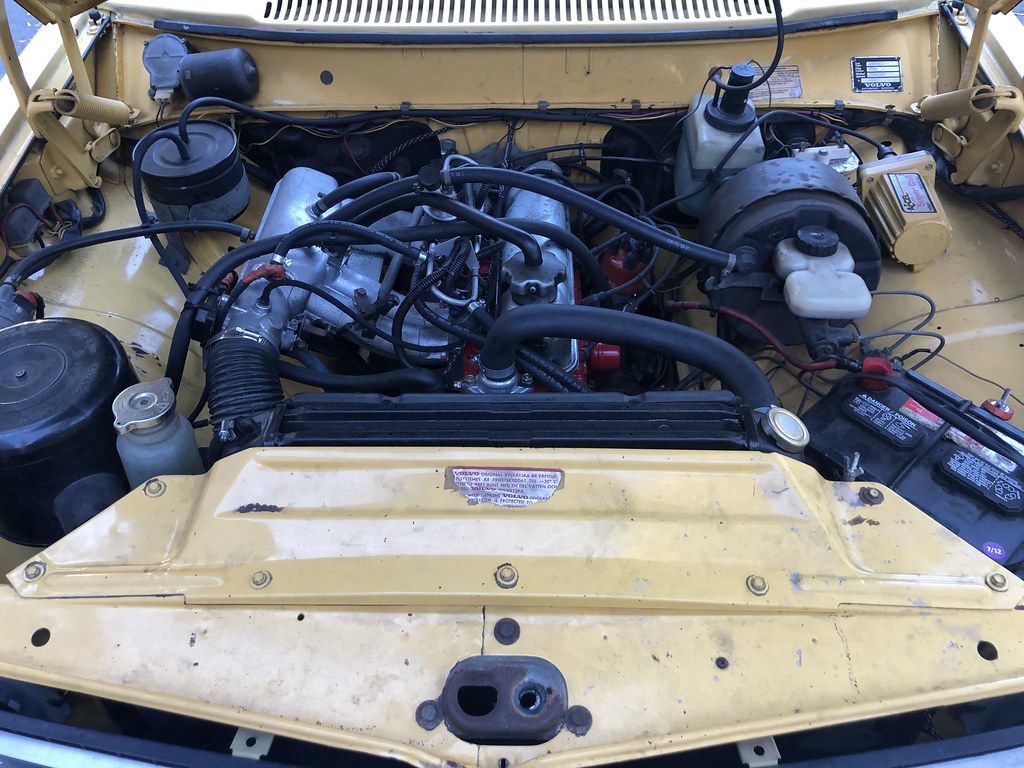
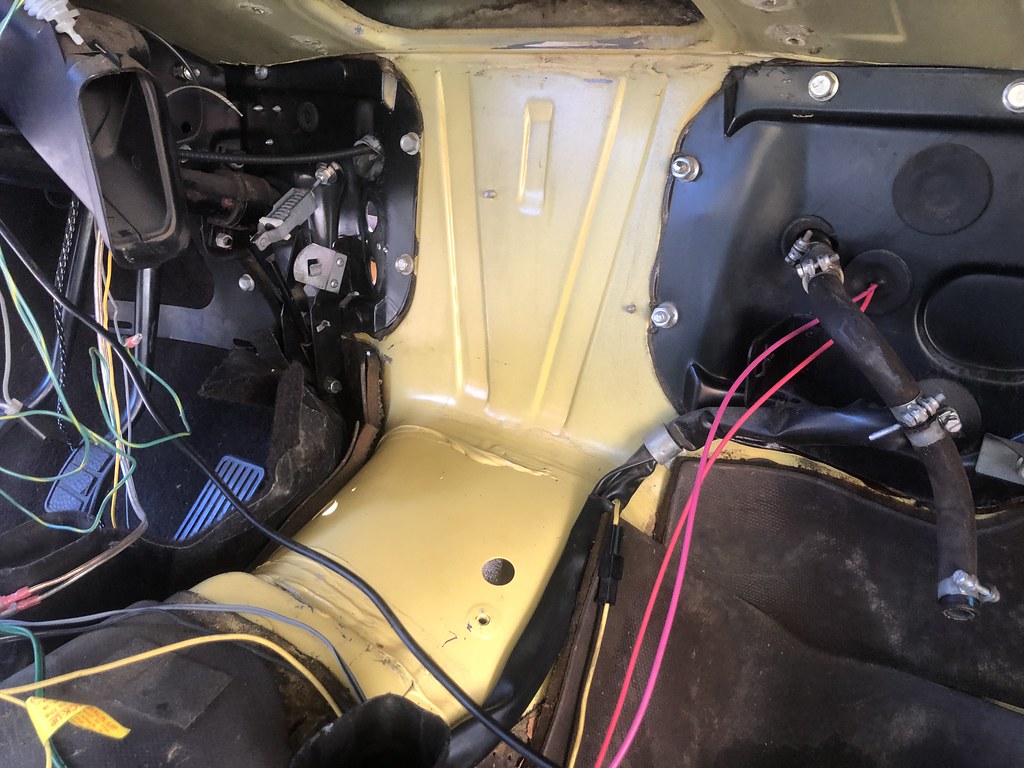
8) The '73 140 bolt-in black firewall panel on the firewall in the passenger passenger footwell has all of the correct size holes for pass-thru of the A/C hoses already in place. The A/C hoses I scored from the '89 car are properly configured and grommeted to align with the expansion valve and evaporator exit port as well as seal up properly once installed. I will be fabricating new anti-leak hoses once I do the final installation.

Looking back on this portion of the project I am very happy to have had a break in the weather with driveway temperatures in the mid-80s. The heat has returned today with shaded temps in the mid 90s and driveway temps (we have an asphalt drive) well over 100F in the sun.

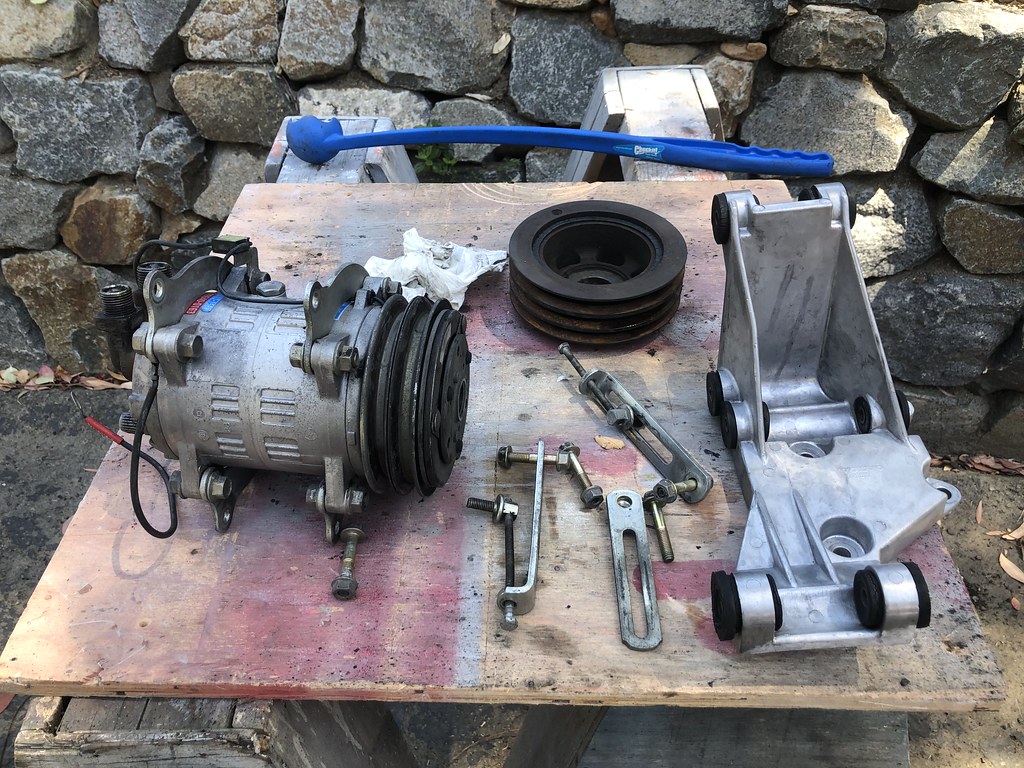
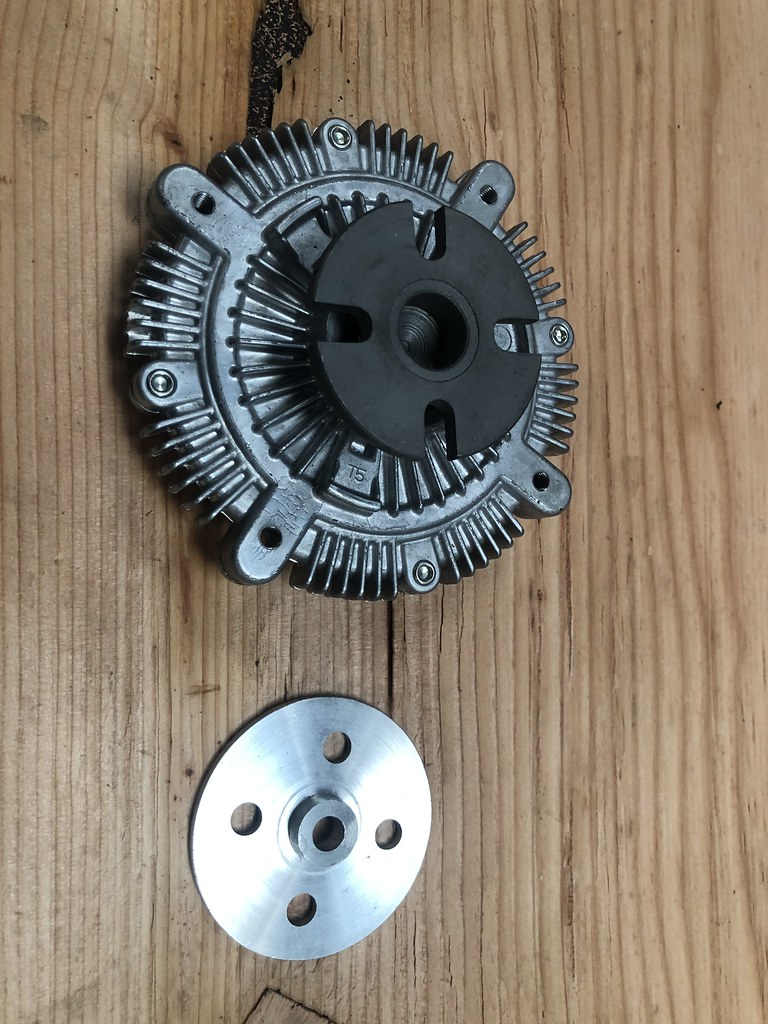
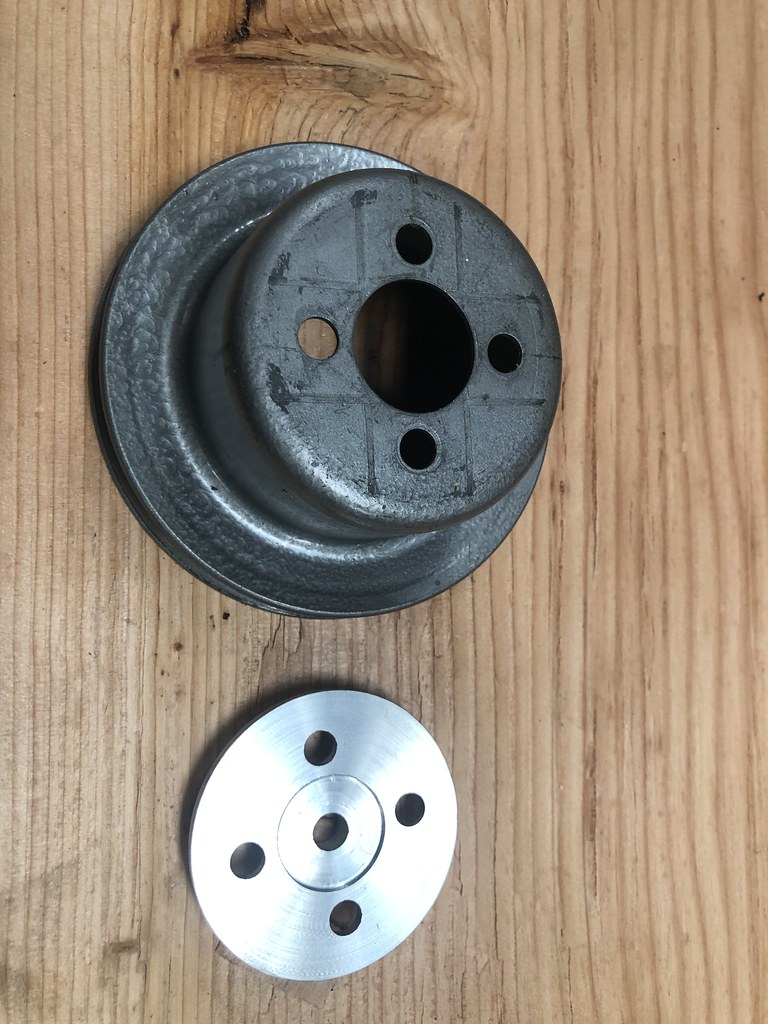
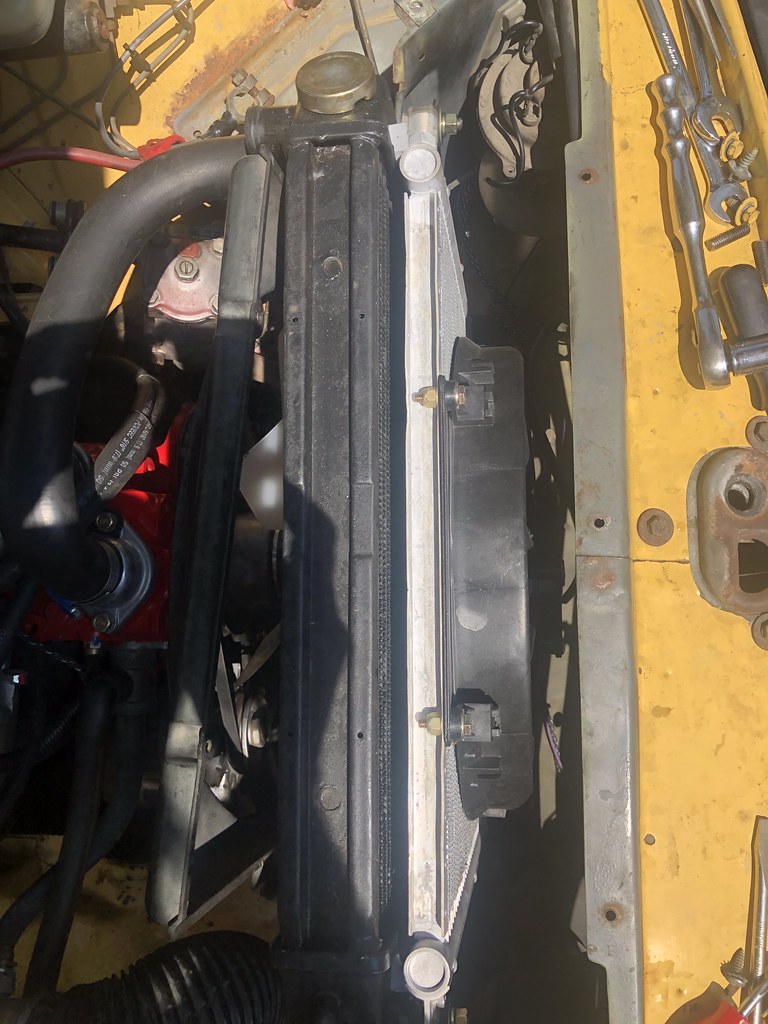
Next up is mounting the under hood hardware: The compressor mount, compressor, dual row crank pulley, receiver/drier, idler pulley and new water pump cooling fan.
Once that hardware is installed I'll finalize the hose lengths and then fabricate and install the hoses. After that it'll be time to charge the system.

50220597626_db62642950_b.jpg

While occasionally trying this was not a difficult job, many parts of it were tedious and sometimes hard to reach. It would have been much fore pleasant to accomplish on a cooler day. But I also have a Lotus Esprit and I know from experience that for every task under the dash on that car one must keep their cell phone handy in case it becomes necessary to have someone else come out to help you extricate yourself from the car; to get back out of the Lotus position! That said, after I was finished and came in the house, my wife looked at my hands, took this pic and asked if the job wasn't, 'death by 1,000 cuts?'
 
What a difference a year makes!

I got back from my morning bike ride and was pretty much gassed. I got to reminiscing about what I was doing one year ago today. So I threw this short video together:
<iframe src="https://player.vimeo.com/video/448151206" width="640" height="360" frameborder="0" allow="autoplay; fullscreen" allowfullscreen></iframe>
Carmel 2019

Can anyone tell me how to link a video to a post so that it shows up?
 
Last edited:
Had some time today and did a bit of underhood A/C preparation. I wanted to move more air thru the radiator than the original fan was capable of motivating. While I have installed a 14" electric pusher in front of the new condenser I wanted to retain an engine driven fan for primary cooling. The aftermarket Flex-A-Lite fan that was on the Bad Banana that the original owner had installed was to wide, front-to-back, to clear the new 2-row belt drive to support a compressor. And there is only 3" clearance between the radiator and water pump so there isn't much room available for an electric puller fan. Taking into account the electrical load that a powerful electric puller fan would add to the system meant that a new higher output alternator would be required. While a new alternator is an option in the future I didn't want to go there just now. Every now and then I manage to keep scope creep in check!

The OEM viscous fan setup is pretty pricey so I started looking at other options and determined that the large diameter (1.8") pilot on the B20 water pump would be an interface issue since 1/2" or 3/4" are the most common fan clutch pilot sizes:
s-l640.jpg


The later B21 / B23 water pumps have one of the smaller pilots as well as a smaller diameter bolt circle so using one of the Aisin fan clutches was not an option. Those clutches are also too long to fit in the limited space between the radiator and water pump. A bit of research showed that Hayden lists a fan clutch, p/n 2558, for the B20. Online review of the specs showed that this fan clutch would mate with the white plastic fan used on later Redblocks. However it was questionable about water pump pilot interface as the Hayden catalog noted that the unit was compatible with both 3/4" and 1/2" pilots. I went forward and ordered thru my local auto parts / machine shop as they would take it back if it didn't fit.

Well, it didn't fit. But a little bit of free time and a slug of aluminum on the lathe allowed me to fabricate an adapter:
50273172076_2bbc6250ec_b.jpg


The water pump pilot is only about 0.06" proud of the pulley when installed so a very thin spacer would make these parts mate up:
50273172001_4ae96e94a5_b.jpg


I installed short 5/16-18 studs in the water pump to make it easier to install the fan. This approach makes it mandatory to remove the radiator to R&R the fan. Since I had the radiator out I took this opportunity to install 3/4" wide x 1/2" thick silicone foam tape on the radiator tanks between the vertical faces of the radiator and condenser to minimize air leakage when the electric pusher fan is activated:
50273172206_b862fd384b_b.jpg


And in-situ:
50272496803_52d8949285_b.jpg


The new fan has about 1/2" clearance to the radiator which should be enough as long as the motor mounts are in good condition:
50273171286_21d2a7881f_b.jpg


Most importantly there is now plenty of room for a 2nd row belt drive: :)
50272496823_19d059d8ec_b.jpg


The last week or so the battery has seemed a little weak when starting 1st thing in the morning. I noticed the date label on the battery while I was under the hood. 8 years is pretty good life for a battery:
50273172111_4935fbe80c_b.jpg


So on my test drive I stopped by our local Costco and replaced the battery for good measure. Hopefully it'll last another 8 years:
50273172106_60197c5b77_b.jpg


My test drive was successful and the new fan has made a noticeable difference in the temperature gauge rating. It was 95F ambient temperature this afternoon when I went to Costco. Yesterday, with the old setup, the gauge read just at the top of the N (normal) on the gauge at idle in downtown traffic. Now it reads at the bottom of the N under the same conditions. Note this rather subjective comparison was made before installing the new battery with idle voltage reading steady at 13.2 volts in both cases.
 
Progress on this a/c project is coming along slow but steadily. This morning before heading off to the shop I fabricated some fuel lines that will clear the a/c compressor and it's mount bracket. It didn't seem like a good idea to simply use longer flex hoses as the routing would necessarily be near ignition sources. In the event that there is ever a fuel leak that would be a bad combination. So hard lines with secure tie down points are in order.

I used a piece of 3/8" steel brake line I had laying about from another project. My China Freight bender is pretty much just past it's limit for bending this large diameter steel tube. And the tight 1"" radius causes the tubing to collapse if you bend more than about 15-20 degrees of angle. To get around this issue it is necessary to make a shallow bend and then slip the tubing about 1/4" in the bender and repeat. This results in about a 2" radius and a less than perfectly seamless arc. But it doesn't collapse the tube! Here are the new lines:
50279673138_1bde67c076_b.jpg


The new hard lines route cleanly down past the front side flange and under the bottom of the a/c mount bracket:
50279672898_09029bd43d_b.jpg


Top side they route cleanly between the thermostat water neck and valve cover to the fuel rail supply and return ports:
50280517732_74e7d36792_b.jpg


On the left hand side of the engine the lines are angled out and down towards the chassis mounted fuel lines:
50279672858_ab5d3706f4_b.jpg


I still need to add a couple of hard points to the a/c mount bracket to attach Adel clamps to secure the lines in place. Maybe I can get that done this weekend. Once the compressor mount modifications are complete I'll go back and replace the remaining screw hose clamps before installing the compressor mount bracket for good.
 
Did a little more A/C work today. I fabricated / welded up the revised A/C compressor mount bracket for the later Sanden-style compressor using the old York-style bracket as a starting point. I'm using the OEM flange brackets from the '89 240 junk yard donor car. These brackets allow the compressor to be adjusted for drive-belt tension with a nice jack screw. For my 'new' compressor bracket I turned some round bar stock to capture the compressor mount bushings. Looking around the shop I found some 1.38" O.D. round bar stock laying around and it was just long enough to make the upper and lower mount tubes. But I messed up when parting the material into two pieces and cut one of them too short. I didn't have any more suitable material laying around so used my mistake cutoff piece as part of the upper mount. What's the old adage, "Measure twice and cut once?"

I purchased a set of 4 new polyurethane bushings from RockAuto for about $10 total. They will press into my new mounting 'tubes'. Then I cut a groove in a piece of 1/2" x 1" rectangular bar stock and welded the round 'tubes' to the newly grooved flat bar. The groove acts as a guide to keep the 'tubes' aligned as well as providing a nice large flat on the back side to weld to the old stock Volvo compressor mount. In order to position the compressor on the mount properly I clamped a couple of straight edges on 1, the crank pulley, and 2, the new idler pulley. I then installed the stock York bracket onto the engine block. With a helper I was able to hold the compressor in position while she scribed location lines on the bracket face so that I could weld everything together on the bench. After tack welding the 'tubes' in place on the bracket a quick fit check showed that the pulleys were properly aligned. I also welded a couple of tube nuts to the bracket to secure a pair of padded Adel clamps for the new fuel hard lines that I fab'd a few days ago.

The revised B20 compressor mount bracket:
50295459788_2013b6341f_b.jpg


While everything was installed for fit check I also measured for the new A/C drive belt.

Besides fitting the Sanden-stlye compressor I needed to fab a bracket to mount the receiver-drier. It will sit behind the right headlight and sandwich in but still leave room for the voltage regulator headlight adjusting screws, air cleaner canister and a/c hoses (hopefully). After examination of the space available I noticed that the3 nice engineers at Volvo had conveniently provided several mounting holes in the selected area. So I laid out the new bracket to make use of the existing Volvo factory holes in the right front fender inner panel.

The receiver-drier bracket:
50295459958_489aefe125_b.jpg


I'll apply a coat of paint to the brackets and bake them tonight. I have to drive up to Lancaster tomorrow so that'll give them plenty of time to cure before installation. Possibly as soon as day after tomorrow. With any luck I'll be able to start laying out a/c hoses and wiring this weekend.
 
Back
Top