• Hello Guest, welcome to the initial stages of our new platform!
    You can find some additional information about where we are in the process of migrating the board and setting up our new software here

    Thank you for being a part of our community!

Vintage 1970 142 Camshaft R/R and distributor gear...

RR

Member
Joined
May 15, 2003
Location
Northern CA
Ok, I have done enough searching and youtubing...here's my question...

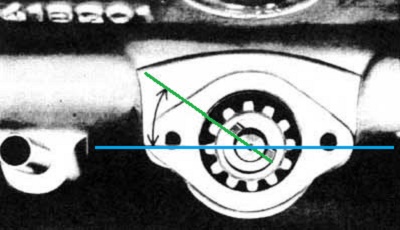
1970 142 with B20B engine, I have the head off to the machine shop for necessary refurbing, 123 ignition on bench ready to install and cam gear off the car but cam retainer still in place as well as crank gear.
The old lifters are out, new ones coming with D cam; and I want to replace the old cam with the new cam.
I have watched enough videos to know how to do the replacement, but...
do I need to mark the distributor gear after shaft gears are aligned and #1 top dead center, before pulling the distributor gear out of the engine? I know the dizzy gear needs to come out before I remove the old and slide in the new; but not sure why or if I need to mark the dizzy gear or not. Also, was the gear properly oriented before pulling???
This timing issue still puzzles me...
Thanks in advance, Rick
 
There isn't any need to mark the distributor. Because you are setting up the timing fresh when you install the new cam and gears. When you are setting up the ignition timing just be sure the engine is at no1 TDC and the valves are closed on no1 so you know it's firing. Then you can install the distributor and align the rim mark with the rotor. Make sure that rotor is aligned with no1 wire on the cap. Setup the ignition timing after you install the cam and valve train and have adjusted the valve lash.
 
Last edited:
With a stock distributor the offset slot in the drive gear points towards cylinder #1 at TDC #1 (not to be confused with TDC #4). This will also have the rotor pointing at #1 once the distributor is installed. I think you'll find that the drive cog on the 123 distributors aren't clocked the same as a stock one so you may need to reclock the drive gear so that the rotor point towards #1 when installed. Don't forget to rotate the engine until the drive gear drops into the oil pump slot after re-installing.

This is where it should be pointing at TDC #1 with a stock distributor. Originally the angle was 35? but was later revised to 5? (although they didn't change the pic) so it may not look like exactly this.

http://hiperformanceautoservice.com/images/DistributorDriveGear.jpg
DistributorDriveGear.jpg


http://hiperformanceautoservice.com/images/DistributorDriveGearRevised.jpg
DistributorDriveGearRevised.jpg
 
There isn't any need to mark the distributor. Because you are setting up the timing fresh when you install the new cam and gears. When you are setting up the ignition timing just be sure the engine is at no1 TDC and the valves are closed on no1 so you know it's firing. Then you can install the distributor and align the rim mark with the rotor. Make sure that rotor is aligned with no1 wire on the cap. Setup the ignition timing after you install the cam and valve train and have adjusted the valve lash.

Thanks again Dave. That's kinda what I was thinking but needed to hear from you.

Cheers
 
It's certainly a very annoying thing to replace and get timed up 'correctly'. Here's a pic that shows what it should be looking like at #1 TDC (valves shut on #1):
B18_dist_drive_gear.jpg


Things that complicate the task:
1) Angled gears, so it rotates as it comes out or goes in. So you have to start in a different position than you end in.
2) The bottom of the dist drive gear slots into the oil pump, so getting it down that last 1/3 inch can be tricky, you'll probably need to rotate the cam around to get it to seat that final bit.

All in all, leave the lifters out and be prepared to rotate the cam around a bit to get it seated, then go to TDC #1 and check the gear alignment, and if it's not right (less likely first time around), pull it out and move it toward the right direction and try again.
 
Last edited:
It's certainly a very annoying thing to replace and get timed up 'correctly'. Here's a pic that shows what it should be looking like at #1 TDC (valves shut on #1):
B18_dist_drive_gear.jpg


Things that complicate the task:
1) Angled gears, so it rotates as it comes out or goes in. So you have to start in a different position than you end in.
2) The bottom of the dist drive gear slots into the oil pump, so getting it down that last 1/3 inch can be tricky, you'll probably need to rotate the cam around to get it to seat that final bit.

All in all, leave the lifters out and be prepared to rotate the cam around a bit to get it seated, then go to TDC #1 and check the gear alignment, and if it's not right (less likely first time around), pull it out and move it toward the right direction and try again.

Good advice, thanks.
 
DO NOT use your impact wrench to tighten the cam gear nut!! Don?t ask me how I know this.1974 Volvo cut back on the harness of the cams or lifters and there were many flat cams.
 
Use the valve lash adjusting method that is in the Haynes manual. That will let you adjust all 8 valves in only one engine rotation or is it one engine cycle? Anyway, the method works great and it's minimal engine turning.
 
Use the valve lash adjusting method that is in the Haynes manual. That will let you adjust all 8 valves in only one engine rotation or is it one engine cycle? Anyway, the method works great and it's minimal engine turning.

The 'nines' method? What I do is basically the same thing (might be what the Haynes manual says). Rotate the engine until a valve is open, and then set the 'mirror' valve - the one on the opposite side, splitting them down the middle. If you look at a cam you'll see the lobes are 180 degrees apart like that. Only takes 10 minutes or so. Assuming you haven't tried to make the valve cover gasket stop leaking by smearing sealer all over the place in the past... (Just use sealer on one side to stick it to the valve cover, leave the block side bare)

I once used one of those IPD reinforcing rings on the oil pump (apparently Richard Gordon had an oil pump break there once in a race, so a product was developed). And HOLY HELL I should have test fit things together before I stuck the oil pan on (and I do seal both sides of the gasket on that). The drive gear did NOT want to go down into the pump with that thing on. I fought with that for a long while before carefully grinding down the edges of the dist gear so it would slide into that ring on the pump.
 
Also, if it turns into a protracted struggle to get the gear in the 100% correct position, you can always punt and just deal with the position its in. The dist has a pretty wide range of adjustment, just install it, get the rotor pointing at one of the terminals at #1 TDC, attach the wires in the firing order from there, and then set the timing. Not that I'd recommend doing that, but there's really nothing too incredibly magical about where the distributor is pointing at TDC, as long as the wires are attached accordingly, and the timing is set.
 
Also, if it turns into a protracted struggle to get the gear in the 100% correct position, you can always punt and just deal with the position its in. The dist has a pretty wide range of adjustment, just install it, get the rotor pointing at one of the terminals at #1 TDC, attach the wires in the firing order from there, and then set the timing. Not that I'd recommend doing that, but there's really nothing too incredibly magical about where the distributor is pointing at TDC, as long as the wires are attached accordingly, and the timing is set.

Brilliant and practical...thanks again. RR
 
Back
Top