
Crazychopstick
(/// _ - )
- Joined
- Dec 22, 2004
Keep in mind that this thread will be edited frequently for corrections, pictures, and additional information
Skilled required for this job 8/10 (difficult and time consuming, multiple tools needed).
This thread is not so much a “how-to” but a simple guide on Basic Spring Cutting. Details and theories on the beneficial and negative aspects of cut springs will be spared for the most part. If you intend to go through with this modification, I’ll assume you’ve done your homework. If not, there will be links at the bottom of the post to several threads dedicated to the subject. Also please read the entire post before attempting this job, you may come across a section that requires a specific tool you may not have.
There are what many will refer to as a proper suspension setup. Lowering springs with matching shocks or adjustable coilovers are the preferred fashion for any lowered car. With these bolt on suspension bits, you get the peace of mind that the parts to install were researched and tested with favorable and safe outcomes to work specifically for your vehicle. With coilovers, you even have the added benefit of adjusting the height of your car or the stiffness of coil to the ride you see fit. However, springs and coilover setups come at a hefty price, ranging from $300 for a set of springs to $700 for a full set of coilovers. A decent die grinder might cost $30…
Here is a rundown of the equipment you will need to lower your Volvo via cut suspension springs:
-Metric sockets ranging from 10-23mm with ratchet and extension (12mm for brakeline bracket, 13mm for three strut mount bolts, 14mm for the swaybar body mounts, 17mm for the swaybar nuts on the endlink, 19mm for the lugnuts and tierod end nuts, 24mm for the top strut nut).
-19 mm wrench
-Two large adjustable wrenches( if you intend to replace tierod ends)
-Floor jack
-Jack stands (at least a pair)
-Spring compressors (at least a pair)
-Xacto knife and hacksaw
-Spare tire
-Die Grinder or Angle Grinder with cutoff wheel (electric or pneumatic)
Highly recommended tools:
-Impact Gun (no less than 295ft-lb)
-Propane torch
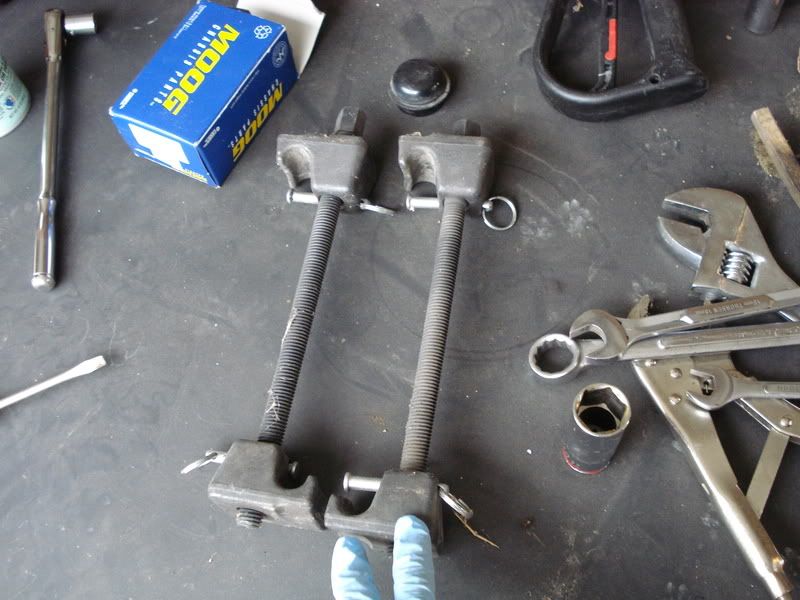
Spring compressors and assorted tools.
First and foremost, measure the vertical height of the middle of the wheel well to the surface of the ground on all four corners of the car, then mark the numbers down somewhere. In fact if you have a partner available have them measure the driver side with you in the car, I will explain the use of this step later in the thread.
Now, I usually like to start suspension work with the front side first. So park on a well lit and flat surface, pull the parking brake, chock the rear wheels and loosen the lug nuts for the 2 front wheels. Roll the floor jack under the engine cross member (make sure it’s stable and won’t slip back towards the brake lines and oil pan or slip forward towards the steering rack and front sway bar) and start jacking the car up slowly.
When the two front wheel have left the ground, place jack stands under the front jack points (I like to face the jack stand’s release lever away from the wheel arch so I don’t accidentally kick it and drop the car on my face). Lower the car onto the jack stands slowly while double checking that the jack points are still directly over the jack stands (often times the car will shift when lowering the jack requiring the realigning of the jack stands).
With the car stable on the jack stands, release the floor jack and roll it out of the way. Recheck the jack stands and rear tire chocks before doing anything else. It is always IMPERATIVE that you are positive the car is in a stable position before removing the wheels. You will be working under the car most of the time and there will be some occasional shaking of the suspension parts, so you do NOT want a 2,800 lb. hunk of Swedish metal crashing onto your puny human body.
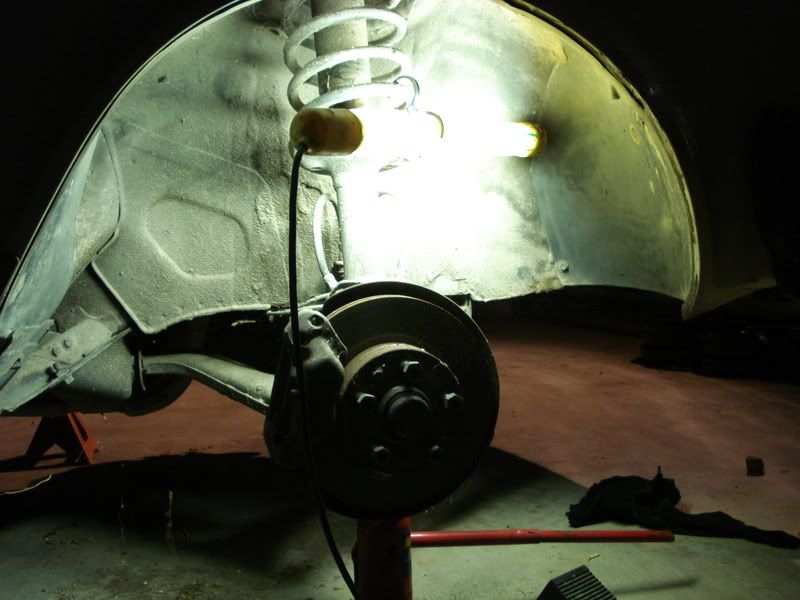
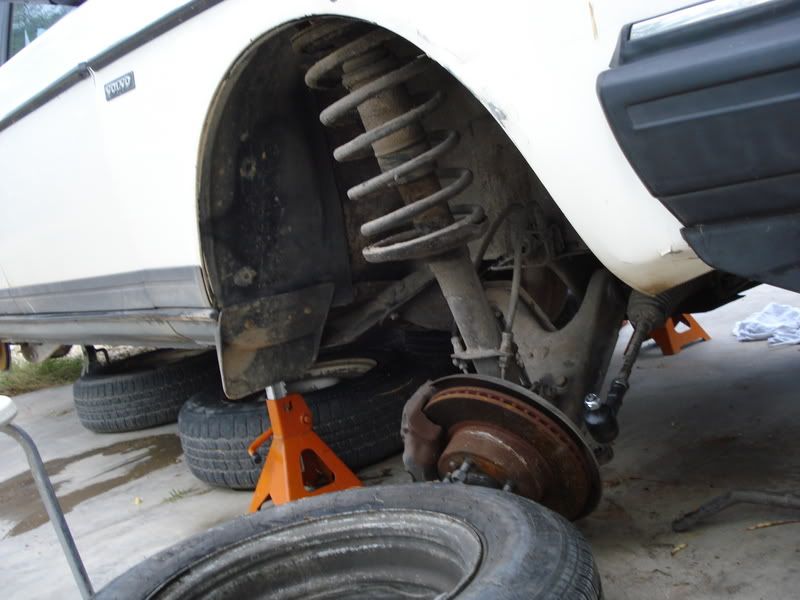
Once you’re comfortable with state of your Volvo, remove the front lug nuts and wheels. Slide the wheels off to the side or under the car for a miniscule added security against falling Volvos. Take a good look at your McPherson strut assembly from the bottom up. You’ll notice that the bottom of the strut is connected to the control arm by the ball joint and connected to the steering rack by the tierod end. A little higher up and you’ll see the endlink attaching the front swaybar ends to the control arm, you will also see the brake caliper, rotor, backing plate, and brake lines. A little higher on the assembly you will notice the bottom spring perch, the actual coil spring, the shock (hidden in the strut tube and held down by a “gland nut”), the shock cover, and bumpstop. Above that will be the upper spring perch and the strut mount held together by large nut and attached to the strut tower by three (3) 13mm nuts.
Now that you’ve become a little more familiar with the suspension bits, you’re going to need to start removing things. Now be forewarned, this next step will require “flexing” the brake lines a few steps later, both the rubber and the hardlines. If you don’t feel comfortable with this your other option can be to disconnect the brake lines from the strut assembly. But if you were to do this, it would require bleeding the brakes, and you might as well take the entire assembly out to work on at the bench, not to mention that the lines may be corroded to the point where you may have to replace the hardlines. Since this thread was created for that quick weekend job, I’m going to assume that you’re up for a bit brake line stretching. Remove the 12mm bolt from the inner fender, this bolt is securing the double brakeline bracket against the bracket mounted on the body of the car. Once the bracket is free, carefully slide it up and out of the body mounted bracket. Now this will allow your brakelines the maximum amount of movement when the springs are taken out. An alternate method mentioned by Towery would be to notch the area where the brakelines are attached to the strut assembly so you can slip them off. I have not explored or attempted this.
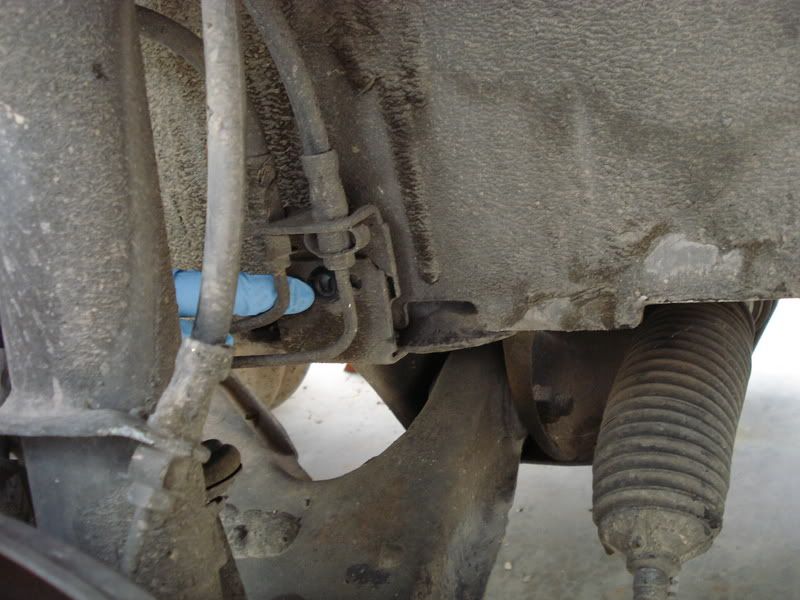
The 12mm brakeline bracket bolt.
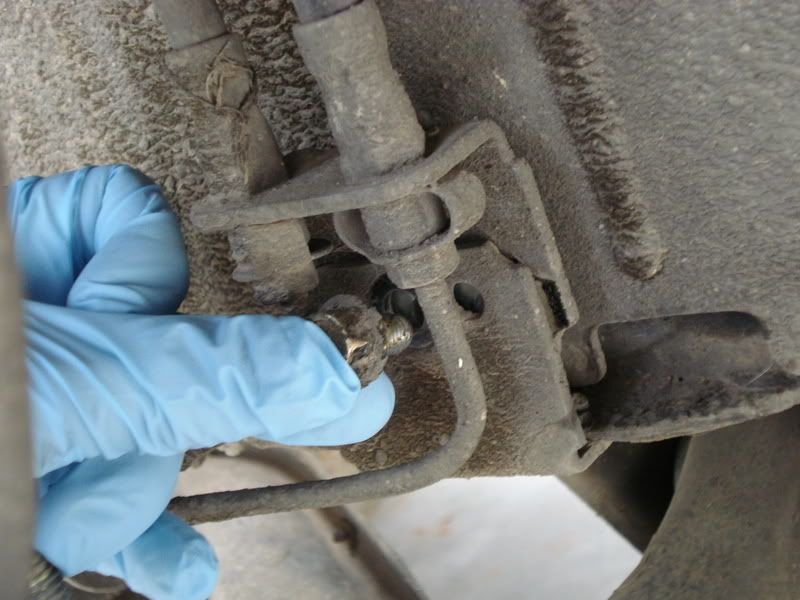
The bracket simply slides up and out.
After this you will need disconnect the swaybar. I suppose you could work with simply disconnecting it at the endlinks but I found it easier to drop the entire bar. It only takes a few minutes to remove the two 17mm endlink nuts and four (4) 14mm swaybar body mount bolts.

Swaybar disconnected at the endlinks (17mm).
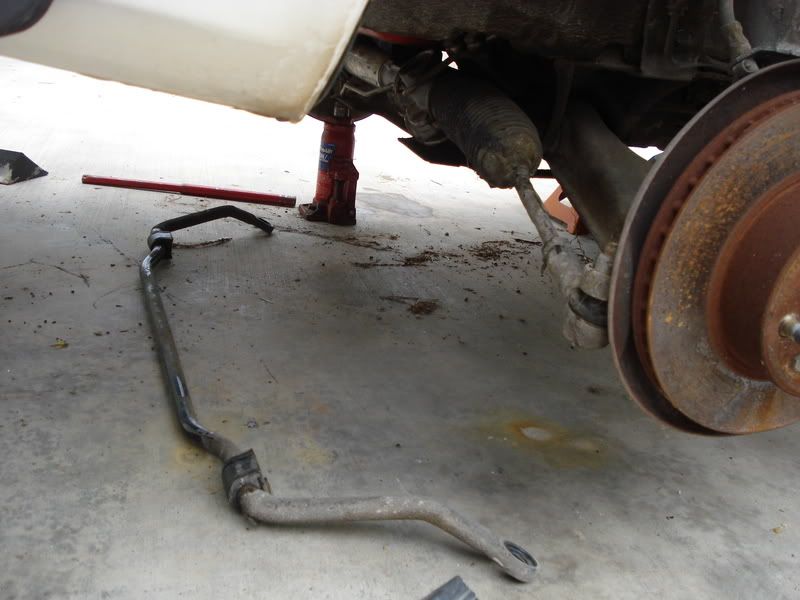
Swaybar dropped from the bodymounts.
Next, you will need to disconnect the tierod end from the strut assembly. This is also a good time to replace the tierod ends if yours are worn, since there’s a chance you may damage them during removal anyways. Unfasten the 19mm nut, if the tierod end spins, use an impact on it or use a bottlejack to apply pressure from the bottom of the tierod end to squish it against the strut assembly so it won’t spin freely. If the nut is loosened completely and the tierod hasn’t fallen off the strut assembly, give the assembly a little whack but keep the nut on the edge of the threaded portion to protect the tierod end in case you miss. Do not hit the tierod end or tierod when removing it, you can damage it easily. If the tierod end is to be replace you can use a pickle fork or a tierod end remover. If it’s corroded, try a penetrating oil like P’Blaster or a maybe propane torch.
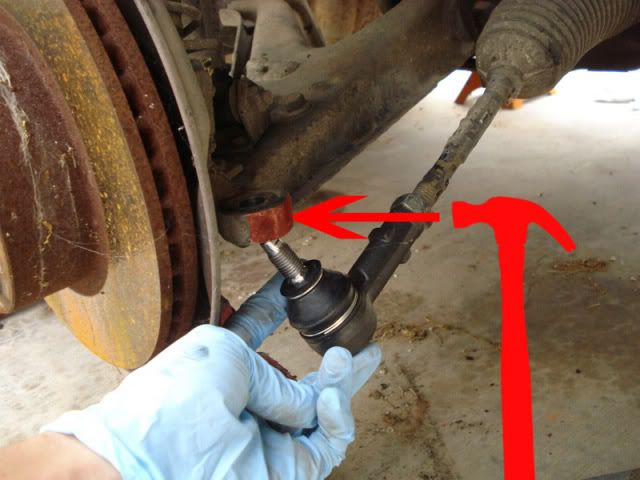
Only strike with hammer with a nut on to protect the threading.
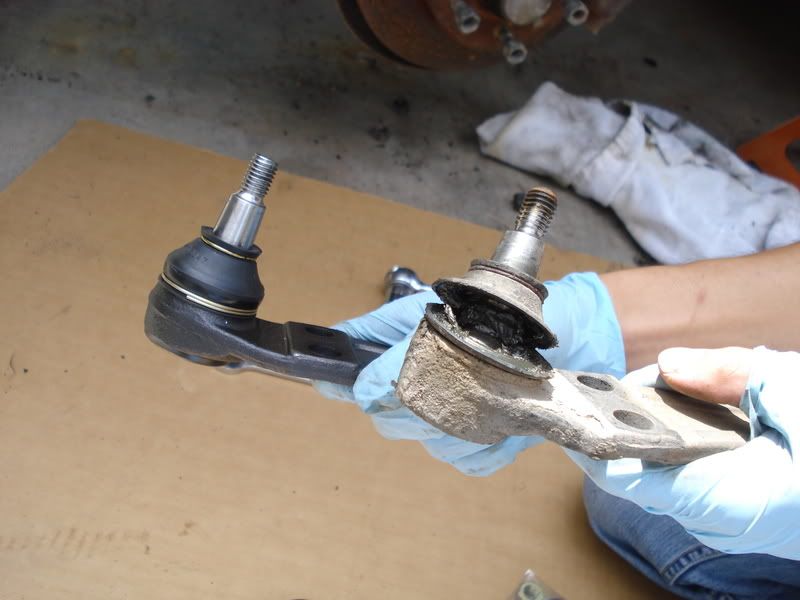
A good time to replace those worn Balljoints and Tierod ends...
Once the tierod ends and swaybars are free, you will need to use your floor jack to slightly raise and compress the front suspension assembly. Simply slide the jack beneath the control arm or lower balljoint and pump it up a tad bit, just enough so when you remove the three strut tower nuts, the entire assembly won’t come crashing down. When there’s a stable support under the assembly, use an impact wrench or the iPD top strut nut tool to loosen the top strut nut. DO NOT REMOVE, just LOOSEN, then remove the top three nuts and slowly lower the whole thing down. I like to place a Volvo spare under the assembly so it doesn’t over flex the brake lines. The next step is a bit more stressful.
Bottlejack supporting the strut assembly.
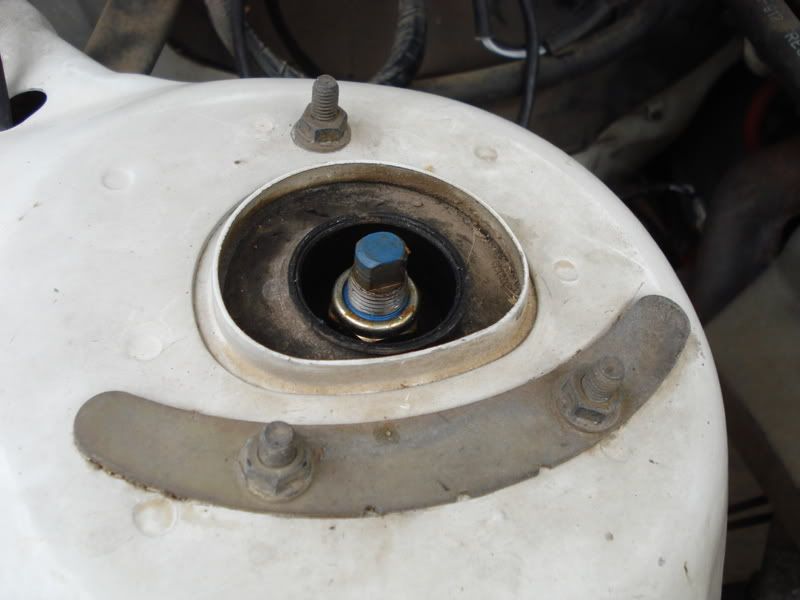
LOOSEN BUT DO NOT REMOVE 24MM STRUT NUT YET (colored blue).
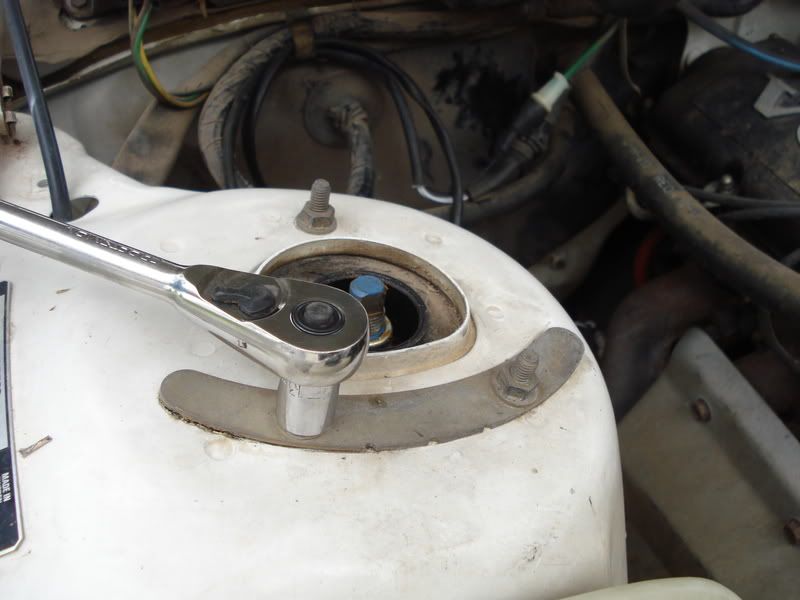
Removal of the three 13mm nuts.
Moving the assembly down and out to attach compressors.
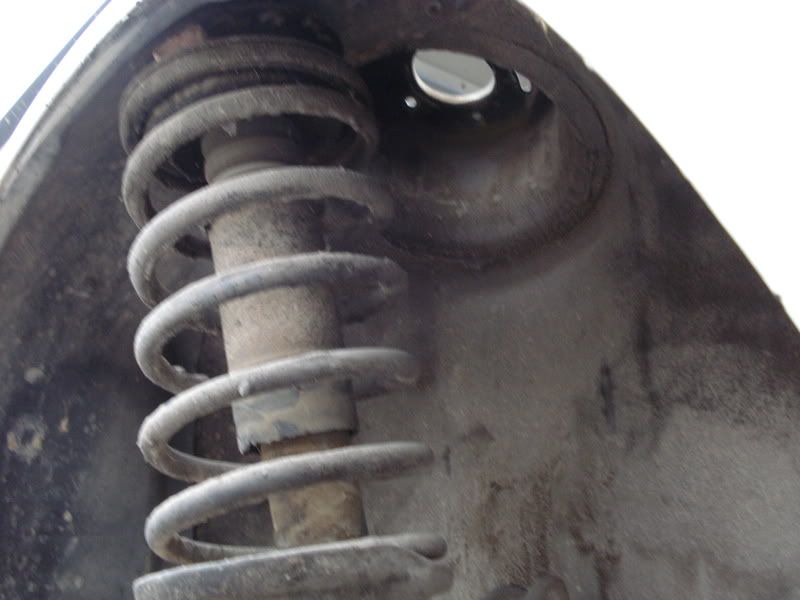
Assembly supported by spare tire.
Attach your spring compressors to the coil, position the hooks so they are as far away from each other as possible, you don’t want to run out of thread when compressing the spring. Begin to tighten them slowly and evenly. I like to use a ratchet and count the number of times I turn the compressor bolt. You will definitely notice if the coil begins to compress unevenly, just try to keep tabs on it. Once the coil spring is compressed to the point where it can actually spin (if you’re counting it takes more or less 280 half-turns of the ratchet on both compressors until the spring is loose enough to spin) between the perches it is compressed enough to remove. Now with a bit of force press the assembly downward and out to clear the inner fender (worn control arm bushings will require almost no force to push downward making it dangerous if you lose grip of the assembly and it either falls too quickly injuring you or over flexes the brakelines), you’ll notice the brake lines stretching a bit, try not to tug on them too hard. Once the assembly is out from under the car, place the spare tire underneath to support it. Use an impact wrench or iPD’s tool to remove the already loosened top strut nut. With the spring compressed properly there is no risk of the spring flying upwards towards your face, however if the spring is not compressed enough, beware…
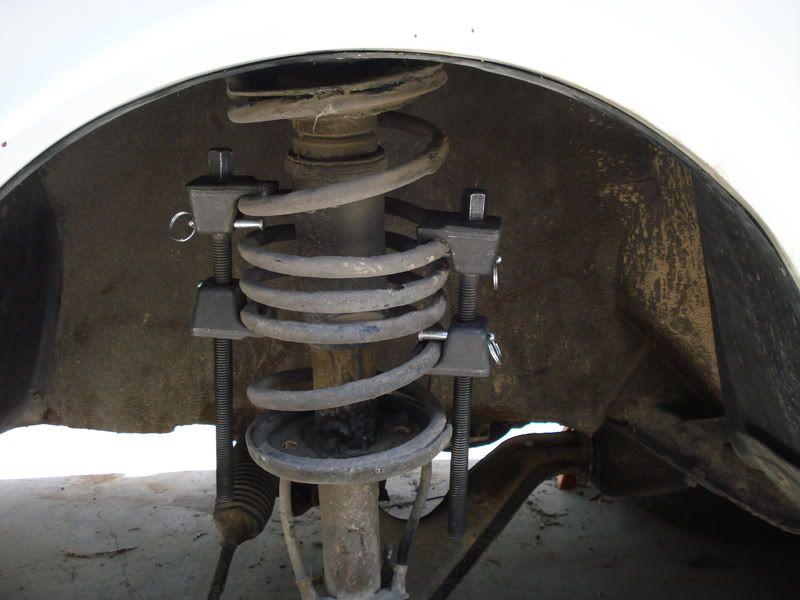
A fully compressed suspension spring.
Anyways with the top nut off the strut mount will separate from the top spring seat and the coil spring itself. Pull the spring off and lay it horizontally on a flat surface. Now begin to loosen the two compressors, once again make sure they are loosened evenly. With everything apart, this may be a good time to replace the strut mounts and the shocks. I did not do this on this particular car because of the budget, but it’s a good time to do it if you’ve got the shocks on hand. Once the spring is free of the compressors try to remember which end is the top end. Although I don’t believe it to be a issue, I am more comfortable chopping the bottom of the front springs. The reasoning? The coils seem to be wound more evenly on the top side allowing it to fit the top spring seat more securely, I mark the top of the spring with spray paint or white-out.
Spring removed and awaiting compressor removal, upper spring perch/mount/hat and strut mount on the lower right of photo.
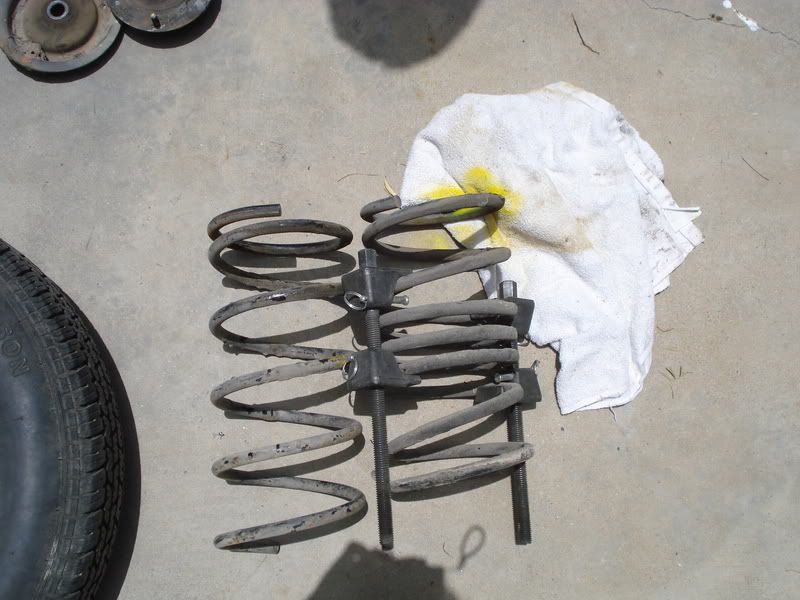
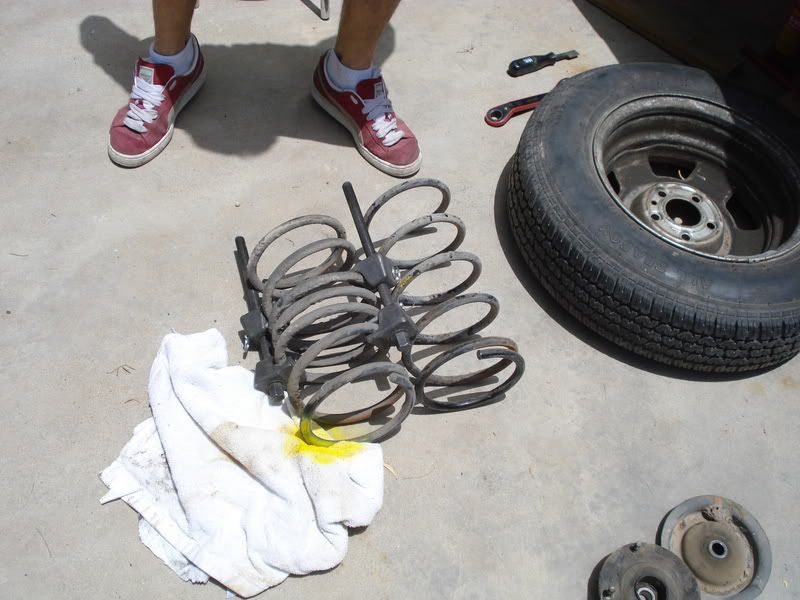
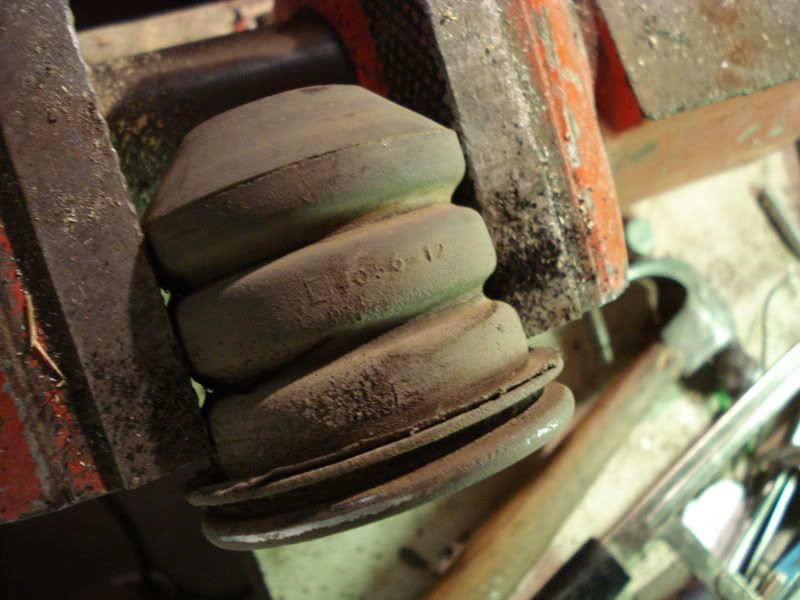
A fully compressed spring along side a spring with two (2) coils removed. Yellow painted side up.
You choice of cutting tool is all up to you. Hacksaws, sawzalls, and sharks with lasers on their heads are all options. I used an angle (die) grinder. With the proper cut-off disk attached it makes quick work of the spring material. Before cutting there are few things to take note of. First is the number of coils to slice. For the front, start with two coils, the best way to count the coils is to trace the coil with your finger until it’s made a complete circle, do this twice and it will be two coils, mark it and prepare for the cutting. The second thing to take note of is which spring you are cutting, because the passenger spring should be on average, cut about .25” (INCHES NOT COILS) shorter than the driver side, this is to keep a slightly more even ride height when there is an occupant only in the driver seat, however because of the potential unevenness in the suspension bushings or shocks you will have to refer to the measurements you took as the first step to be sure if this is necessary. For example, if your original measurements read that the passenger side was already lower than the driver side then you will have to compensate by slicing more off on the driver side or cutting them evenly. However never do more than .5”(INCHES NOT COILS) in difference at a time, that small bit of coil material can make a big change in ride height difference, just try you best at estimating.
When you’re prepared to do the actual cut attach the coil spring to a vice or similar holding device and prepare to chop. Make sure you wear proper safety equipment before starting any slices. Wear goggles to protect your eyes from metal shrapnel, wear a face mask or respirator to protect your lungs from metal dust, wear thick gloves to protect your hands from heated metal, and wear ear plugs to protect your ears from the terrible scream of metal on metal contact. The cutting is pretty straight forward, adjust the angle of the cut to get all the way through the coil and try not to accidentally nick any of the coils you plan to keep. After cutting I like to run the spring under some cold water to cool the metal quicker, this is not a necessity especially with a new cut-off disk on the grinder. Cut slowly and carefully or you may end up lowering your forearm instead of your car.
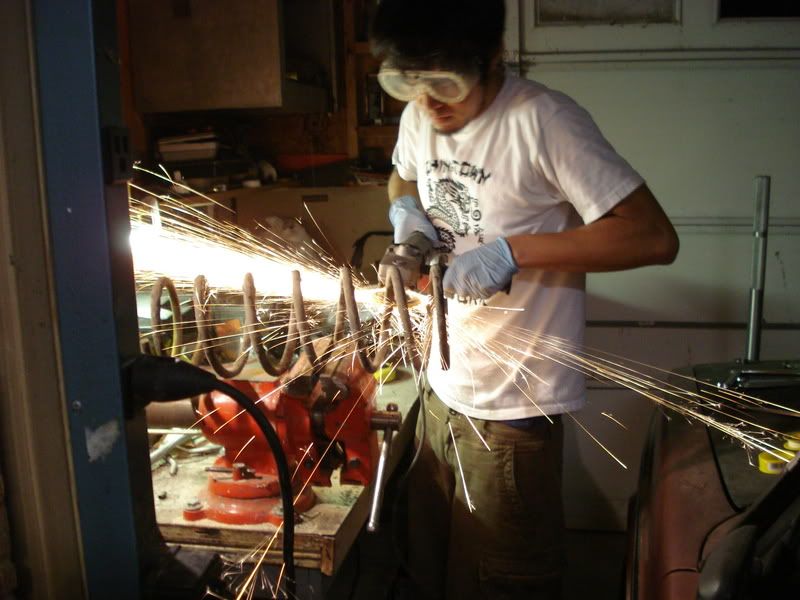
Chopping the coils.
While the spring is cooling take the bumpstop to the bench and cut it with a hacksaw. The bumpstop is that little hard rubber piece that is found underneath the top spring perch, it has the shock cover connected to it. I cut mine in half to compensate for the reduced suspension travel. You don’t want to hit those bumpstops too often. Also don’t forget to install it back on the assembly!
Bumpstop removed, yours may vary in appearance.
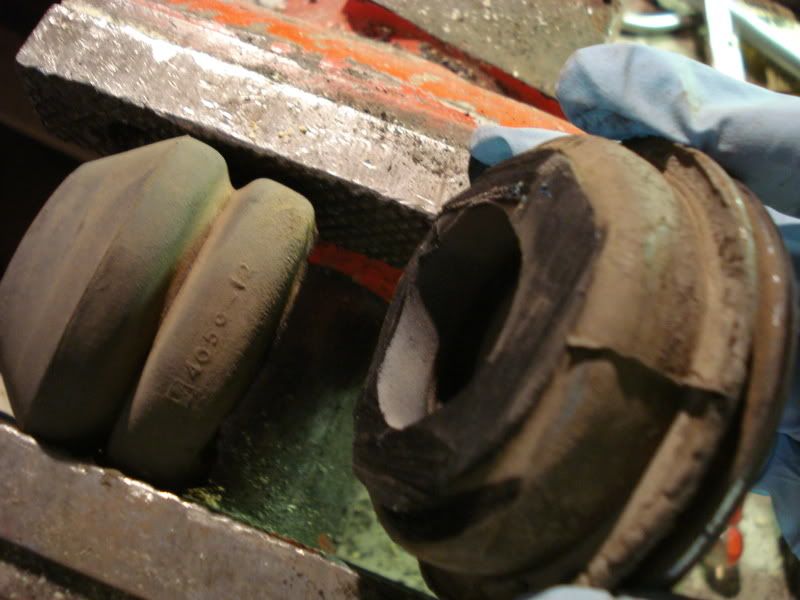
Bumpstop sliced in half to compensate for reduced suspension travel.
Installation is the reverse of removal lol. Simply compress your newly cut spring put it back on the strut assembly. Attach the compressors to the cut spring a bit closer in coils, keep in mind you don’t want the ratchet or wrench getting stuck on the upper perch when uncompressing. Spring compression should be as already noted, even and slow, but you only need to compress it enough to clear the shock and fit the rest of the hardware. Keep note of which side is bottom and which side is top. If you lose track make sure you use the cut side of the spring as the bottom. Also make note of which side of the upper spring perch is the upside. You may have to pull the threaded top of the shock upwards (or press downward depending on the condition of the shock)and keep pressure on it to keep it from compressing when attempting to attach the top strut nut, it’s a bit of a balancing act getting the top spring seat and the strut mount together while hand threading the 24mm strut nut but you’ll get it eventually, compress the spring moar if needed, once you have the top strut nut on thread it down a bit so it won’t come off but don’t bother fully tightening it just yet. With the compressed spring, upper seat, and strut mount loosely attached via the top strut nut, gently force the assembly back into the wheel well. Keep an eye on those brake lines, they should be okay but keep an eye on them, you don’t want them to snap, always have something for under strut support, whether it is the spare tire or a cinderblock. When attaching the upper spring seat and strut mount you will notice the coil doesn’t fit as well as it’s pre-cut version, don’t worry, once the spring is fully uncompressed, it will fit as well as it did before, just make sure the ends are fully in their seats, feel for the notches in the perches and make sure the coil ends are in properly. When uncompressing the spring, be sure to do so slowly, you may have to constantly realign the spring in the perches, if you’re CAREFUL you may use a small hammer to knock them back into place once the spring has reached a compression point where it can’t be turned freely.
Repeat the spring removal and cutting on the opposite side (keeping in mind that the passenger side coil may need to be .25” shorter, refer to measurements)
When you have both cut springs back on the car, remember to attach the tierod ends, swaybars(attaching the endlink to the front sway then the body mounts when the wheels are on the ground has always worked best for me), brake line bracket, upper three strut mount nuts(torque when the wheels are on the ground, don’t strip they take minimal torque to tighten), and to tighten the top strut mount nut(torque with wheel on the ground, go to town tightening this bish down), attach the wheels, raise the car with the jack, remove the stands, and lower the car back on the ground, keep in mind that the jack should be positioned in a way that you can easily remove it even with the reduced crossmember and bumper clearance. Don’t forget to torque all of your fasteners, lugnuts included.
Don't forget washers or the camber alignment plate.
Lowering the rear is a bit easier. Once again follow the above steps in jacking up the car (except the rear obviously) and securing it with jackstands and wheel chocks. The rear axle pumpkin (differential housing) is my preferred jacking position, just becareful that you have the jack centered on the pumpkin and not crushing the differential drain plug if you car in fact has one. The 240 rear suspension is a four-link design, the panhard rod making the 5th link. You can take relief in knowing that that none of it needs to removed, aside from the rear swaybar and lower shock mount that resides within the control arms.
<unfinished>
http://forums.turbobricks.com/showthread.php?t=21695
http://forums.turbobricks.com/showthread.php?p=534746#post534746
http://forums.turbobricks.com/showthread.php?p=565374#post565374
http://forums.turbobricks.com/showthread.php?t=60489
http://forums.turbobricks.com/showthread.php?t=71902
http://forums.turbobricks.com/showthread.php?p=2055513#post2055513
Skilled required for this job 8/10 (difficult and time consuming, multiple tools needed).
This thread is not so much a “how-to” but a simple guide on Basic Spring Cutting. Details and theories on the beneficial and negative aspects of cut springs will be spared for the most part. If you intend to go through with this modification, I’ll assume you’ve done your homework. If not, there will be links at the bottom of the post to several threads dedicated to the subject. Also please read the entire post before attempting this job, you may come across a section that requires a specific tool you may not have.
There are what many will refer to as a proper suspension setup. Lowering springs with matching shocks or adjustable coilovers are the preferred fashion for any lowered car. With these bolt on suspension bits, you get the peace of mind that the parts to install were researched and tested with favorable and safe outcomes to work specifically for your vehicle. With coilovers, you even have the added benefit of adjusting the height of your car or the stiffness of coil to the ride you see fit. However, springs and coilover setups come at a hefty price, ranging from $300 for a set of springs to $700 for a full set of coilovers. A decent die grinder might cost $30…
Here is a rundown of the equipment you will need to lower your Volvo via cut suspension springs:
-Metric sockets ranging from 10-23mm with ratchet and extension (12mm for brakeline bracket, 13mm for three strut mount bolts, 14mm for the swaybar body mounts, 17mm for the swaybar nuts on the endlink, 19mm for the lugnuts and tierod end nuts, 24mm for the top strut nut).
-19 mm wrench
-Two large adjustable wrenches( if you intend to replace tierod ends)
-Floor jack
-Jack stands (at least a pair)
-Spring compressors (at least a pair)
-Xacto knife and hacksaw
-Spare tire
-Die Grinder or Angle Grinder with cutoff wheel (electric or pneumatic)
Highly recommended tools:
-Impact Gun (no less than 295ft-lb)
-Propane torch
Spring compressors and assorted tools.
First and foremost, measure the vertical height of the middle of the wheel well to the surface of the ground on all four corners of the car, then mark the numbers down somewhere. In fact if you have a partner available have them measure the driver side with you in the car, I will explain the use of this step later in the thread.
Now, I usually like to start suspension work with the front side first. So park on a well lit and flat surface, pull the parking brake, chock the rear wheels and loosen the lug nuts for the 2 front wheels. Roll the floor jack under the engine cross member (make sure it’s stable and won’t slip back towards the brake lines and oil pan or slip forward towards the steering rack and front sway bar) and start jacking the car up slowly.
When the two front wheel have left the ground, place jack stands under the front jack points (I like to face the jack stand’s release lever away from the wheel arch so I don’t accidentally kick it and drop the car on my face). Lower the car onto the jack stands slowly while double checking that the jack points are still directly over the jack stands (often times the car will shift when lowering the jack requiring the realigning of the jack stands).
With the car stable on the jack stands, release the floor jack and roll it out of the way. Recheck the jack stands and rear tire chocks before doing anything else. It is always IMPERATIVE that you are positive the car is in a stable position before removing the wheels. You will be working under the car most of the time and there will be some occasional shaking of the suspension parts, so you do NOT want a 2,800 lb. hunk of Swedish metal crashing onto your puny human body.
Once you’re comfortable with state of your Volvo, remove the front lug nuts and wheels. Slide the wheels off to the side or under the car for a miniscule added security against falling Volvos. Take a good look at your McPherson strut assembly from the bottom up. You’ll notice that the bottom of the strut is connected to the control arm by the ball joint and connected to the steering rack by the tierod end. A little higher up and you’ll see the endlink attaching the front swaybar ends to the control arm, you will also see the brake caliper, rotor, backing plate, and brake lines. A little higher on the assembly you will notice the bottom spring perch, the actual coil spring, the shock (hidden in the strut tube and held down by a “gland nut”), the shock cover, and bumpstop. Above that will be the upper spring perch and the strut mount held together by large nut and attached to the strut tower by three (3) 13mm nuts.
Now that you’ve become a little more familiar with the suspension bits, you’re going to need to start removing things. Now be forewarned, this next step will require “flexing” the brake lines a few steps later, both the rubber and the hardlines. If you don’t feel comfortable with this your other option can be to disconnect the brake lines from the strut assembly. But if you were to do this, it would require bleeding the brakes, and you might as well take the entire assembly out to work on at the bench, not to mention that the lines may be corroded to the point where you may have to replace the hardlines. Since this thread was created for that quick weekend job, I’m going to assume that you’re up for a bit brake line stretching. Remove the 12mm bolt from the inner fender, this bolt is securing the double brakeline bracket against the bracket mounted on the body of the car. Once the bracket is free, carefully slide it up and out of the body mounted bracket. Now this will allow your brakelines the maximum amount of movement when the springs are taken out. An alternate method mentioned by Towery would be to notch the area where the brakelines are attached to the strut assembly so you can slip them off. I have not explored or attempted this.
The 12mm brakeline bracket bolt.
The bracket simply slides up and out.
After this you will need disconnect the swaybar. I suppose you could work with simply disconnecting it at the endlinks but I found it easier to drop the entire bar. It only takes a few minutes to remove the two 17mm endlink nuts and four (4) 14mm swaybar body mount bolts.
Swaybar disconnected at the endlinks (17mm).
Swaybar dropped from the bodymounts.
Next, you will need to disconnect the tierod end from the strut assembly. This is also a good time to replace the tierod ends if yours are worn, since there’s a chance you may damage them during removal anyways. Unfasten the 19mm nut, if the tierod end spins, use an impact on it or use a bottlejack to apply pressure from the bottom of the tierod end to squish it against the strut assembly so it won’t spin freely. If the nut is loosened completely and the tierod hasn’t fallen off the strut assembly, give the assembly a little whack but keep the nut on the edge of the threaded portion to protect the tierod end in case you miss. Do not hit the tierod end or tierod when removing it, you can damage it easily. If the tierod end is to be replace you can use a pickle fork or a tierod end remover. If it’s corroded, try a penetrating oil like P’Blaster or a maybe propane torch.
Only strike with hammer with a nut on to protect the threading.
A good time to replace those worn Balljoints and Tierod ends...
Once the tierod ends and swaybars are free, you will need to use your floor jack to slightly raise and compress the front suspension assembly. Simply slide the jack beneath the control arm or lower balljoint and pump it up a tad bit, just enough so when you remove the three strut tower nuts, the entire assembly won’t come crashing down. When there’s a stable support under the assembly, use an impact wrench or the iPD top strut nut tool to loosen the top strut nut. DO NOT REMOVE, just LOOSEN, then remove the top three nuts and slowly lower the whole thing down. I like to place a Volvo spare under the assembly so it doesn’t over flex the brake lines. The next step is a bit more stressful.
Bottlejack supporting the strut assembly.
LOOSEN BUT DO NOT REMOVE 24MM STRUT NUT YET (colored blue).
Removal of the three 13mm nuts.
Moving the assembly down and out to attach compressors.
Assembly supported by spare tire.
Attach your spring compressors to the coil, position the hooks so they are as far away from each other as possible, you don’t want to run out of thread when compressing the spring. Begin to tighten them slowly and evenly. I like to use a ratchet and count the number of times I turn the compressor bolt. You will definitely notice if the coil begins to compress unevenly, just try to keep tabs on it. Once the coil spring is compressed to the point where it can actually spin (if you’re counting it takes more or less 280 half-turns of the ratchet on both compressors until the spring is loose enough to spin) between the perches it is compressed enough to remove. Now with a bit of force press the assembly downward and out to clear the inner fender (worn control arm bushings will require almost no force to push downward making it dangerous if you lose grip of the assembly and it either falls too quickly injuring you or over flexes the brakelines), you’ll notice the brake lines stretching a bit, try not to tug on them too hard. Once the assembly is out from under the car, place the spare tire underneath to support it. Use an impact wrench or iPD’s tool to remove the already loosened top strut nut. With the spring compressed properly there is no risk of the spring flying upwards towards your face, however if the spring is not compressed enough, beware…
A fully compressed suspension spring.
Anyways with the top nut off the strut mount will separate from the top spring seat and the coil spring itself. Pull the spring off and lay it horizontally on a flat surface. Now begin to loosen the two compressors, once again make sure they are loosened evenly. With everything apart, this may be a good time to replace the strut mounts and the shocks. I did not do this on this particular car because of the budget, but it’s a good time to do it if you’ve got the shocks on hand. Once the spring is free of the compressors try to remember which end is the top end. Although I don’t believe it to be a issue, I am more comfortable chopping the bottom of the front springs. The reasoning? The coils seem to be wound more evenly on the top side allowing it to fit the top spring seat more securely, I mark the top of the spring with spray paint or white-out.
Spring removed and awaiting compressor removal, upper spring perch/mount/hat and strut mount on the lower right of photo.
A fully compressed spring along side a spring with two (2) coils removed. Yellow painted side up.
You choice of cutting tool is all up to you. Hacksaws, sawzalls, and sharks with lasers on their heads are all options. I used an angle (die) grinder. With the proper cut-off disk attached it makes quick work of the spring material. Before cutting there are few things to take note of. First is the number of coils to slice. For the front, start with two coils, the best way to count the coils is to trace the coil with your finger until it’s made a complete circle, do this twice and it will be two coils, mark it and prepare for the cutting. The second thing to take note of is which spring you are cutting, because the passenger spring should be on average, cut about .25” (INCHES NOT COILS) shorter than the driver side, this is to keep a slightly more even ride height when there is an occupant only in the driver seat, however because of the potential unevenness in the suspension bushings or shocks you will have to refer to the measurements you took as the first step to be sure if this is necessary. For example, if your original measurements read that the passenger side was already lower than the driver side then you will have to compensate by slicing more off on the driver side or cutting them evenly. However never do more than .5”(INCHES NOT COILS) in difference at a time, that small bit of coil material can make a big change in ride height difference, just try you best at estimating.
When you’re prepared to do the actual cut attach the coil spring to a vice or similar holding device and prepare to chop. Make sure you wear proper safety equipment before starting any slices. Wear goggles to protect your eyes from metal shrapnel, wear a face mask or respirator to protect your lungs from metal dust, wear thick gloves to protect your hands from heated metal, and wear ear plugs to protect your ears from the terrible scream of metal on metal contact. The cutting is pretty straight forward, adjust the angle of the cut to get all the way through the coil and try not to accidentally nick any of the coils you plan to keep. After cutting I like to run the spring under some cold water to cool the metal quicker, this is not a necessity especially with a new cut-off disk on the grinder. Cut slowly and carefully or you may end up lowering your forearm instead of your car.
Chopping the coils.
While the spring is cooling take the bumpstop to the bench and cut it with a hacksaw. The bumpstop is that little hard rubber piece that is found underneath the top spring perch, it has the shock cover connected to it. I cut mine in half to compensate for the reduced suspension travel. You don’t want to hit those bumpstops too often. Also don’t forget to install it back on the assembly!
Bumpstop removed, yours may vary in appearance.
Bumpstop sliced in half to compensate for reduced suspension travel.
Installation is the reverse of removal lol. Simply compress your newly cut spring put it back on the strut assembly. Attach the compressors to the cut spring a bit closer in coils, keep in mind you don’t want the ratchet or wrench getting stuck on the upper perch when uncompressing. Spring compression should be as already noted, even and slow, but you only need to compress it enough to clear the shock and fit the rest of the hardware. Keep note of which side is bottom and which side is top. If you lose track make sure you use the cut side of the spring as the bottom. Also make note of which side of the upper spring perch is the upside. You may have to pull the threaded top of the shock upwards (or press downward depending on the condition of the shock)and keep pressure on it to keep it from compressing when attempting to attach the top strut nut, it’s a bit of a balancing act getting the top spring seat and the strut mount together while hand threading the 24mm strut nut but you’ll get it eventually, compress the spring moar if needed, once you have the top strut nut on thread it down a bit so it won’t come off but don’t bother fully tightening it just yet. With the compressed spring, upper seat, and strut mount loosely attached via the top strut nut, gently force the assembly back into the wheel well. Keep an eye on those brake lines, they should be okay but keep an eye on them, you don’t want them to snap, always have something for under strut support, whether it is the spare tire or a cinderblock. When attaching the upper spring seat and strut mount you will notice the coil doesn’t fit as well as it’s pre-cut version, don’t worry, once the spring is fully uncompressed, it will fit as well as it did before, just make sure the ends are fully in their seats, feel for the notches in the perches and make sure the coil ends are in properly. When uncompressing the spring, be sure to do so slowly, you may have to constantly realign the spring in the perches, if you’re CAREFUL you may use a small hammer to knock them back into place once the spring has reached a compression point where it can’t be turned freely.
Repeat the spring removal and cutting on the opposite side (keeping in mind that the passenger side coil may need to be .25” shorter, refer to measurements)
When you have both cut springs back on the car, remember to attach the tierod ends, swaybars(attaching the endlink to the front sway then the body mounts when the wheels are on the ground has always worked best for me), brake line bracket, upper three strut mount nuts(torque when the wheels are on the ground, don’t strip they take minimal torque to tighten), and to tighten the top strut mount nut(torque with wheel on the ground, go to town tightening this bish down), attach the wheels, raise the car with the jack, remove the stands, and lower the car back on the ground, keep in mind that the jack should be positioned in a way that you can easily remove it even with the reduced crossmember and bumper clearance. Don’t forget to torque all of your fasteners, lugnuts included.
Don't forget washers or the camber alignment plate.
Lowering the rear is a bit easier. Once again follow the above steps in jacking up the car (except the rear obviously) and securing it with jackstands and wheel chocks. The rear axle pumpkin (differential housing) is my preferred jacking position, just becareful that you have the jack centered on the pumpkin and not crushing the differential drain plug if you car in fact has one. The 240 rear suspension is a four-link design, the panhard rod making the 5th link. You can take relief in knowing that that none of it needs to removed, aside from the rear swaybar and lower shock mount that resides within the control arms.
<unfinished>
http://forums.turbobricks.com/showthread.php?t=21695
http://forums.turbobricks.com/showthread.php?p=534746#post534746
http://forums.turbobricks.com/showthread.php?p=565374#post565374
http://forums.turbobricks.com/showthread.php?t=60489
http://forums.turbobricks.com/showthread.php?t=71902
http://forums.turbobricks.com/showthread.php?p=2055513#post2055513
Last edited:

