• Hello Guest, welcome to the initial stages of our new platform!
    You can find some additional information about where we are in the process of migrating the board and setting up our new software here

    Thank you for being a part of our community!

1971 145 with no name

mechaniman

oooh shiny
Joined
Aug 31, 2009
Location
eugene, oregon
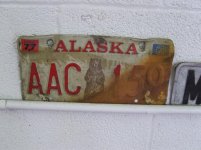
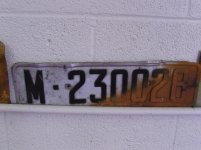
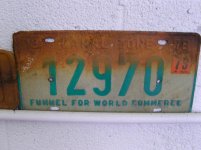
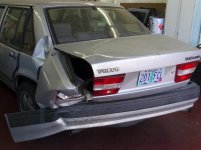
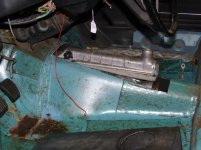
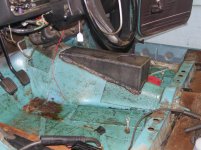
Well... My name is Erik, I'm a long time listener first time caller. Lets start from the beginning. I helped a friend of mine to buy this car from the original owner, she was an elderly lady who was having issues turning this car in the parking lots. The story she told us was that she bought the car new while her husband was station at a military base in Madrid , Spain. The car spent the first five years of its life in Europe, in 1976 her husband got transferred to Alaska for two years, then in 1978 transferred to Panama. This car has definitely been around the block.
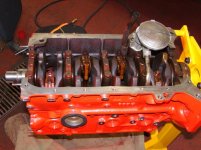
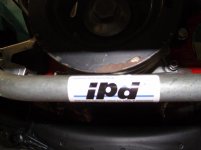
My friend drove the car for 3 or 4 years, I helped him with a few thing, new front bushings, ball joints, new cam gear, ipd cam.
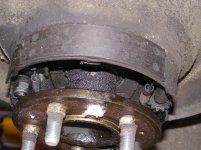
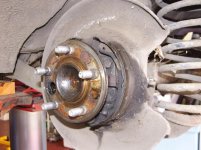
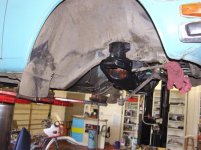
It drove pretty damn good. Last year the rear calipers froze and the front bearings went out. He has not had the money to fix it so it sat in his driveway for another year. It was a hard thing to watch, so I offered him some cash and here it is.
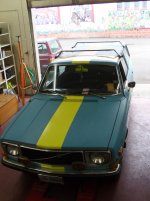
Here is my goal.
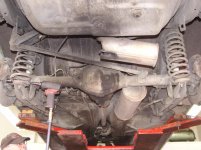
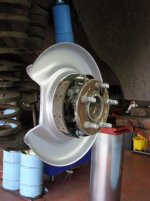
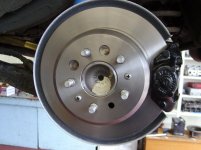
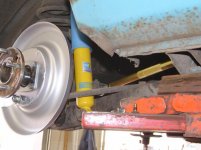
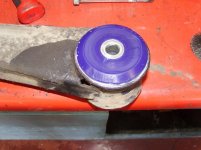
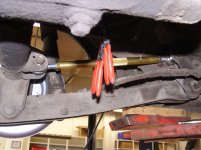
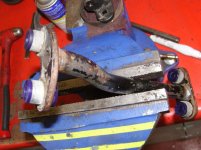
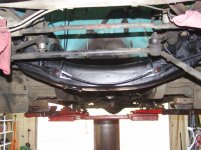
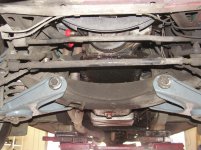
Its getting all new poly suspension, lowering/sport springs, bilstien HD shocks, all new brake calipers, rotors, brake lines, bearings front and rear.
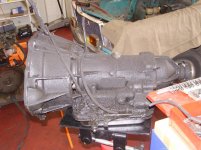
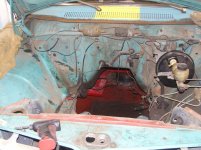
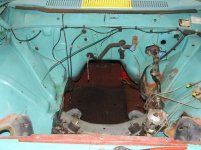
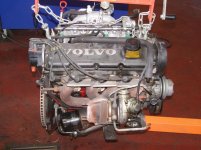
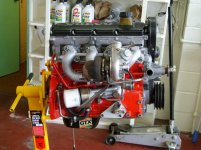
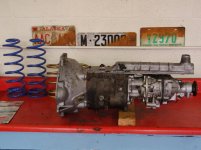
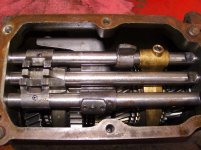
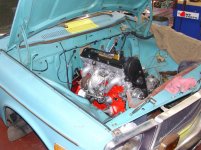
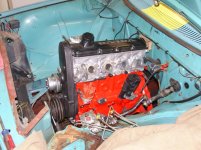
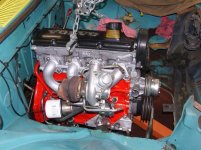
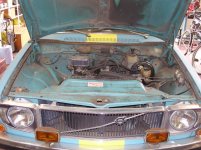
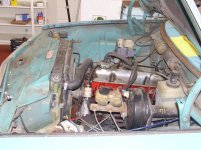
Good to have a solid foundation. Next its getting a B230ft out of a 92 940, an M410 trans out of a 70 1800. Well... you'll see theres more to come.
 

Attachments

  • SNB11275.jpg
    SNB11275.jpg
    93.9 KB · Views: 918
  • SNB11277.jpg
    SNB11277.jpg
    83.6 KB · Views: 907
  • SNB11316.jpg
    SNB11316.jpg
    121.3 KB · Views: 903
  • SNB11317.jpg
    SNB11317.jpg
    126.7 KB · Views: 903
  • SNB11318.jpg
    SNB11318.jpg
    116 KB · Views: 983
Last edited:
Progress

I'm getting ready to start pulling the engine and trans, but first I started cleaning out all the junk and trash I inherited from the previous owner. I popped the cover off the right rear wheel well, I don't think the covers been off for ten years or more. I found a set of very rusty snow chains, a bottle of coolant and oh whats this.... The original European license plate, a Panama license plate from 1978 and an Alaska plate from 1976.
 

Attachments

  • SNB11326.jpg
    SNB11326.jpg
    98.6 KB · Views: 890
  • SNB11325.jpg
    SNB11325.jpg
    93.6 KB · Views: 893
  • SNB11324.jpg
    SNB11324.jpg
    89.4 KB · Views: 899
  • SNB11323.jpg
    SNB11323.jpg
    88.5 KB · Views: 899
More progress

So got the Engine and trans out, and started cleaning up the engine bay. Its amazing what a good pressure washer can do.
 

Attachments

  • SNB11327.jpg
    SNB11327.jpg
    123.4 KB · Views: 891
  • SNB11328.jpg
    SNB11328.jpg
    117.9 KB · Views: 888
  • SNB11329.jpg
    SNB11329.jpg
    119.9 KB · Views: 884
  • SNB11405.jpg
    SNB11405.jpg
    103.2 KB · Views: 876
Last edited:
hurry up and wait

So.. I have a ton of parts on order, some on back order. I hate that. oh well there is a lot of prep work to be done. The first picture is of the parts donor car, It got hit hard while just parked on the street ( poor guy ). If it was only one year newer I'd have a squirter motor. oh well.
I pulled the engine and trans out of the 940. The engine ran well but I pulled the head off because it looked like the head gasket was seeping oil. sent the head to the machine shop to be cleaned and inspected, Its got a crack between the intake and exhaust valve on the #4 cylinder. Well thats no good, so I got another one from the local wrecking yard and the machine shop gave it their seal of approval. Painted the block ford red. Everything is cleaned and ready for assembly.
I installed a b20 oil pump, the tube from the pump to the block hits the crank so I had to slot the pump mounting holes to spin it just enough to clear, kind of a tight fit but it should work just fine.
also you can see on the bare block I'm using those conversion mounting brackets that yoshifab is selling ( nice product ).
 

Attachments

  • SNB11339.jpg
    SNB11339.jpg
    78.5 KB · Views: 877
  • SNB11343.jpg
    SNB11343.jpg
    110.5 KB · Views: 874
  • SNB11359.jpg
    SNB11359.jpg
    112.1 KB · Views: 873
  • SNB11360.jpg
    SNB11360.jpg
    92.8 KB · Views: 870
  • SNB11362.jpg
    SNB11362.jpg
    97.3 KB · Views: 863
Engine assembled

Well I finished putting this motor together, I'm gonna wait to install it when I finish the front end suspension stuff and I need to get my trans all cleaned up. I'm still waiting on my front poly bushing set ( its on back order from IPD until sep. 30th ) I have almost everything for the rear suspension, so here we go.
Started pulling the rear brakes apart, The rear wheel bearing seals look like they have been leaking for awhile, those e-brake shoes are soaked.
I have not been able to find another set of shoes, but a old guy I used to work with told me a trick. I soaked those shoes in gasoline over night, the next morning I lit them on fire and you could see all that oil bubbling out, I repeated the process 3 times and now they are dry as a bone, I just sanded the friction surface a little and they are good as new.
While those shoes were soaking, I painted the backing plate, did the bearings and seals.
 

Attachments

  • SNB11375.jpg
    SNB11375.jpg
    119.5 KB · Views: 848
  • SNB11374.jpg
    SNB11374.jpg
    106.5 KB · Views: 848
  • SNB11373.jpg
    SNB11373.jpg
    112.7 KB · Views: 852
  • SNB11372.jpg
    SNB11372.jpg
    112.4 KB · Views: 862
  • SNB11391.jpg
    SNB11391.jpg
    80.1 KB · Views: 842
Last edited:
i like it!
i would also like to meet the first person who thought of that trick for the brake shoes
"hmmmm, i dont think hitting it with a hammer will fix it, maybe i should light it on fire!"
 
i like it!
i would also like to meet the first person who thought of that trick for the brake shoes
"hmmmm, i dont think hitting it with a hammer will fix it, maybe i should light it on fire!"
 
more progress

Finished the rear brakes, installed some Bilstiens and adjustable torque rods by Yoshifab, and I got the poly trailing arm bushings done. I need to go out to the wrecking yard and grab some 240 rear spring perches to install my 240 lowering / sport springs.
 

Attachments

  • SNB11394.jpg
    SNB11394.jpg
    80.2 KB · Views: 805
  • SNB11388.jpg
    SNB11388.jpg
    88 KB · Views: 807
  • SNB11385.jpg
    SNB11385.jpg
    88 KB · Views: 812
  • SNB11378.jpg
    SNB11378.jpg
    93 KB · Views: 811
more, more, more

Pulled the old M410 out of the garage, I've been hoarding it for years, waiting for the perfect project to put it in. It came out of a 1970 1800e, it was in perfect shape, the 1800 ended up getting a close ratio m45 for the track. The M410 doesn't really need anything besides some cleaning up and some new input and tailshaft seals, I might pull the overdrive and replace the two pistons with Volvo's updated ones with bigger o-rings.
I would really like to have a short shifter on this but I don't know how big of a hole I want to cut in my tunnel, or I could get an M41 top shifter plate and use the long stick. We'll see.
I installed a manual pedal cluster yesterday and replaced my steering column bushings with poly.
More to come on monday.
 

Attachments

  • SNB11396.jpg
    SNB11396.jpg
    98.1 KB · Views: 809
  • SNB11397.jpg
    SNB11397.jpg
    115.2 KB · Views: 808
  • SNB11398.jpg
    SNB11398.jpg
    110.4 KB · Views: 812
  • SNB11401.jpg
    SNB11401.jpg
    122.7 KB · Views: 807
  • SNB11403.jpg
    SNB11403.jpg
    102.6 KB · Views: 802
couple snags, but no biggie

Well, I'm still waiting for front end bushings ( back order is a pain in my ass ) and I don't want to install my engine until the front is finished. So I came up with a good compromise. I decided to pull the whole front end apart and prep the subframe. Today I pulled the whole front brake assembly and painted the backing plates, then I pulled upper and lower control arms. I ran into a snag on the lower control arms, the bolt was frozen to the bushings and the bushings just free spinned in the arms, I kinda trashed the bolts trying to get it all apart. also when I pulled the front springs, the rights side was missing the metal spring seat retainer.
I wasn't going to but I decided to paint the subframe, I just went with flat black because its going to get dirty anyways. Tomorrow I can now install the motor on to my bare subframe.
 

Attachments

  • SNB11425.jpg
    SNB11425.jpg
    94.7 KB · Views: 772
  • SNB11423.jpg
    SNB11423.jpg
    102.9 KB · Views: 773
  • SNB11422.jpg
    SNB11422.jpg
    111.3 KB · Views: 773
  • SNB11417.jpg
    SNB11417.jpg
    89.5 KB · Views: 769
  • SNB11412.jpg
    SNB11412.jpg
    110.5 KB · Views: 773
Don't forget to get the offset 240 engine mounts and grind down the alignment pints to use with the yoshifab mounts. They fit great. Post up if you have an alignment problem, with the tranny. I cant wait to drive mine once I get the swap finished.

What are you doing for an intake manifold?
 
Engine is in

Got the motor in today, that is a pretty tight fit. I did use 240 engine mounts , the right side doesn't look like its sitting flat, I'll worry about that after my trans is installed. I test fitted the trans, I think I'm going to keep the short shifter setup so I figured out where to start cutting.
Also just like meeki007 ran into, my crank pulley hits the IPD sway bar I got in there. I don't know if I want to buy a smaller pulley, I may just ad a spacer to the sway bar mounting brackets. another thing to think about when the trans is mounted.
 

Attachments

  • SNB11434.jpg
    SNB11434.jpg
    52 KB · Views: 728
  • SNB11433.jpg
    SNB11433.jpg
    120.3 KB · Views: 732
  • SNB11431.jpg
    SNB11431.jpg
    123.2 KB · Views: 735
  • SNB11429.jpg
    SNB11429.jpg
    115.9 KB · Views: 740
71 versus 72 trans tunnel

Well... I really didn't believe that Volvo changed the trans tunnel that much between 71 and 72. This is my 5th 140 and I've had both long shifter and short shifter and definitely prefer the short shifter. So, I started by just cutting a small hole thinking I could raise the trans enough to line up. Boy was I wrong, the short shifter assembly takes up alot of room. You can see by the pics that hole ended up being almost the length of the trans minus the bell housing.
So, I ended up making a tunnel box and welding it in.
Tomorrow I will paint both sides and get some of that spray on sound dampening/ insulation stuff and apply to both sides as well.
I'm a pretty bad welder so don't make fun...
 

Attachments

  • SNB11439.jpg
    SNB11439.jpg
    125.1 KB · Views: 702
  • SNB11441.jpg
    SNB11441.jpg
    105.6 KB · Views: 697
  • SNB11445.jpg
    SNB11445.jpg
    114.5 KB · Views: 697
  • SNB11444.jpg
    SNB11444.jpg
    107.1 KB · Views: 693
  • SNB11446.jpg
    SNB11446.jpg
    96.3 KB · Views: 696
Back
Top